
That moment when you’re standing in the parking lot, bike in hand, staring at your hitch rack like it’s a puzzle box? You’re not alone. Improper loading causes thousands of preventable bike scratches, frame cracks, and even roadside accidents every year. Whether you drive a compact SUV with a 1.25-inch hitch or a truck with a 2-inch receiver, mastering the loading sequence takes just 7 minutes—and prevents costly damage. This guide cuts through the confusion with step-by-step techniques verified by rack engineers, so your carbon frame mountain bike or heavy e-bike arrives trail-ready every time.
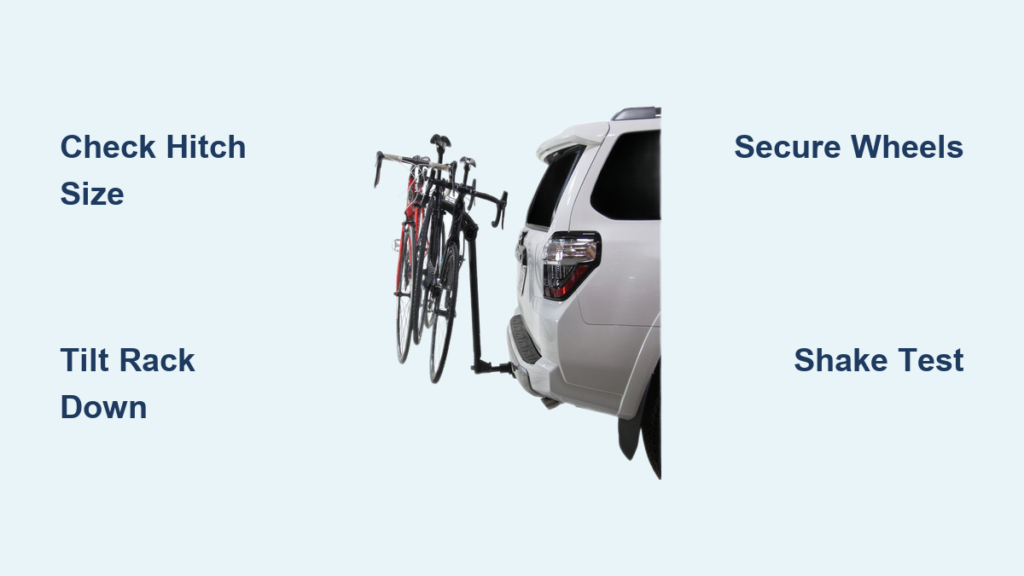
Verify Hitch Compatibility Before Lifting Your Bike

Skip this step and you risk a wobbling rack that scrapes your bumper or detaches mid-drive. Your vehicle’s hitch receiver size—either 1.25-inch or 2-inch—is non-negotiable. Measure the square opening with a tape measure or check your owner’s manual; never assume based on vehicle size. Once confirmed, insert the hitch pin fully through both the rack and receiver tube until the clip engages. Critical step: Activate the anti-wobble mechanism (usually a lever or knob near the hitch ball) until you feel solid resistance. Without this, even minor road vibration loosens connections. If your rack rattles when pushed side-to-side, reinsert the pin and retry—never drive with movement.
Prep Your Bike in 30 Seconds Flat
Unloading a water bottle mid-highway because it snagged on the rack isn’t just annoying—it’s dangerous. Start by removing all accessories: water bottles, frame pumps, saddle bags, and phone mounts. Lower your seat post 4-6 inches to prevent contact with your vehicle’s rear window or other bikes. For full-suspension mountain bikes, wipe dirt off the down tube where clamps will grip—grit acts like sandpaper during transport. If you own a step-through frame bike, attach the adapter bar now (more on this later). This groundwork prevents 90% of loading headaches before you even lift the bike.
Tilt Rack Down for Safe Loading Space
Your rack’s tilt mechanism isn’t optional—it’s your secret weapon against bumper scratches. Locate the pedal or lever at the rack’s base (often near the hitch pin) and press down firmly. This tilts the rack 45 degrees away from your vehicle, creating 12-18 inches of clearance. Never skip this: Attempting to load with the rack upright forces you to lift higher, risking dropped bikes and strained backs. Keep the rack tilted throughout loading. For multi-bike trips, return it to this position after securing each bike before loading the next. When done, the rack should swing freely without hitting your bumper—test it by hand before lifting your bike.
Lift & Align Without Straining Your Back
Grip the bike’s top tube with both hands, not the handlebars or seat. Lift smoothly to waist height (not overhead) while keeping your knees bent. Approach the rack from the side—not head-on—to avoid kicking your vehicle. Angle the front wheel slightly upward to clear wheel trays. Center the bike directly over the rack’s wheel channels; misalignment causes frustrating repositioning later. E-bike owners: Remove the battery first (check your manual for quick-release tabs) and recruit a helper—these bikes often exceed 50 lbs. If lifting solo, rest the bike’s top tube on the rack’s frame arm first, then lift the rear wheel into position.
Secure Wheels in Under 10 Seconds
Drop the front wheel into its tray first, rolling it forward until the tire seats fully against the backstop. Platform racks require both wheels: Guide the rear wheel into its channel while supporting the bike’s weight. Adjust wheel holders outward for fat tires (4-5 inches) or inward for skinny road tires (1.5-2 inches) until snug against the tire sidewalls. Red flag: If the wheel wobbles when shaken, the holders are too loose. Tighten until they resist finger pressure but don’t deform the tire. For bikes with fenders, ensure fenders clear the tray edges—reposition if they catch during loading.
Clamp Frame Perfectly: Carbon-Friendly Technique

Standard Frames: Avoid Top Tube Damage
Position the clamp arm 6-8 inches behind the seat tube on the top tube. Close the lever until you feel firm resistance—stop immediately if using a carbon frame. Over-tightening cracks carbon in seconds. The bike should feel solid but not rigid; you should detect slight frame flex when gently shaking the handlebars.
Step-Through Frames: Adapter Bar Fix
Without a top tube, attach the adapter bar between your seat post and handlebar stem before lifting. Thread it through the seat post clamp slot, then secure the stem end under handlebar tape. Now clamp the adapter bar as you would a top tube. This distributes pressure safely—never clamp seat posts directly.
Full-Suspension Bikes: Target Strong Tubes
Clamp the down tube (below the pedals) or seat tube (behind the saddle), avoiding suspension pivots or thin seat stays. If rear suspension interferes with wheel trays, skip wheel mounting and use frame clamps only. Confirm no brake lines or derailleurs contact the rack when tilted upright.
Shake Test: The 5-Second Safety Check
Before driving, perform this critical test: Grip the handlebars firmly and try to shake the bike side-to-side and front-back. Any movement means insecure attachment—recheck wheel trays and frame clamps immediately. Next, tilt the rack upright by hand. Watch for pedal clearance: If pedals hit your bumper, lower the seat post further. Finally, spin the wheels—they should rotate freely without brake rub against the rack. Never skip this: Loose bikes become projectiles at highway speeds.
Load Multiple Bikes Without Handlebar Chaos

Two-Bike Order: Heaviest First
Place the heavier bike (like an e-bike) closest to your vehicle for stable weight distribution. Angle its handlebars left. Position the second bike with handlebars angled right—this prevents handlebar tangling during bumps. Maintain 6+ inches between frames; use the rack’s spacing arms if provided.
Four-Bike Strategy: Alternate Angles
Load bikes from innermost to outermost position. Alternate handlebar angles: left, right, left, right. Keep heaviest bikes (e-bikes, cargo bikes) in positions 1 and 2 (closest to vehicle). Reserve outer spots for step-through or full-suspension bikes needing special clamping. Check that no seat posts or pedals overlap between bikes when tilted upright.
Fix Bike Sway Before Highway Driving
Wobbling bikes damage frames and racks. If your bike rocks during the shake test:
– Re-center wheels in trays (off-center wheels cause sway)
– Equalize strap tension on both sides of wheel holders
– Tighten the hitch anti-wobble knob another quarter-turn
Pro tip: Thread a Velcro strap through the rear wheel and around the frame triangle—it eliminates 95% of movement. For long wheelbase bikes (like cargo bikes), install the included adapter bar between rack arms to prevent frame flex.
Store Rack to Prevent Rust Next Winter
After unloading, tilt the rack down and wipe wheel trays with a dry cloth to remove grit. Spray silicone lubricant on tilt levers and clamp pivots—never use WD-40 (it attracts dust). In coastal areas, rinse the rack with fresh water monthly to remove salt residue. Before winter storage, apply rust inhibitor to the hitch tube and store the rack folded in a dry garage. Remove fabric straps and store them indoors to prevent UV cracking. Critical: Always unplug any electrical connectors for light-equipped racks.
Mastering how to put a bike on a hitch bike rack transforms stressful pre-ride chaos into a 90-second routine. The real secret? Consistent clamp positioning and that non-negotiable shake test. Practice these steps in your driveway with an old bike first—feel where the clamp bites, test tilt clearance, and perfect your lift technique. Soon, you’ll load carbon frames and heavy e-bikes with the confidence of a seasoned cyclist. Remember: Proper loading isn’t just about convenience; it’s the difference between arriving with a ride-ready bike or a repair bill. Now grab your adapter bar and hit the road—your trail awaits.


