
Your dirt bike starts right up with the choke on but immediately stalls the second you turn it off. This frustrating scenario plagues riders with bikes that have been sitting too long, especially models like the Yamaha TT-R125L and Kawasaki KLX 125L. The culprit is almost always a clogged pilot circuit in your carburetor—a problem you can fix yourself with basic tools and some patience. Understanding why your dirt bike not idling occurs, how to properly clean your carburetor, and when to replace parts instead of cleaning them will get you back on the trail without expensive shop bills.
This guide walks you through the entire diagnostic and repair process for idle issues. Whether you’re a beginner learning bike maintenance or an experienced rider tackling your first carburetor job, these proven steps will restore proper idle function and prevent future problems. Let’s dive into the specific causes and solutions for your dirt bike not idling properly.
Why Your Dirt Bike Won’t Idle
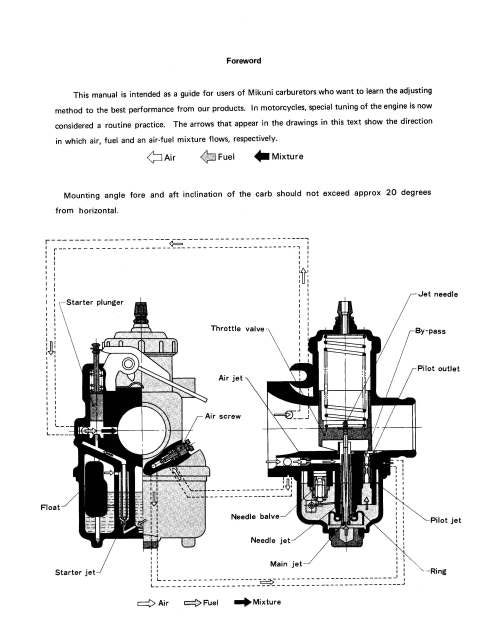
Modern carbureted dirt bikes require an extremely precise air-fuel mixture at idle, delivered through microscopic passageways that are easily blocked by dried fuel residue. When these tiny channels get clogged, your engine simply can’t get enough fuel at low RPMs, causing it to stall the moment you close the throttle. The pilot circuit handles all fuel delivery at idle and low throttle positions, using the smallest jets in your entire carburetor system.
Bikes stored with fuel in the carburetor for just a few months often develop these blockages, while units sitting for six years (like one Yamaha TT-R125L owner experienced) will almost certainly have severe contamination throughout the fuel system. Here’s why the choke trick works temporarily: it enriches the mixture through separate passageways that bypass the pilot jet. When you remove the choke, you force the engine to rely on the blocked pilot circuit, and it starves for fuel at idle.
Identifying Your Specific Idle Problem
Before tearing into your carburetor, accurately characterize how your dirt bike not idling manifests. A bike that starts easily with choke but stalls without it indicates a pilot circuit problem. If it runs well at higher RPMs but stumbles at low throttle, you’re dealing with fuel delivery issues rather than ignition problems.
Pay close attention to your adjustment screws—they provide critical diagnostic clues. An idle speed screw that produces no response when turned typically means your engine is running so lean it can’t respond to adjustments. Similarly, if your air mixture screw creates no change in idle quality, your mixture circuit is likely completely blocked.
Watch for secondary symptoms that point to related issues. Fuel steadily dripping from the overflow line suggests a leaking float needle valve that needs attention alongside your pilot circuit work. If your bike runs poorly across all RPM ranges rather than just at idle, you may have broader contamination or need to investigate other systems beyond the pilot circuit.
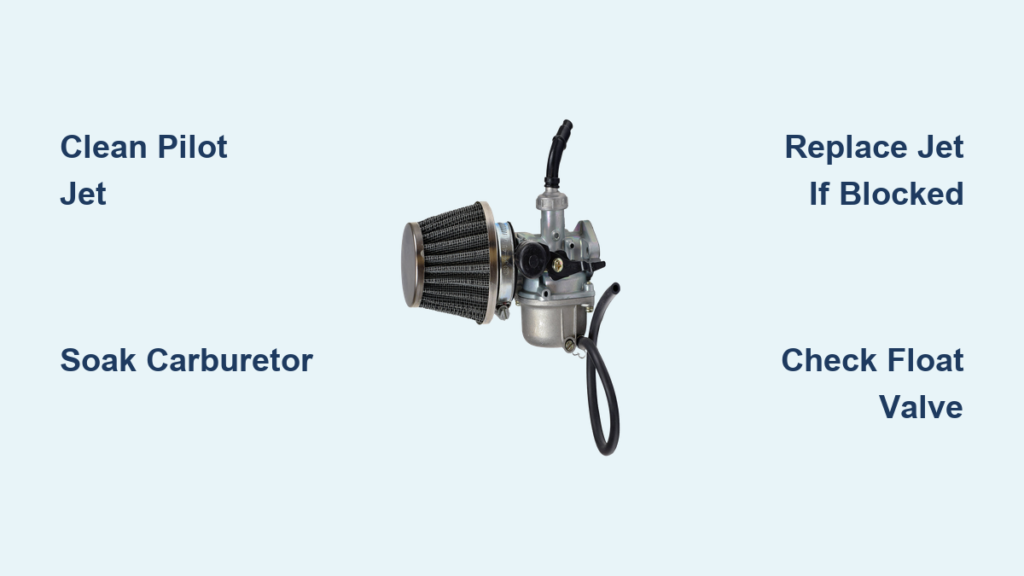
The Pilot Jet: Your Primary Idle Culprit
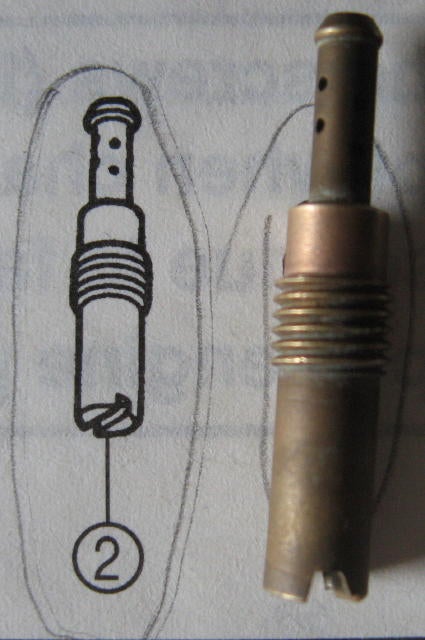
The pilot jet and its associated passageways represent the most frequent cause when a dirt bike refuses to maintain idle without choke. This tiny brass component contains an extremely small orifice that meters fuel to the pilot circuit, and it can become completely blocked by varnish deposits formed when gasoline evaporates.
One Yamaha TT-R125L owner shared their experience with a bike that had been sitting for six years. After soaking the carburetor in Pine Sol for 36 hours and performing thorough cleaning, the pilot jet remained partially obstructed. Only after installing a new 17.5 pilot jet did the bike finally idle properly. This demonstrates that sometimes cleaning simply isn’t enough—severe contamination bonds to internal surfaces in ways that resist even aggressive cleaning.
Proper Testing Methods for Pilot Jet Function
To verify if your pilot jet is the problem, use a single strand of multi-strand copper wire (the soft type used in electrical work) to test for obstructions. The copper strand should pass freely through all visible holes in the jet, particularly through the end where the restriction is most critical. If resistance is encountered, the jet remains partially or completely blocked.
Important: Never use steel wire or welding tip cleaners—they can enlarge the precisely calibrated orifice and create new running issues. If the copper wire doesn’t pass through easily, replace the jet rather than risk damaging it with aggressive cleaning attempts.
Complete Carburetor Cleaning Protocol
Step-by-Step Disassembly and Soaking
Effective carburetor cleaning requires complete disassembly—remove all jets, needles, floats, and seals before cleaning. Take photos or notes of hose and cable connections for accurate reassembly. Remove all rubber components first, as carb cleaners can dissolve O-rings and seals.
Submerge the carburetor body and metal components completely in cleaning solution for an extended period. Pine Sol has proven exceptionally effective for severe contamination—the recommended soaking period is at least 48 hours for bikes that have been sitting long-term, though 36 hours may suffice for moderate dirt.
During soaking, periodically agitate the components and ensure all passageways remain filled with solution. The goal is to loosen stubborn deposits that have bonded to internal surfaces over months or years. For particularly severe contamination, a second soaking period after initial cleaning may be necessary.
Critical Rinsing and Verification Steps
After soaking, thoroughly rinse components to remove all cleaning solution residue. Use a mixture of water and baking soda to neutralize Pine Sol or carb cleaner, preventing chemical reactions that could damage components during reassembly. Rinse each component individually while blowing compressed air through all passageways to dislodge loosened debris.
The rinsing process must continue until no residue or odor remains on any component—any remaining cleaner can react with fuel and create new deposits. Following rinsing, dry all components completely before reassembly to prevent flash rusting of steel parts.
Finally, blow compressed air through all passages to verify successful cleaning. Each passageway should allow free airflow when unobstructed. Pay special attention to the pilot jet circuit, as its small orifice is most susceptible to partial obstruction that may not be visible but still restricts fuel flow.
When to Replace Components Instead of Cleaning

Cleaning efforts frequently fail to restore severely clogged jets to proper function, making replacement the more practical solution. The pilot jet’s extremely small orifice often develops varnish deposits bonded to internal surfaces in ways that resist even aggressive cleaning. New jets are relatively inexpensive and provide confidence in proper function compared to cleaned jets that may have hidden restrictions.
For beginners learning carburetor maintenance, purchasing a complete jet kit ensures you have the correct replacement parts while providing spares for future maintenance. The minimal cost of a new pilot jet (typically $5-$15) is negligible compared to the time and frustration of repeated cleaning attempts that ultimately fail.
The carburetor body itself rarely requires replacement unless damaged or excessively worn. Cracks, warped mating surfaces, or worn throttle shaft bores represent legitimate reasons for body replacement, but contamination issues can almost always be resolved through cleaning alone. Before replacing an entire carburetor, verify that cleaning has been performed thoroughly and symptoms persist with a clean, properly assembled unit.
Preventing Future Idle Problems
Proper storage preparation prevents the fuel system problems that lead to idle issues. Before storing your dirt bike for extended periods:
- Add fuel stabilizer to the gas tank and run the engine briefly to circulate treated fuel through all carburetor circuits
- Drain the carburetor float bowl to eliminate the fuel reservoir where deposits form during storage
- Turn the petcock to the “off” position to prevent fuel from gravity-feeding into the bowl
Bikes ridden regularly experience fewer fuel system problems because fresh gasoline prevents varnish formation. The additives in modern fuel help keep components clean, and regular engine operation ensures these additives reach all carburetor areas. Even short riding sessions provide benefit compared to complete inactivity.
Model-Specific Considerations
The Yamaha TT-R125L’s small displacement makes it particularly sensitive to pilot circuit contamination. Its correspondingly small jets require precise fuel delivery, so bikes stored with fuel almost always need pilot jet service before proper idle returns. The TT-R125L’s popularity means extensive community knowledge exists for jetting with various modifications.
The Kawasaki KLX 125L shares similar carburetor characteristics. One KLX owner’s experience with a bike that sat for over a year demonstrates how quickly fuel deterioration creates problems. After initial cleaning, the bike ran well for a week but then returned to its non-idling condition, suggesting residual deposits continued breaking loose. This pattern indicates multiple cleaning sessions may be required before the fuel system fully stabilizes.
Professional Service vs DIY Repair
While many owners successfully resolve idle problems themselves, professional carburetor cleaning provides an alternative if you lack time, tools, or confidence. Professional services typically include ultrasonic cleaning that reaches passageways difficult to access through home methods.
Weigh the cost of professional service against your bike’s value and your mechanical capabilities. For inexpensive used dirt bikes, shop fees may exceed the bike’s value, making DIY repair practical. For higher-value machines or owners who value their time, professional service provides expert results without the learning curve.
Key Takeaways for Immediate Results
A dirt bike not idling almost always traces back to a clogged pilot circuit in the carburetor. Thorough cleaning with extended soaking in Pine Sol or carburetor cleaner, followed by compressed air verification, resolves most cases. When cleaning fails, pilot jet replacement provides a reliable solution at minimal cost.
Prevention through proper storage procedures and regular usage eliminates most idle problems before they develop. Understanding how the fuel system works and how to perform basic maintenance keeps your bike running reliably while reducing dependence on professional service. These skills provide lasting value for dirt bike ownership—once you’ve fixed your dirt bike not idling issue, you’ll approach future maintenance with confidence.


