
You fire up your dirt bike, but the moment you turn off the choke, your engine sputters and dies. This frustrating scenario—where your dirt bike only runs on choke—plagues riders of all skill levels and indicates a dangerously lean fuel-air mixture. When your bike demands choke engagement even after warming up, you’re dealing with insufficient fuel delivery during normal operation. The choke creates a richer mixture by restricting airflow, which temporarily masks an underlying issue that requires immediate attention. Ignoring this problem leads to fouled spark plugs, wasted fuel, and potential long-term engine damage.
Most dirt bikes depend on precise fuel-air ratios for optimal performance, and their lean-biased calibration makes them especially vulnerable to minor system disruptions. Unlike street bikes that might merely run rough with similar issues, dirt bikes often become completely inoperable without choke assistance. This guide delivers specific diagnostic steps and proven fixes for each potential cause, so you can restore proper running conditions and get back to riding.
Why Your Dirt Bike Demands Choke to Stay Running
Your dirt bike’s choke exists for one purpose: to enrich the fuel mixture during cold starts. Cold engines need more fuel relative to air because fuel evaporates less efficiently when components are cold. Once warmed up, your engine should transition to normal operation without choke assistance. When this transition fails, your bike is signaling that the “choke off” mixture contains too much air and not enough fuel.
Lean Condition Symptoms Beyond Choke Dependence
Watch for these additional symptoms that confirm a lean condition:
– Sputtering or hesitation when accelerating from idle
– High-pitched whining sound from the engine at idle
– Backfiring through the exhaust due to incomplete combustion
– Overheating during extended rides as lean mixtures burn hotter
How Dirt Bike Calibration Increases Vulnerability
Dirt bikes operate with leaner fuel mixtures than street motorcycles to reduce emissions, prevent engine knock, and improve fuel efficiency. This intentional lean bias means even minor fuel delivery restrictions or air leaks that street bikes might tolerate will cripple your dirt bike’s performance. A tiny crack in your intake boot or a partially clogged pilot jet becomes critical rather than merely inconvenient.
Diagnose Fuel System Blockages in Under 15 Minutes

Fuel delivery problems cause more choke-dependent running issues than any other system. Before removing your carburetor, verify your fuel system delivers adequate volume.
Test Petcock Flow Rate Properly
- Disconnect the fuel line from the petcock
- Place the line into a graduated container
- Turn petcock to “ON” position for 30 seconds
- Measure collected fuel – should be 150-200ml minimum
If flow rate is low, remove the petcock and spray carb cleaner through all passages. Replace the internal screen if disintegrated (cost: ~$80 for new petcock). Critical mistake to avoid: Don’t assume a petcock works properly just because fuel drips out—it must deliver sufficient volume under demand.
Check Fuel Tank Vent Operation
A clogged tank vent creates vacuum that restricts fuel flow. Test by:
– Running bike with fuel cap slightly loosened
– If performance improves immediately, clean or replace the vent tube
– Look for kinks or blockages in the small-diameter vent hose
Find Air Leaks That Create Lean Mixtures
Unmetered air entering your system creates lean conditions that require choke compensation. These leaks often hide in plain sight.
Locate Hidden Intake Boot Cracks
- Start engine and let idle
- Spray carb cleaner around intake boot connections
- Listen for RPM changes indicating leak points
- Shine flashlight at boot while engine runs to spot tiny cracks
Pro tip: Pay special attention to the underside of the boot where it connects to the carburetor—this area commonly develops hairline cracks from vibration.
Inspect Vacuum Lines for Invisible Damage
Cracked vacuum lines cause significant air leaks. Check by:
– Pinching each line while engine runs
– Listening for RPM changes indicating leaks
– Replacing all lines showing brittleness or discoloration
– Using clear silicone tubing for easier future inspections
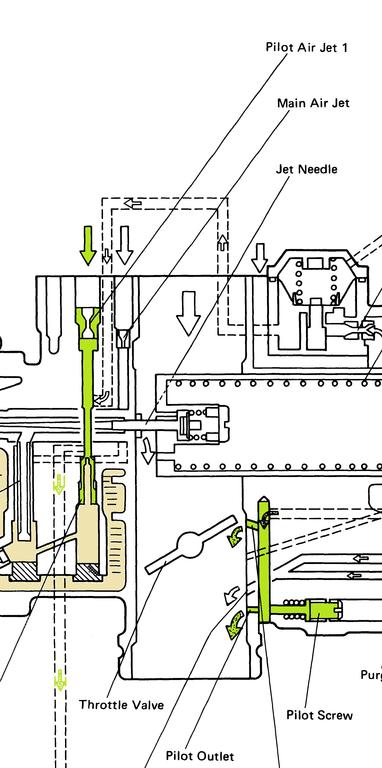
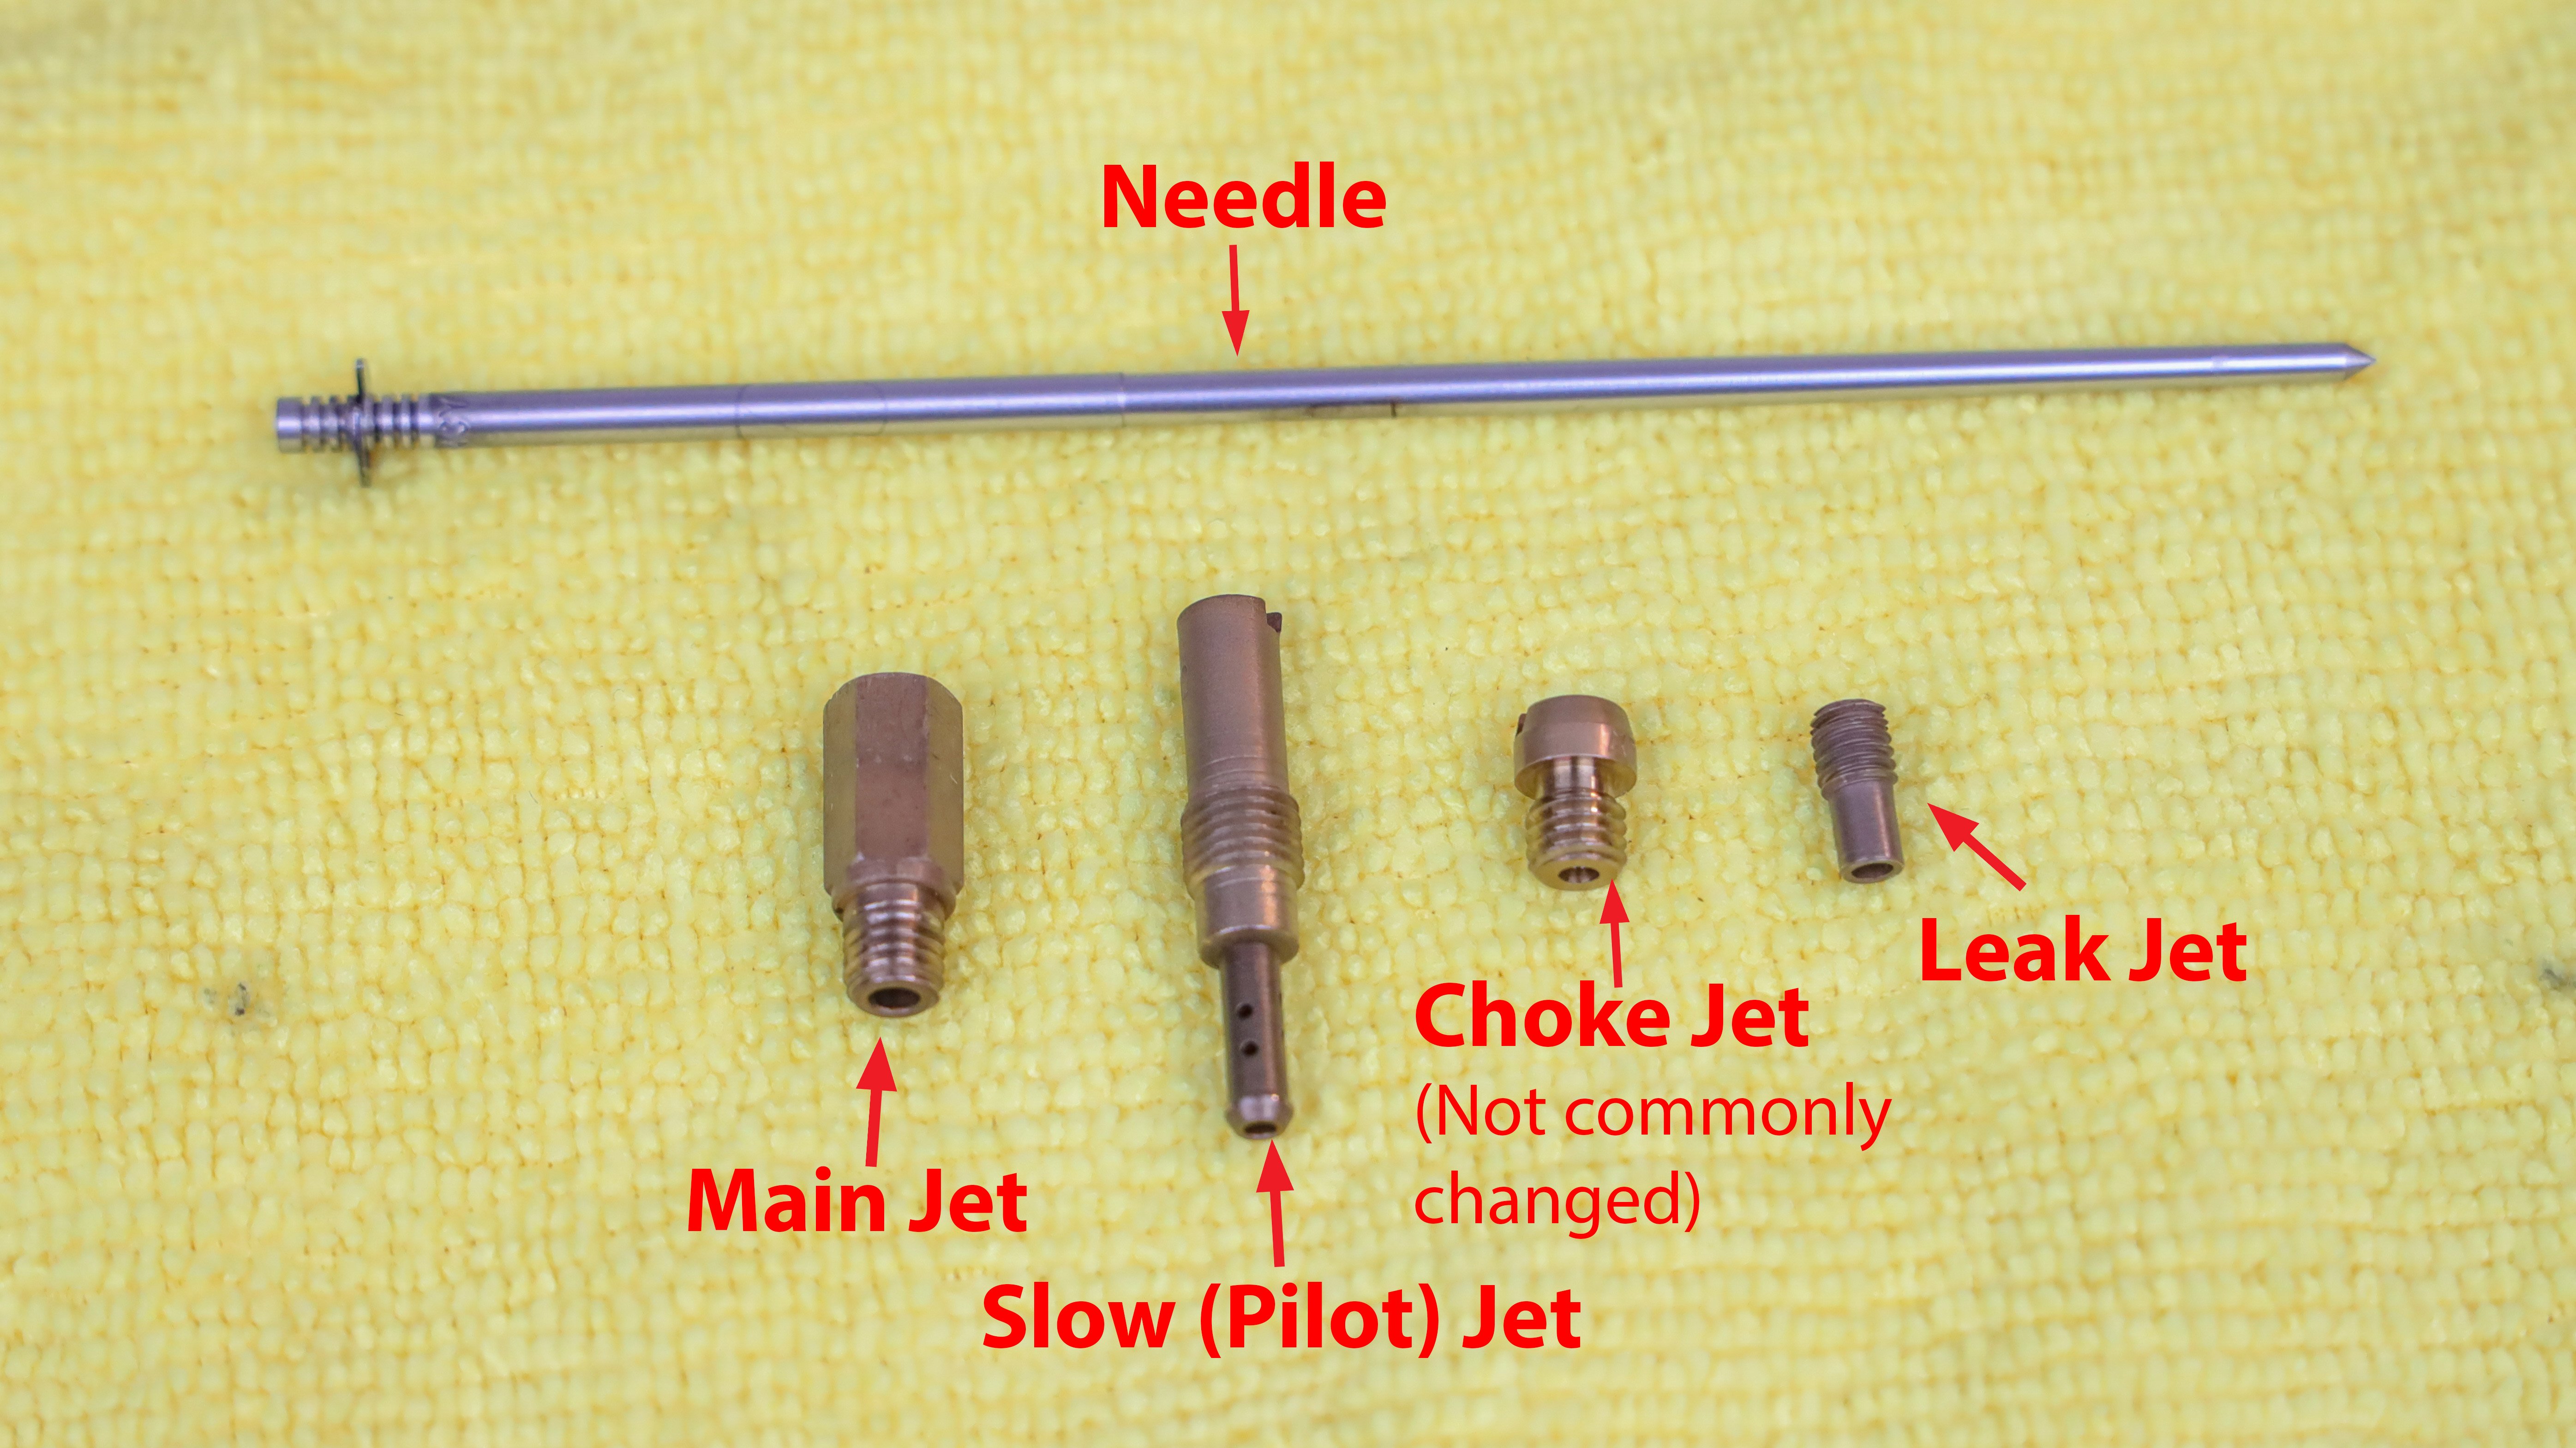
Clean Carburetor Jets Without Full Disassembly
Before removing your carburetor, try these targeted cleaning methods for common problem areas.
Clear Clogged Pilot Jet in 10 Minutes
The pilot jet (controlling idle mixture) clogs most frequently. Fix it by:
1. Removing the pilot screw (typically 2 turns out from seated)
2. Spraying carb cleaner through the pilot screw hole
3. Inserting a fine wire (like a guitar string) through the passage
4. Reinstalling screw at baseline 1.5-2 turns out position
Warning: Never force a wire through the pilot jet—this delicate passage easily damages. If resistance occurs, soak the area with carb cleaner for 15 minutes before retrying.
Unclog Main Jet Without Removing Carburetor
For acceleration problems, target the main jet:
– Remove the float bowl drain screw
– Spray carb cleaner directly into the main jet opening
– Use compressed air to blow through the jet passage
– Run engine with choke off to test improvement
Adjust Mixture Screws for Perfect Idle
Improper mixture screw settings mimic clogged jet problems. Set them correctly before assuming internal carburetor issues.
Proper Adjustment Technique
- Start with pilot screw at 2 turns out from fully seated
- Turn screw clockwise (leaner) until RPM drops noticeably
- Turn counter-clockwise (richer) until RPM stops increasing
- Set final position 1/4 turn richer than peak RPM point
Critical note: If RPM doesn’t change when turning the screw through a 1-2 turn range, your pilot circuit is completely blocked and requires thorough cleaning.
Fix Acceleration Problems When Throttle Is Applied
When your bike runs fine at idle with choke but dies when you open the throttle, focus on these specific components.
Clear Needle Jet Orifice Blockages
- Remove the jet needle by loosening its retaining clip
- Inspect the small orifice in the carburetor neck
- Run a fine wire through this passage from inside the carburetor
- Spray carb cleaner through the passage until clear
This tiny hole controls mid-range fuel delivery and often clogs without affecting idle operation.
Verify Main Jet Size Compatibility
Check your main jet number (stamped on the jet):
– Stock main jet: Typically 105-120 depending on model
– Aftermarket exhaust: May require 2-3 sizes larger
– High altitude riding: Needs smaller jet numbers
A main jet that’s too small creates acceleration problems even with proper idle mixture.
Prevent Future Choke-Dependent Running
Regular maintenance prevents the conditions that force choke dependence.
Monthly Fuel System Checks
- Drain float bowl weekly during riding season
- Replace fuel filter every 6 months
- Use fuel stabilizer for storage longer than 30 days
- Run carburetor dry before extended storage
Pro tip: After each ride, shut off petcock and let engine run until it stalls—this prevents fuel varnish buildup during storage.
Critical Carburetor Storage Practices
Before storing your bike:
1. Drain carburetor completely using float bowl screw
2. Spray fogging oil through spark plug hole
3. Store in climate-controlled environment if possible
4. Never store with fuel in carburetor beyond 30 days
Stale fuel creates varnish that clogs jets within weeks, making proper storage essential for reliable starting.
When to Seek Professional Help
While most choke-dependent running issues are DIY-fixable, consult a professional mechanic if:
– You’ve completed all troubleshooting steps without success
– Timing chain shows excessive slack (more than 1 inch play)
– Cylinder compression falls below manufacturer specifications
– Fuel injection system components show fault codes
Riding extensively with the choke engaged causes spark plug fouling, increased fuel consumption, and potential engine damage from improper combustion. Address the root cause rather than relying on this temporary fix.
A dirt bike that only runs on choke isn’t just annoying—it’s signaling a serious fuel delivery problem that worsens with time. By systematically checking your fuel flow, air intake integrity, and carburetor condition, you can isolate and fix the specific issue causing your lean running condition. The solutions outlined here address 95% of choke-dependent running cases, getting you back to riding without artificial enrichment. Remember: proper maintenance prevents these issues from developing in the first place, so incorporate these checks into your regular riding routine for trouble-free performance.


