
Your dirt bike’s performance on the trail or track depends entirely on proper setup—neglecting these critical adjustments means fighting your machine instead of working with it. A well-configured bike absorbs impacts smoothly, maintains traction through corners, and reduces rider fatigue during long rides. Whether you’re racing motocross or exploring remote trails, taking 30 minutes to dial in your dirt bike setup transforms how the machine responds to your inputs and handles varying terrain. This guide covers the exact adjustments you need to make for peak performance, from suspension settings to handlebar positioning, so you can ride with confidence on any terrain.
Measure and Set Sag for Optimal Suspension Performance
Proper sag measurement ensures your suspension works within its optimal range, directly affecting how your bike handles bumps, corners, and jumps. This foundational adjustment determines whether your bike feels too stiff or too soft when you hit obstacles, making it the first step in any dirt bike setup.
Static vs. Rider Sag Measurement Process
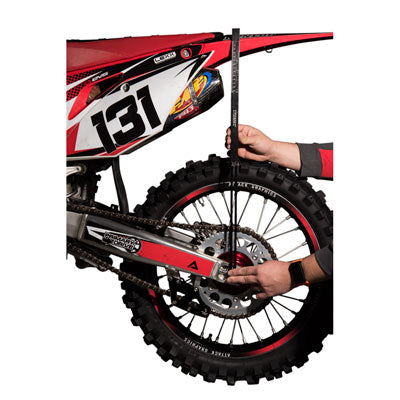
Place your bike on a stand and measure from a fixed point on your rear fender down to the rear axle—this is your static sag. Next, have a helper hold the bike upright while you sit in your normal riding position with full gear. Take the same measurement again to get your rider sag. Subtract the rider sag from the static sag to determine your actual sag value. For most dirt bikes, the magic number falls between 100-120mm, representing 25-30% of total suspension travel.
Achieving the Perfect Sag Range for Your Riding Style
Adjust your shock preload by turning the preload collar on the shock body—clockwise increases preload (reducing sag), counterclockwise decreases preload (increasing sag). After each adjustment, remeasure to verify your progress. If you’re racing motocross, aim for the lower end of the range (100mm); for trail riding, the higher end (120mm) provides better bump absorption. Recheck sag after significant temperature changes, as heat expands suspension components and affects measurements.
Fine-Tune Clicker Settings for Your Specific Terrain
Clicker adjustments let you customize suspension behavior for different track conditions without changing internal components. Mastering these settings transforms how your bike handles everything from whoop sections to rocky technical trails.
Understanding Rebound Damping for Better Traction
Rebound controls how quickly your suspension extends after compressing over an obstacle. Too slow, and your bike packs down in consecutive bumps; too fast, and the wheel bounces off the ground, reducing traction. For hardpack tracks, start with 12-14 clicks out (softer rebound); for soft/sandy conditions, try 8-10 clicks (firmer rebound). Make changes in 1-2 click increments and ride the same section multiple times to feel the difference.
Compression Settings for Different Track Conditions
Compression damping determines how easily your suspension compresses under load. For smooth tracks with small bumps, softer compression (more clicks out) provides better small-bump compliance. On rough tracks with big jumps, firmer compression (fewer clicks) prevents bottoming out. Most riders find success starting with 10-12 clicks out for low-speed compression and 2-3 clicks for high-speed compression, then adjusting based on specific track conditions.
Configure Handlebar Position for Maximum Control

Your handlebar position directly impacts your riding posture, control inputs, and fatigue levels during long rides. Getting this right means less strain on your wrists and shoulders while improving your ability to steer precisely through technical sections.
Finding Your Ideal Handlebar Height
Lower handlebars create a more aggressive stance for better weight distribution during jumps and high-speed corners, but they increase upper body fatigue on long trail rides. For motocross, position bars at the lowest mounting holes; for trail riding, raise them 5-10mm for a more upright, comfortable position. Test different heights by riding technical sections—you should maintain control without excessive upper body movement.
Setting the Perfect Handlebar Angle
A slight upward tilt of 10-15 degrees reduces wrist strain and improves brake and clutch lever leverage. When properly angled, your wrists should feel neutral—not bent upward or downward—when gripping the bars in your normal riding position. This subtle adjustment makes a dramatic difference during long rides, preventing the “arm pump” sensation that comes from fighting an awkward bar position.
Precision Brake Setup for Confident Stopping Power
Proper brake configuration gives you the precise control needed for technical descents and high-speed cornering. A well-tuned brake system provides consistent, predictable stopping power exactly when you need it.
Front Brake Adjustments for Optimal Performance
Check pad clearance using a feeler gauge—0.02-0.04 inches ensures minimal lever travel before engagement without causing drag. Bleed your brakes regularly to eliminate air bubbles that create spongy lever feel. Adjust lever reach so your index finger can comfortably reach the lever while maintaining a firm grip on the bar—most bikes offer tool-free reach adjustment via a dial near the lever pivot.
Rear Brake Tuning for Technical Terrain
Set rear brake pedal height so it operates comfortably from your natural standing position without requiring foot repositioning. The pedal should have minimal free play (about 1/4 inch) before engagement begins. For technical trail riding, slightly firmer rear brake settings help control speed without locking the wheel on loose surfaces. Test your adjustments on a slight downhill section to verify smooth, progressive braking.
Set Correct Tire Pressures for Your Riding Conditions
Tire pressure dramatically affects traction, bump absorption, and overall handling. The right pressure maximizes the contact patch while preventing rim damage from hard impacts.
Pressure Guidelines for Different Terrain Types
Start with 12-15 PSI for general trail riding, then adjust based on conditions: reduce to 10-12 PSI for soft/sandy terrain to increase the contact patch, or increase to 14-16 PSI for hardpack to improve cornering precision. Ride a short section at your initial pressure, then check tire temperature—hot tires indicate pressure is too high, cold tires suggest pressure is too low. Make adjustments of 1 PSI at a time until the tire feels neither too soft nor too firm.
How Rider Weight Affects Tire Pressure Selection
Heavier riders (over 180 lbs) typically need 1-2 PSI more than the baseline recommendations to prevent excessive sidewall flex, while lighter riders (under 150 lbs) can often run 1-2 PSI lower for improved traction. Always check pressure when tires are cold, as riding heats the air inside and increases pressure by 2-3 PSI. Carry a quality pressure gauge on your bike for trail-side adjustments when conditions change.
Install Essential Protection Components Before Riding
Protection components prevent costly damage during inevitable tip-overs and crashes, allowing you to ride more aggressively without worrying about damaging critical components.
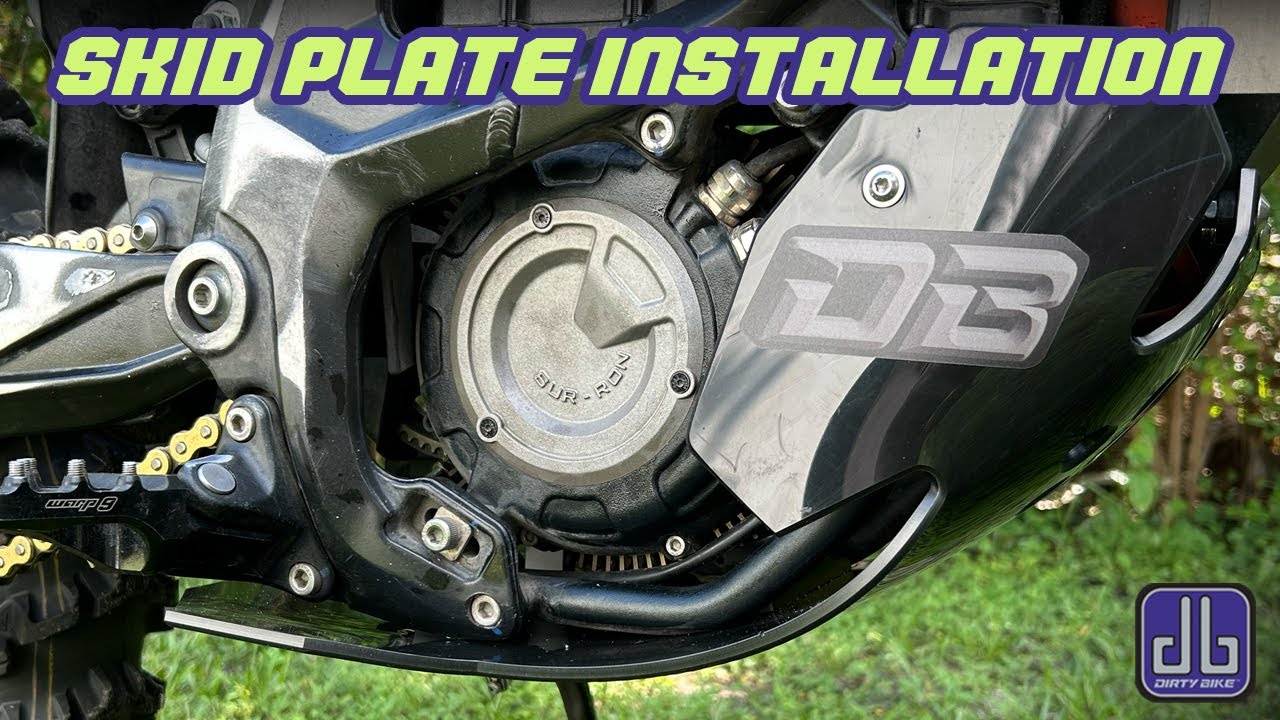
Choosing the Right Skid Plate for Your Riding Style
Plastic skid plates offer excellent impact absorption with minimal weight penalty, ideal for trail riders focused on weight savings. Aluminum plates provide maximum protection against hard impacts but add noticeable weight. For enduro riding, choose a skid plate that covers the entire engine case and mounts securely to frame points rather than just the engine—this prevents the plate from pulling out during hard impacts. Ensure all mounting bolts are torqued to specification and check them after your first few rides as they may loosen initially.
Proper Pipe Guard Installation to Prevent Damage
Install pipe guards with heat-resistant mounting hardware designed specifically for exhaust applications—they won’t fail from heat exposure like standard hardware. Position guards to cover the entire header pipe where your leg would contact during a tip-over. For dual-sport riding, choose guards that don’t interfere with passenger footpegs or luggage racks. Check guards regularly for cracks or heat damage, replacing them before they fail during a critical moment.
Complete Your Pre-Ride Inspection Checklist
A thorough pre-ride inspection takes just five minutes but prevents most trail-side breakdowns and ensures your dirt bike setup remains optimal for safe riding.
Critical Safety Checks Before Every Ride
Start with tire pressure and tread condition—look for cuts, embedded objects, or excessive wear. Next, check chain tension (1-1.5 inches of play at midpoint) and lubrication. Test both brakes for firm lever feel with minimal travel before engagement. Finally, verify all critical fasteners are secure, particularly axle nuts, handlebar clamps, and skid plate bolts. This quick routine catches 90% of potential issues before they become problems on the trail.
Pro Tip: Keep a small toolkit mounted on your bike with a tire pressure gauge, chain lube, and basic wrenches for trail-side adjustments. Nothing ruins a ride faster than being stranded because you couldn’t fix a simple issue like low tire pressure or a loose chain.


