
If your dirt bike feels unstable in corners, bottoms out constantly, or shakes violently at speed, you might be dealing with too much sag on dirt bike suspension. This common handling problem occurs when the rear shock compresses beyond the optimal range, fundamentally altering your bike’s geometry and turning a confident trail machine into a handful. The good news is that excessive sag is one of the most solvable suspension issues you can diagnose and fix in your own garage with basic tools and an understanding of how suspension geometry affects handling.
When your rear suspension sags too far, the rear end of your bike sits abnormally low, shifting weight away from the front wheel and reducing the suspension travel available to absorb bumps. This creates a chain reaction of handling problems that affect everything from cornering grip to high-speed stability. Understanding why too much sag occurs, how it affects your bike’s behavior, and what adjustments fix it will help you restore optimal handling and ride with confidence again.
Recognize Excessive Sag Symptoms
Before you can fix too much sag on dirt bike suspension, you need to identify whether this is actually your problem. The symptoms of excessive sag are distinctive and often appear together, creating a handling feel that experienced riders describe as “chopper-like” compared to a properly set-up bike. Recognizing these warning signs early prevents crashes and saves you from attributing poor handling to rider error or other bike problems.
Why Your Front Tire Pushes Out in Corners
The most immediately noticeable symptom is front tire push through corners. When the rear end sits too low, weight transfers away from the front wheel, reducing the downforce that helps the front tire maintain grip during turns. Instead of carving cleanly through corners, you’ll feel the front wheel wanting to drift wide or “wash out,” especially in fast corners and on hardpack surfaces. This push forces you to slow down earlier than necessary or risk running wide, and it makes the bike feel sluggish and reluctant to change direction.
How Constant Bottoming Out Reveals Sag Problems
Constant bottoming out on moderate impacts indicates your suspension has no travel left to absorb bumps. When the rear shock is already compressed too far under static conditions, even small bumps push it past its limits. You’ll feel harsh impacts through the frame on square-edge bumps, landing from jumps, and through whoop sections. Rather than smoothing out obstacles, your suspension becomes a direct conduit for shock to your body, causing fatigue and discomfort that compound over a ride.
Why Your Bike Shakes at High Speeds
High-speed instability manifests as head-shake, a dangerous oscillation of the front end that intensifies with speed. The reduced front-wheel loading from excessive rear sag makes the steering assembly unstable, and even your steering damper fights a losing battle against the wrong geometry. The bike feels nervous on straightaways, requiring constant micro-adjustments to maintain direction. This instability is particularly dangerous because it can escalate quickly from a subtle wobble to a violent oscillation that’s difficult to control.
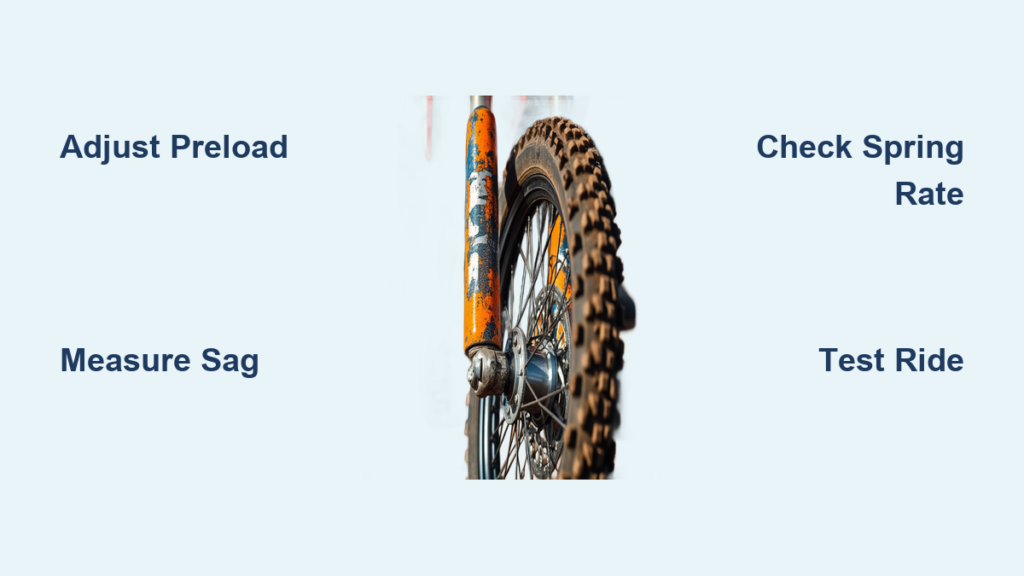
Measure Your Dirt Bike Sag Accurately

Proper diagnosis requires accurate sag measurements using either a Motion Pro sag stick, a Motool Slacker digital sag scale, or even a simple tape measure and zip tie. The process involves taking two measurements: static sag with the bike on a centerstand, and race sag (also called rider sag) with you mounted in full riding gear. The difference between these two numbers tells you whether your sag falls within the acceptable range.
Step-by-Step Sag Measurement Procedure
- Place your bike on a centerstand so the rear wheel hangs free
- Measure from a fixed point on the rear fender directly above the axle to the center of the axle
- Record this static sag measurement
- Carefully lower the stand and mount the bike in full riding gear
- Measure from the same fender point to the axle while seated normally
- Subtract the second measurement from the first to get your race sag
The recommended sag range for most motocross bikes falls between 97mm and 105mm (approximately 3.8 to 4.1 inches), though successful riders operate between 95mm and 110mm depending on their weight and riding style. If your race sag measures beyond 105mm to 110mm, you have too much sag on dirt bike suspension that needs correction. Static sag should also fall within the manufacturer’s specified range—typically around 25mm to 30mm on most bikes.
Adjust Preload to Reduce Excessive Sag
The first correction step for too much sag on dirt bike suspension is adjusting preload on your existing spring. Preload increases the initial compression on the spring, raising the static and race sag measurements toward the optimal range. The adjustment process differs between Japanese-branded bikes and WP-equipped European models, so identify your shock type before proceeding.
Japanese Bike Preload Adjustment (Honda, Yamaha, Kawasaki, Suzuki)
On Japanese-branded dirt bikes, preload adjustment requires a hammer and punch to turn the two lock nuts on the shock body:
– Loosen the lock nuts securely
– Turn the preload collar clockwise to increase preload and reduce sag
– Each quarter to half turn typically produces noticeable changes
– Re-measure sag after each adjustment
– Tighten lock nuts securely when target sag is achieved
WP Suspension Preload Adjustment (KTM, Husqvarna, GasGas)
For WP suspension found on European models, the adjustment mechanism uses an oversize preload ring with a pinch bolt clamp:
– Loosen the pinch bolt clamp
– Use a long flat-bladed screwdriver to rotate the preload ring clockwise
– A full rotation typically changes sag by approximately 3mm
– Re-measure carefully after each adjustment
– Tighten the pinch bolt securely once target sag is reached
When You Need a Stiffer Spring Instead of Preload
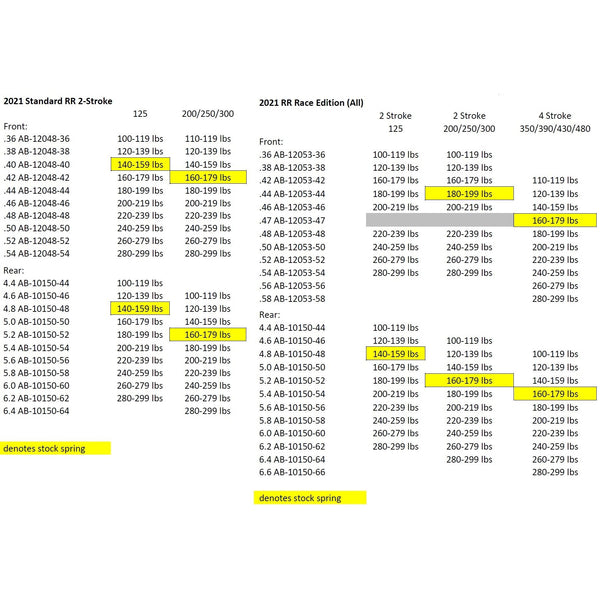
If preload adjustments can’t achieve proper sag, or when static sag falls outside the recommended range, you need a different spring rate. Spring rate selection requires matching the spring’s firmness to your weight, riding style, and terrain preferences.
How to Determine If You Need a New Spring
Your static sag measurement serves as the primary indicator for spring rate correctness:
– If static sag is too small even with maximum preload → spring is too soft → need stiffer spring
– If static sag is too large even with minimal preload → spring is too stiff → need softer spring
– Ideal static sag falls within manufacturer’s range (typically 25-30mm)
Consider not just your body weight but also gear, hydration packs, or accessories that add consistent weight. A five-pound change in rider gear can shift sag measurements noticeably, so factor these items into your spring selection.
Track-Specific Sag Adjustments for Optimal Performance

Once you have the correct spring rate and preload, sophisticated riders adjust sag based on track conditions and race strategies. These small tweaks can optimize handling for specific situations without requiring spring changes.
Tight Technical Tracks vs. Wide Open Courses
- Tight tracks with frequent direction changes: Reduce sag to 100mm for better turn-in response
- Wide-open tracks with long straights: Increase sag to 110mm for improved stability
- Supercross-style jumps: Prioritize settings that resist bottoming under heavy landings
Avoid These Common Sag Mistakes
Several persistent misconceptions lead riders to incorrect setups or missed diagnoses. Understanding these common mistakes helps you avoid them and achieve correct suspension setup more quickly.
Why Sag Isn’t a One-Time Setup
Sag is not a one-time setup task. You should check sag whenever rider weight changes significantly, including gear variations, hydration pack use, or body weight fluctuations. Tire changes that alter unsprung weight can affect sag readings, and adding or removing accessories like number plate frames or handguards changes the bike’s overall setup. A five-pound change in rider gear can noticeably shift sag measurements, so re-measure when your setup changes.
The Static Sag vs. Race Sag Priority Error
Some riders prioritize static sag over race sag, but this approach misses the point. The race sag number is what matters for handling feel, while static sag serves primarily as an indicator of correct spring rate and suspension health. Set race sag to your preferred value first, then verify that static sag falls within its recommended range. Focusing only on static sag often produces a setup that feels wrong despite “correct” numbers.
New Shock Break-In Period Matters
New shock absorbers require break-in time before sag measurements become accurate and stable. A brand-new shock typically sits higher in its travel until broken in, with full break-in occurring after approximately two hours of riding. Set up new or newly serviced shocks, ride for a break-in period, then re-measure and adjust as necessary. This two-step process ensures your final settings remain stable rather than drifting as the suspension settles.
Quick Reference: Fixing Excessive Sag
When you identify too much sag on dirt bike suspension, follow this systematic approach:
- Measure sag accurately using a sag stick or tape measure
- Compare measurements to recommended ranges (97-105mm race sag)
- Increase preload incrementally and re-measure
- If static sag remains outside range, consider spring rate change
- Test ride to verify handling improvement
The dramatic symptoms of excessive sag should resolve immediately once your sag measurements fall within the optimal range. Pay attention to cornering grip, bump absorption, high-speed stability, and overall confidence on the bike.
Maintain Proper Sag Long-Term
Keep your dirt bike’s sag in optimal range with regular maintenance:
– Check sag before each race weekend or monthly for trail riders
– Monitor for sudden changes that may indicate suspension wear
– Address oil leaks or unusual bottoming immediately
– Document your settings for future reference
Proper sag setup transforms your dirt bike from a handling liability into a confidence-inspiring machine that responds predictably to your inputs. By understanding and correcting too much sag on dirt bike suspension, you’ll ride faster, safer, and with significantly less fatigue on every ride.


