
Your dirt bike boots take more punishment than almost any other piece of riding gear. From the relentless scrape of foot pegs to the impact of crashes and the constant exposure to dirt and debris, these critical safety components endure extreme conditions on every ride. Eventually, you’ll notice worn soles, cracked buckles, gashed plastic components, or even completely ripped heels—and that’s when the urgent question arises: how do you effectively perform dirt bike boot repair without wasting money on temporary fixes? For riders who’ve invested in quality boots priced between $400-$600, professional repair typically costs less than half the price of new boots while preserving the customized fit you’ve already achieved through countless hours of riding. This guide delivers exactly what you need to know about dirt bike boot repair, from immediate DIY fixes for trail emergencies to professional resoling services that can extend your boots’ life for years, complete with pricing details, repair timelines, and decision-making frameworks to get your boots back in action fast.
Sole Wear That’s Eating Through Your Dirt Bike Boots
The relentless friction between your foot pegs and boot soles creates the most common damage pattern for dirt bike riders. Specifically, the ball of your foot and arch area bear the brunt of contact during every ride, and over months of aggressive riding, this repeated friction wears straight through even the toughest sole materials. Sidi boots in particular develop telltale holes where peg contact has worn completely through, leaving your foot exposed and compromising your critical connection to the bike. Heel damage occurs when boots catch under the rear wheel during crashes or extreme maneuvers, often ripping away chunks of material that leave the heel flapping or completely separated.
Immediate Shoo Goo Sole Repair Technique
For on-the-spot dirt bike boot repair when sole wear becomes critical, Shoo Goo stands as the most reliable adhesive solution recommended by experienced riders. This flexible, tenacious adhesive bonds to virtually any material—rubber soles, synthetic boot materials, or plastic components—and maintains integrity through extreme trail conditions. Before application, thoroughly clean the repair area with isopropyl alcohol to remove dirt, oil, and debris that might compromise the bond. Apply Shoo Goo generously to both surfaces, then wrap blue painter’s tape tightly around the boot to apply consistent pressure during the 24-48 hour drying period. When excess adhesive squeezes out, wipe it away immediately with a cloth dampened with WD-40, followed by a final wipedown with Windex for a clean finish.
Pro Tip: For sole repairs near high-stress areas like the kickstarter side, reinforce your Shoo Goo application by embedding a thin strip of fiberglass cloth or boot liner material between the adhesive layers. This creates a composite repair that withstands repeated impacts far better than adhesive alone.
When DIY Sole Repair Won’t Cut It
Shoo Goo has limitations that become apparent in high-stress areas where constant force and flexing occur. Some riders report repairs failing after just two rides for damage near the kickstarter contact point, where the boot repeatedly slams against the peg during starting. If you notice your repair failing repeatedly in these high-impact zones, it’s time to consider professional intervention. Complete sole replacement becomes necessary when holes extend beyond the immediate peg contact area or when the structural integrity of the sole has been compromised to the point where adhesive alone can’t maintain a secure bond through riding stresses.
Fixing Gashed Plastic Components on Alpinestars and Sidi Boots

Plastic component damage affects boots like the Alpinestars Tech3, where mysterious gashes develop in ankle and lower leg plates, often compromising waterproofing and structural integrity. These gashes might result from debris contact, crashes, or simply the stress of aggressive riding, but they let water and dirt inside while reducing the boot’s protective capability. For minor gashes affecting primarily waterproofing (rather than structural integrity), Shoo Goo applied to both sides of the damage and reinforced with a patch on the interior creates an effective temporary solution. The interior patch distributes stress and prevents the repair from pulling apart during the flexing that occurs during riding.
Professional Plastic Component Restoration
For severe gashes or cracks in plastic components, professional repair services offer superior results compared to DIY methods. MX Boot Resole and Repair uses specialized techniques to reinforce damaged plastic sections with internal supports that maintain flexibility while restoring structural integrity. The process involves carefully cleaning the damaged area, applying multiple layers of flexible adhesive with embedded reinforcement materials, and finishing with color-matched paint to minimize visual impact. Professional plastic repairs typically cost between $40-$65 depending on damage extent and boot model, but deliver significantly longer-lasting results than temporary DIY fixes.
Warning: Never attempt to weld or melt plastic components back together using heat guns or soldering irons. This creates weak spots that fail catastrophically during riding and can release toxic fumes that damage both your boots and your health.
Repairing Ripped Heels After Rear Wheel Catch Damage
Heel damage represents one of the most dramatic failures you’ll encounter with dirt bike boots, often occurring when your boot catches under the rear wheel during a crash or extreme maneuver. This type of damage typically leaves the heel flapping or completely separated from the main boot structure, rendering the boot unsafe for further riding until repaired. The critical factor determining repair viability is whether the separation has compromised the internal structural components or just affected the outer material.
Emergency Trailside Heel Repair
When your heel rips while riding and you need immediate dirt bike boot repair to get home safely, follow this field-expedient method: First, clean the separated surfaces as best you can with a damp cloth or alcohol wipe. Apply Shoo Goo liberally to both surfaces, then wrap the area tightly with electrical tape or duct tape to hold the repair in place during the initial set. Ride home slowly, avoiding aggressive foot positioning that might stress the repair. Once home, reinforce the repair with additional Shoo Goo layers and blue painter’s tape for 48 hours before riding again. This emergency fix typically holds for several rides but should be followed by professional repair as soon as possible.
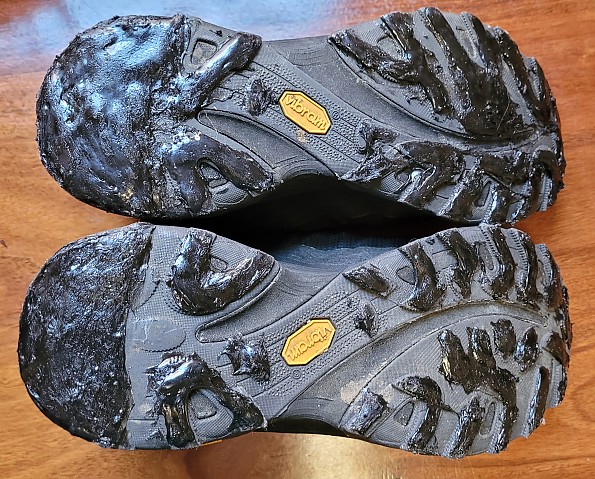
Tire Tread Sole Replacement: The Tiajuana Truckers Method
For riders seeking more durable sole repairs than adhesives alone can provide, the “Tiajuana Truckers” method offers a creative solution using actual tire tread as replacement sole material. This approach creates significantly longer-lasting repairs than simple adhesive patches, though it demands more skill and proper technique to execute successfully. The process involves cutting tire tread material to match your boot’s sole shape, preparing the original sole surface through rigorous cleaning and light sanding, and bonding the tread using appropriate adhesives designed for rubber-to-rubber bonding.
Step-by-Step Tire Tread Application
- Source appropriate tire tread – Find a section of heavy-duty truck or motorcycle tire with sufficient thickness (1/4 inch minimum) and suitable tread pattern
- Clean and prepare the sole – Remove all dirt and oil with isopropyl alcohol, then lightly sand the entire sole surface
- Trace and cut the tread – Position the boot on the tread material and trace the outline, adding 1/8 inch extra around the perimeter
- Apply adhesive – Use a rubber-specific adhesive like Barge Cement, applying two thin coats with drying time between
- Press and clamp – Position the tread carefully, then wrap tightly with blue painter’s tape for 72 hours
This method creates a sole that withstands peg contact far better than original materials, often lasting through multiple riding seasons before requiring attention. The textured surface also provides superior grip when your feet contact the bike frame during aggressive riding positions.
MX Boot Resole and Repair Service Cost Breakdown

When your boots need professional attention, MX Boot Resole and Repair stands out as the premier dedicated service for dirt bike boot repair in Southern California, with locations in Corona Del Mar and Encinitas. This shop specializes exclusively in motorcycle boot resoling and repair, working with all major brands including Alpinestars, Sidi, Gaerne, Fox, TCX, Leatt, and others. Their focused expertise means they understand the unique construction methods and stress points of dirt bike boots far better than general-purpose repair shops.
Professional Resoling Price Structure
Professional resoling services base pricing on boot model and sole construction type, with costs varying based on the complexity of the replacement process:
- Welted Sole Boots:
- Sidi Soles (for Alpinestars Tech 6/8): $190
- Gaerne SG10/Trial Soles: $190
- Gaerne SG12 Soles: $195
- Gaerne Enduro Soles: $200
- TCX X-Blast/Comp EVO: $190
-
Additional midsole repairs: $40-$65
-
Molded Sole Boots:
- Alpinestars Tech 3/5/7: $195
- Tech 7 (2014+): $215
- Tech 7 Enduro: $230
- Tech 10: $230
- Fox Instinct (new model): $195
- TCX Comp EVO Michelin: $200
- SIDI Adventure: $205
- Leatt Flexlock: $230
Hardware costs add to these base prices based on manufacturing pricing plus installation—buckles, straps, and other components incur extra charges. Colored soles require special ordering, adding both time and cost to the repair. Standard turnaround includes free return shipping to the 48 continental US states.
When $200 Resoling Costs Less Than New $500 Boots
The financial case for professional dirt bike boot repair strongly favors repair in most situations. New dirt bike boots typically cost around $500, making a $118 to $230 resoling service an excellent investment that extends the life of quality boots by several additional years. Even at the higher end of the pricing scale, professional resoling typically costs less than half the price of new boots while preserving the break-in period and customized fit you’ve already achieved through hours of riding.
Repair vs. Replacement Decision Framework
Evaluate these factors when deciding between repair and replacement:
- Boot value – Budget boots under $150 may not justify extensive repair investment
- Overall condition – Boots showing wear in multiple areas may not warrant repair
- Break-in period – Properly fitted boots offer comfort that new boots can’t match during their break-in phase
- Damage location – High-stress area damage often requires professional repair for durability
- Riding frequency – Frequent riders benefit more from professional repairs that last
For quality boots in the $400 to $600 range, even professional resoling represents a smart financial choice that preserves your investment. Riders who use their boots two to three times weekly typically extend their boots’ life by 1-2 additional years through professional resoling, making the economics overwhelmingly favorable compared to replacement.
Preventing Future Damage With Proper Boot Maintenance
Proactive maintenance significantly extends the time between dirt bike boot repair sessions and reduces the overall cost of boot ownership. After each ride, inspect your boots for early signs of wear—small areas of sole wear protected with adhesive before they develop into holes requiring full resoling can save you significant money and inconvenience.
Essential Post-Ride Boot Care Routine
- Immediate cleaning – Remove dirt and debris with a soft brush and damp cloth
- Thorough inspection – Check for developing wear spots, especially in peg contact areas
- Conditioning – Apply leather conditioner to synthetic materials to maintain flexibility
- Drying – Air dry completely away from direct heat sources
- Storage – Keep in a cool, dry place with boot trees or newspaper to maintain shape
Pro Tip: Apply a thin layer of Shoo Goo to high-wear areas (ball of foot, heel edge) before they develop holes. This creates a protective barrier that extends sole life significantly and makes future repairs easier if wear does progress.
Regular maintenance not only extends boot life but also preserves safety features. Compromised waterproofing from unaddressed gashes, weakened structural integrity from ignored cracks, and reduced grip from worn soles all diminish your protection during rides. By addressing minor issues immediately, you prevent them from developing into major damage requiring extensive dirt bike boot repair.
Local Cobbler Fixes for Buckles, Straps, and Minor Tears
Traditional shoe repair shops offer an often-overlooked option for dirt bike boot repair, with some riders reporting successful repairs for tears, strap issues, buckle replacements, and sole problems at costs as low as $5 for simple fixes. Cobblers bring experience working with leather, synthetic materials, and various closure systems that translate well to motorcycle boot repairs. The advantages include lower cost, faster turnaround, and the ability to address multiple damage types in a single visit.
Finding the Right Cobbler for Boot Repairs
Not all cobblers understand the specific materials and construction methods used in dirt bike boots, so ask these questions before committing:
- “Have you repaired motorcycle boots before?”
- “What experience do you have with synthetic materials and plastic components?”
- “Can you work with the specific closure systems on dirt bike boots?”
The right cobbler can handle minor repairs quickly and affordably, while more complex damage might still benefit from specialist services like MX Boot Resole. For buckle replacements, strap repairs, and minor sole edge damage, a skilled cobbler often provides the fastest, most economical dirt bike boot repair solution.
Sole Performance Shoe Repair for Street and Dirt Riding Boots
Sole Performance, located in Encinitas, California, specializes specifically in motorcycle boot repairs and resoling with an owner described as an ex-racer who understands exactly what riders need from their boots. This background shows in their work, particularly with the soft sole material found on street and road race boots—the material that gets chewed up rapidly by pegs during aggressive riding.
The resoling process at Sole Performance involves using MX boot soles that get carefully sanded down to remove tread texture and achieve appropriate thickness for optimal pedal feel. This custom approach creates soles that work excellently and last significantly longer than original equipment in many cases. Riders praise the shop’s ability to work with various boot brands and recommend their services for both dirt bike and street riding boots alike.
Final Note: Whether you choose DIY solutions for immediate trailside fixes or professional services for comprehensive restoration, proper dirt bike boot repair extends your boots’ life while maintaining the safety and performance you rely on. By understanding your specific damage, matching the right repair method to your needs, and implementing preventive maintenance, you’ll keep your boots in top condition for countless more rides. Remember that boots already broken in to your feet provide superior comfort and control compared to new boots, making quality repair a smart investment in both your riding experience and your wallet.


