
Struggling with a stubborn kick-start on your dirt bike after a crash or during competition can ruin your entire riding experience. Adding electric start to your dirt bike transforms this frustration into instant engine engagement with just a button press—a game-changer for riders of all ages and skill levels. Whether you’re outfitting a youth bike for your child, enhancing a pit bike for convenience, or upgrading a larger displacement machine that demands excessive kick-start effort, this guide reveals exactly how to install electric start on a dirt bike correctly. You’ll discover which models accept straightforward retrofits, when an engine swap makes more sense, and critical installation steps that prevent costly mistakes.
Before grabbing your tools, recognize that not all dirt bikes convert equally well to electric start. Many were engineered exclusively with either kick-start or electric-start systems from the factory, with fundamentally different engine cases that determine conversion feasibility. Attempting an electric start installation on incompatible models often leads to wasted time, money, and frustration when discovering internal components don’t align. This guide focuses on practical approaches that deliver working results, whether you’re modifying a popular Honda CRF450R or a smaller SSR 125 pit bike.
Gather Required Tools for Electric Start Installation
Having the right tools prevents mid-project frustration and ensures proper installation that withstands trail conditions. Skip this preparation phase, and you’ll likely face stripped bolts or electrical faults that compromise your entire system.
Essential Mechanical Tools Checklist
Your socket wrench set (8-19mm) forms the foundation for removing engine covers, mounting brackets, and securing the starter motor. Include both standard and metric sizes since some Chinese-made pit bikes mix measurement systems. A torque wrench proves non-negotiable—overtightening starter bolts cracks engine cases, while undertightening causes vibration-related failures. Budget 30-45 minutes to gather these tools before starting, preventing frustrating mid-installation stops.
Critical mistake to avoid: Using impact tools on starter mounting bolts. The sudden force damages internal gears and housing—always hand-tighten with controlled torque application.
Electrical Installation Must-Haves
Wire cutters and strippers prepare connections cleanly without damaging conductors, while heat shrink tubing creates professional-grade insulation that resists vibration and moisture better than electrical tape. A multimeter saves hours of troubleshooting by verifying continuity before connecting the battery—test this tool on a known circuit first to confirm accuracy. Keep zip ties and mounting clips handy to secure wiring away from moving parts; loose wires get severed by the swingarm during operation.
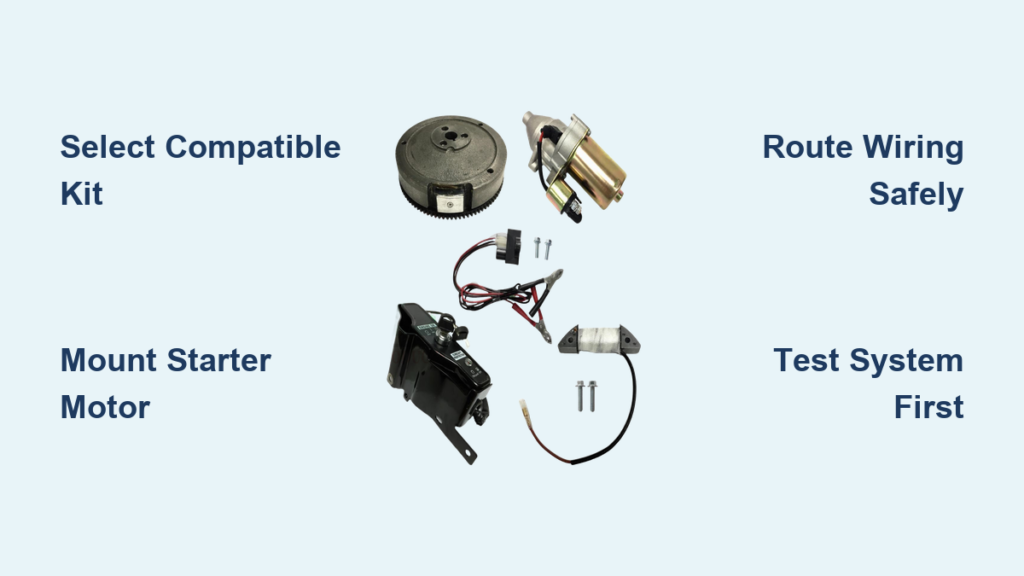
Select Compatible Electric Start Kit for Your Dirt Bike
Choosing the wrong kit guarantees installation headaches and potential damage to your engine. Compatibility extends beyond physical fitment to electrical requirements and internal engine design—never assume universal fitment.
Match Kit to Your Specific Bike Model
Research kits designed explicitly for your make, model, and year—Honda CRF450R owners need different components than SSR 125 riders. Universal kits often require custom brackets or adapters that introduce failure points. For youth bikes like the SSR MX125, confirm whether your frame has space for battery mounting before purchasing; many require creative solutions due to compact designs. Budget $250-$600 for a complete kit depending on bike size and component quality.
Battery and Electrical Component Requirements
Your battery must deliver sufficient cranking amps (typically 100-150 CCA) to spin the engine reliably, especially in cold conditions. Opt for a lithium motorcycle battery (6-8 pounds) instead of heavier lead-acid options (12-15 pounds) to minimize weight gain. Verify that the kit includes a properly sized starter relay—undersized units overheat and fail during repeated starting attempts. Check if your bike needs a stator upgrade; most 125cc+ engines require this to maintain charging capacity with the new electrical load.
Prepare Dirt Bike for Electric Start Conversion
Proper preparation prevents damage to components and creates efficient workflow during installation. Rushing this phase leads to lost parts, incorrect reassembly, and avoidable mistakes.
Secure Bike and Document Original Configuration
Position your dirt bike on a center stand with rear wheel elevated—this allows engine rotation during alignment checks. Take multiple photos of wiring harness routing, fuel line connections, and component placement before disassembly. Label each removed part with masking tape noting its location (e.g., “tank front left bolt”). These simple steps save 20-30 minutes during reassembly and prevent misconnecting critical components.
Remove Existing Kick-Start Components
Clearing space for the new starter motor requires careful disassembly of existing components. Work methodically to avoid damaging parts you’ll need to reinstall.
Disconnect and Remove Fuel Tank Safely
Drain fuel completely before disconnecting lines—place a container beneath the petcock to catch residual fuel. Loosen fuel line clamps with a small flathead screwdriver before gently twisting and pulling lines off fittings. Label electrical connectors with tape indicating their original positions, as many look identical but serve different functions. Improper reconnection of the fuel pump or sensor wires creates no-start conditions that waste troubleshooting time.
Mount Starter Motor with Precision Alignment
Correct starter motor positioning prevents gear grinding, premature wear, and failure to engage—the most common electric start installation errors.
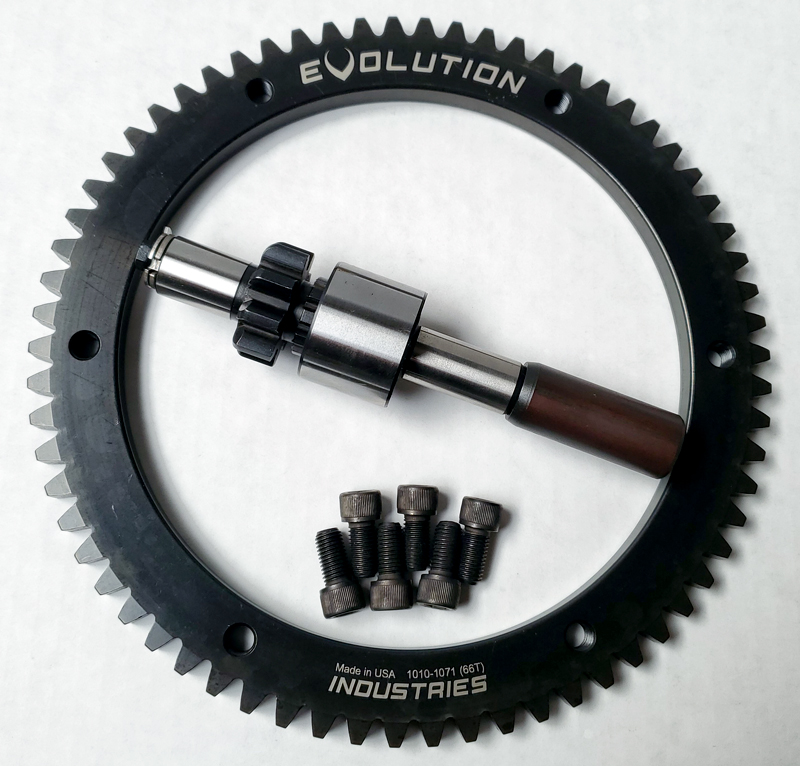
Verify Gear Meshing Before Final Torquing
Hand-tighten mounting bolts while rotating the engine slowly to check starter gear engagement with the ring gear. Proper meshing produces a smooth, quiet engagement sound—grinding indicates misalignment. Test rotation through a full revolution to ensure consistent meshing without binding points. Only after confirming perfect alignment should you apply final torque (typically 8-12 ft-lbs depending on model).
Connect Electrical System Without Short Circuits
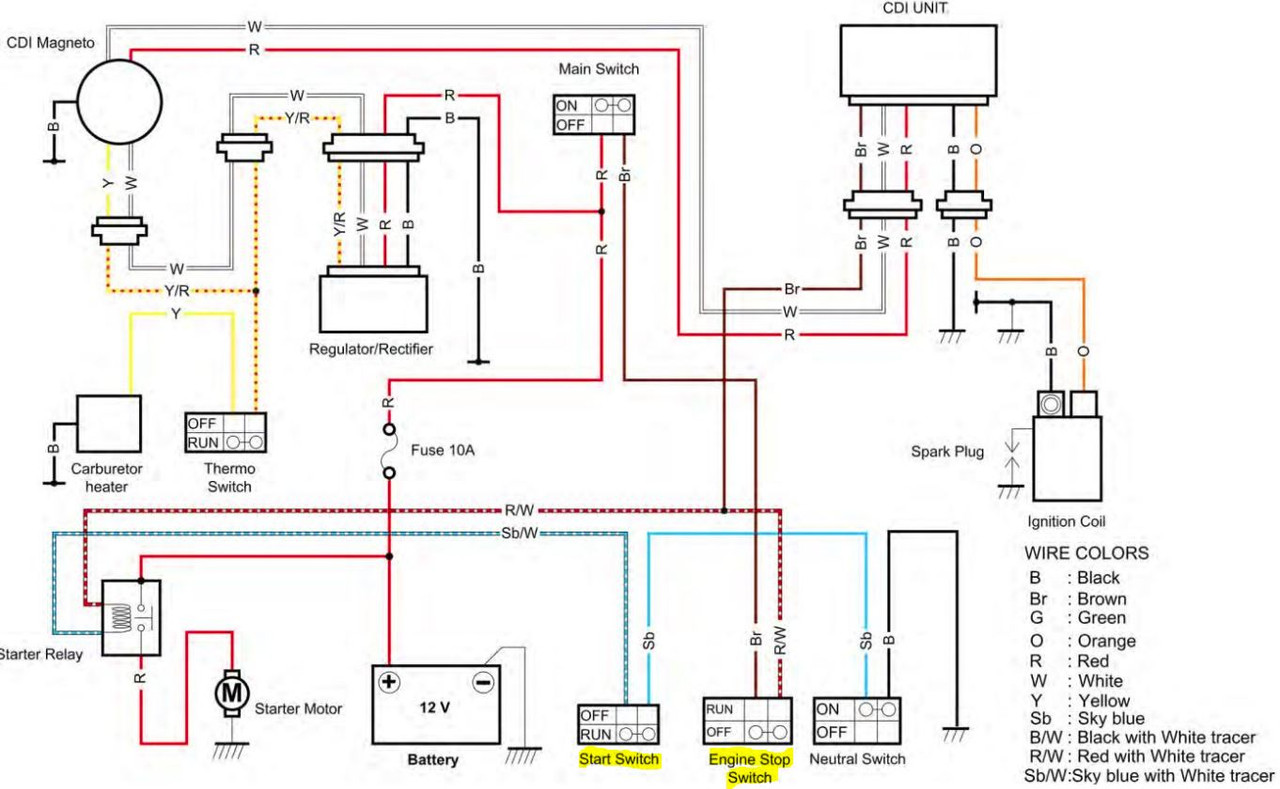
Electrical mistakes cause more failed installations than mechanical issues. Follow these steps to create a reliable wiring system that survives trail conditions.
Route Wires Away from Critical Components
Secure wiring harnesses along the frame spine using zip ties every 4-6 inches, maintaining at least 1 inch clearance from exhaust pipes. Never route wires across the swingarm pivot point—suspension movement will eventually sever connections. Install a 30-amp fuse within 6 inches of the battery positive terminal; this critical safety component prevents electrical fires during wiring faults.
Test Starting System Before Full Reassembly
Verify basic functionality before reinstalling all components—a small investment of time prevents major disassembly later.
Initial Power-On Sequence Testing
With the fuel tank removed for safety, connect the battery and test starter engagement only (no fuel system active). Press the start button for 2-second intervals with 10-second rests between attempts to prevent starter overheating. Listen for smooth gear engagement—whining indicates improper meshing, while clicking suggests insufficient power delivery. Check all connections for heat buildup after three activation cycles; warm terminals indicate undersized wiring.
Consider Engine Swap for Incompatible Models
Some dirt bikes, particularly Chinese-made pit bikes like the SSR MX125, resist practical electric start retrofits due to incompatible engine cases. Recognizing this early saves money and frustration.
Evaluate Cost-Benefit of Complete Engine Replacement
For models lacking internal components to accept starter motors, a complete YX 140cc electric start engine swap ($400-$600) often costs less than custom fabrication. Factor in potential resale value of your original engine—young riders’ parents frequently seek kick-start engines for simplicity, potentially recovering $100-$150. The swap eliminates compatibility concerns while delivering factory-engineered reliability that custom kits can’t match.
Budget Realistically for Electric Start Conversion
Underestimating costs derails many projects. Account for both visible and hidden expenses before starting.
Total Project Cost Breakdown
| Component | Basic Retrofit | Complete Engine Swap |
|---|---|---|
| Starter Kit | $250-$400 | N/A |
| Battery | $80-$150 | Included |
| Labor | $200-$400 | $150-$300 |
| Additional Parts | $100-$300 | $50-$150 |
| Total | $630-$1,250 | $600-$1,000 |
Factor in 15-20% contingency for unexpected requirements like frame modifications or upgraded stators. Professional installation often proves cost-effective when considering your time value and potential component damage from mistakes.
Maintain Electric Start System Reliability
Proper maintenance prevents most electric start failures. Create a monthly inspection routine to catch issues early.
Critical Connection Points to Check Monthly
- Battery terminals for corrosion and tightness
- Starter motor mounting bolts for security
- Wiring connections near swingarm for chafing
- Ground connections between frame and engine
Clean corroded terminals with a baking soda/water solution and a stiff brush—never use abrasive materials that damage metal surfaces. Replace any wire insulation showing cracks or abrasion immediately before moisture causes shorts.
Understand Weight and Performance Trade-offs
Electric start adds 8-15 pounds to your dirt bike—manage this impact based on your riding priorities.
Weight Distribution Matters More Than Total Gain
Mount the battery as low and centered as possible to minimize handling effects. Lithium batteries (6-8 lbs) save 5-7 pounds versus lead-acid options—worth the $30-$50 premium for serious riders. Competitive racers often remove electric start for main events but keep it for practice days, gaining convenience without sacrificing race-day performance.
Final Pre-Ride Verification Checklist
Complete these checks before hitting the trails to ensure reliable electric start operation:
- Confirm starter motor engages within 0.5 seconds of button press
- Verify battery maintains 12.6+ volts after three starting attempts
- Check all wiring for security and clearance from moving parts
- Test charging system output (should exceed 13.5 volts at 3,000 RPM)
- Ensure kill switch functions correctly with new electrical system
Pro Tip: Carry a basic toolkit and zip ties on your first few rides after installation—early detection of loose connections prevents being stranded.
With proper installation and maintenance, your electric start system delivers years of reliable service that transforms your dirt bike experience. The convenience of instant starting outweighs the minor weight penalty for most riders, particularly parents with youth bikes or riders with physical limitations. By following these precise steps, you’ll avoid the common pitfalls that plague DIY electric start installations and enjoy trouble-free starting season after season.


