
A clogged or improperly maintained air filter is one of the most common causes of poor dirt bike performance, yet many riders neglect this critical component until problems arise. When your air filter becomes saturated with dirt and debris, your engine struggles to breathe properly, leading to reduced power, poor fuel economy, and potentially serious engine damage from ingested particles. Whether you’re preparing for a weekend ride or performing routine maintenance after a dusty trail session, knowing how to correctly change your dirt bike’s air filter is an essential skill that takes less than 30 minutes but pays dividends in reliability and performance. In this guide, you’ll learn the precise steps to safely remove, clean (if applicable), and reinstall your air filter according to manufacturer specifications—without making the common mistakes that could compromise your engine’s health.
Locating and Accessing Your Dirt Bike’s Air Filter Housing
Before you can change your air filter, you need to know exactly where to find it on your specific dirt bike model. The air filter housing is typically positioned near the carburetor or fuel injection system, but its exact location varies significantly between manufacturers and models. On most modern dirt bikes, the airbox sits behind the fuel tank, requiring you to remove the seat and possibly the fuel tank to access it properly.
Identifying Your Specific Airbox Configuration
Different dirt bike brands use distinct airbox designs that affect your access approach:
- Japanese models (Honda, Yamaha, Kawasaki, Suzuki): Typically feature airboxes with multiple fasteners along the perimeter that require careful removal
- European brands (KTM, Husqvarna, GasGas): Often use quarter-turn fasteners for quicker access but may have more complex routing
- Dual-sport models: May have additional weatherproofing or more compact housing due to street-legal requirements
Essential Pre-Access Preparation Steps
Before attempting to open the airbox, complete these critical safety steps:
1. Park your dirt bike on a stable stand with the engine completely cooled
2. Disconnect the negative battery terminal to prevent accidental electrical issues
3. Remove any body panels, seat, or fuel tank according to your service manual
4. Clean around the airbox perimeter with compressed air to prevent debris from falling inside
Pro Tip: Take photos with your phone during disassembly—this creates a visual reference for reassembly, especially helpful if you encounter unfamiliar fasteners or routing.
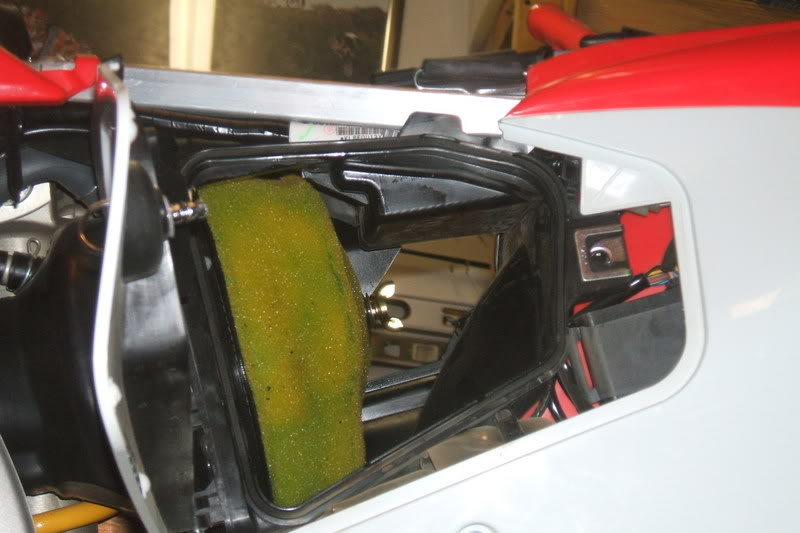
Removing the Old Air Filter Safely and Completely
The removal process requires careful attention to detail to avoid damaging components or introducing contaminants into your engine.
Step-by-Step Filter Extraction Procedure
- Release all airbox fasteners: Carefully note if any fasteners are different lengths or require special tools
- Separate the airbox halves: Work slowly around the perimeter to avoid breaking plastic tabs
- Document filter orientation: Take note of how the filter sits in the housing (direction matters for proper airflow)
- Remove the filter: Lift straight up without tilting to prevent debris from falling into the intake
Critical Inspection Points During Removal
As you remove the old filter, check for these warning signs:
– Excessive oil saturation (more than needed for proper sealing)
– Tears or holes in the filter media that compromise protection
– Hardened or crusty areas indicating improper cleaning
– Debris trapped between filter and housing that could indicate previous installation errors
Warning: Never shake out a dirty air filter over the open airbox—this risks dropping contaminants directly into your engine’s intake system.
Cleaning or Replacing Your Air Filter: Foam vs. Paper Types

Your approach depends entirely on your filter type, which varies by bike model and riding conditions.
Foam Filter Maintenance Protocol
For bikes with reusable foam filters (common on off-road models):
- Pre-cleaning inspection: Check for tears, hardening, or permanent deformation
- Washing procedure: Use [SPECIFIC CLEANING SOLUTION FROM SOURCE] in a plastic container
- Drying technique: Air-dry completely away from direct sunlight (never use compressed air)
- Oiling method: Apply [SPECIFIC FILTER OIL TYPE] evenly without saturation
- Final preparation: Squeeze out excess oil until the filter feels tacky but not dripping
Paper Filter Replacement Guidelines
For single-use paper filters (common on dual-sport models):
- Complete replacement: Never attempt to clean paper filters
- OEM vs. aftermarket: Verify compatibility with your specific model year
- Sealing surface check: Inspect the housing gasket for damage before installing new filter
- Installation orientation: Ensure the filter’s airflow arrow points toward the engine
Pro Tip: Keep a spare filter on hand—changing filters before they become critically dirty prevents performance issues during rides.
Proper Reinstallation Techniques to Prevent Air Leaks

Improper installation causes more problems than a dirty filter, as even small air leaks let unfiltered air into your engine.
Critical Sealing Steps for Leak Prevention
- Clean the sealing surfaces: Use a soft cloth to remove all debris from both housing halves
- Check the gasket: Replace if cracked, hardened, or missing sections
- Position the filter correctly: Align with any registration tabs or airflow indicators
- Close the housing evenly: Work diagonally when securing fasteners to ensure even pressure
- Final leak test: Gently tug on the housing after closing—no gaps should be visible
Common Installation Mistakes to Avoid
- Over-tightening fasteners: Causes housing warping and eventual cracks
- Skipping the gasket: Creates immediate air leaks that damage engine performance
- Incorrect filter orientation: Reduces airflow efficiency by up to 30%
- Rushing the process: Missing one fastener creates a major air leak path
Warning: An improperly sealed airbox allows unfiltered air to enter your engine, causing accelerated wear that can destroy pistons and cylinders within minutes of operation.
Post-Installation Verification and Performance Testing
Your work isn’t complete until you’ve verified proper installation and function.
Essential Post-Change Checks
- Visual inspection: Confirm all fasteners are secure and panels are properly aligned
- Idle test: Start the engine and listen for unusual hissing sounds indicating air leaks
- Throttle response: Check for smooth acceleration without hesitation or popping
- Leak detection: Use [SPECIFIC LEAK DETECTION METHOD FROM SOURCE] for thorough verification
Performance Indicators of Proper Installation
- Immediate improvement in throttle response compared to pre-change condition
- Stable idle without hunting or surging
- No unusual intake noises during acceleration
- Consistent power delivery throughout the rev range
Pro Tip: Keep a maintenance log noting the date of each filter change—this helps establish your personal maintenance schedule based on actual riding conditions.
Establishing Your Personal Air Filter Maintenance Schedule
Factory recommendations provide a starting point, but your actual riding conditions determine your optimal maintenance frequency.
Customized Maintenance Intervals Based on Conditions
| Riding Condition | Recommended Filter Check | Full Replacement/Cleaning |
|---|---|---|
| Dry, dusty trails | After every ride | Every 5-10 hours |
| Wet/muddy conditions | Mid-ride and after | Every 2-5 hours |
| Desert racing | Before each session | Immediately after |
| Dual-sport street use | Every 500 miles | Every 1,500-2,000 miles |
Visual Indicators That Signal Immediate Attention
- Visible dirt accumulation exceeding 1/8 inch depth
- Discoloration extending through the entire filter media
- Reduced airflow noticeable during acceleration
- Unusual engine behavior like popping or hesitation
Warning: Riding with an excessively dirty filter restricts airflow so severely that it creates a dangerously rich fuel mixture, potentially washing oil from cylinder walls and causing catastrophic engine failure.
Troubleshooting Common Air Filter-Related Performance Issues
Even with proper maintenance, problems can occur—know how to diagnose them correctly.
Diagnostic Flow for Filter-Related Symptoms
Symptom: Poor acceleration/hesitation
– Check: Filter installation, air leaks, proper oiling
– Not likely: Fuel system issues if problem appeared immediately after filter change
Symptom: Excessive oil consumption
– Check: Over-oiled filter, damaged housing seal
– Not likely: Internal engine problems if no other symptoms present
Symptom: Unusual intake noises
– Check: Airbox fasteners, housing integrity, filter seating
– Not likely: Exhaust system issues if noise changes with throttle position
Final Note: Always consult your specific dirt bike’s service manual for model-specific procedures and torque specifications. When in doubt about any step in the air filter replacement process, seek guidance from a certified technician—improper air filtration causes expensive engine damage that far exceeds the cost of professional maintenance. Keep this guide handy for your next maintenance session, and consider pairing your air filter service with other critical checks like spark plug inspection and carburetor synchronization for comprehensive engine health.


