
That frustrating morning when your dirt bike refuses to start while your riding buddies fire up and head out without you? The culprit is almost always improper choke operation. Knowing exactly how to turn choke on dirt bike separates riders who spend precious trail time kicking dead engines from those who fire up instantly and hit the dirt running. Whether you’re battling freezing morning temperatures or just restarting after lunch, mastering choke control creates reliable cold starts that get you riding faster. This guide reveals precisely where to find your choke, the exact sequence for perfect ignition, and critical mistakes that sabotage your starting attempts every time.
Find Your Dirt Bike’s Choke Mechanism Fast
Locating your choke quickly saves time and frustration at the trailhead. Most dirt bikes use one of two choke designs that determine how to turn choke on dirt bike effectively. Carburetor-mounted chokes appear as black knobs protruding from the side of your carburetor body—look for them near the airbox on models like the Yamaha YZ-250F. Handlebar-mounted chokes function as levers connected to the carburetor via cable, positioned near your left grip for immediate access without bending down.
Identify Carburetor-Mounted Choke Operation
On carburetor-mounted systems, the choke knob typically requires pulling outward to its fully extended position to engage enrichment. Some models need upward movement instead of outward—this variation depends on your specific bike’s carburetor design. Never assume partial movement is sufficient; the knob must reach its mechanical stop to create the rich mixture needed for cold starts. If uncertain, consult your owner’s manual for the exact movement required by your manufacturer.
Recognize Handlebar-Mounted Choke Positions
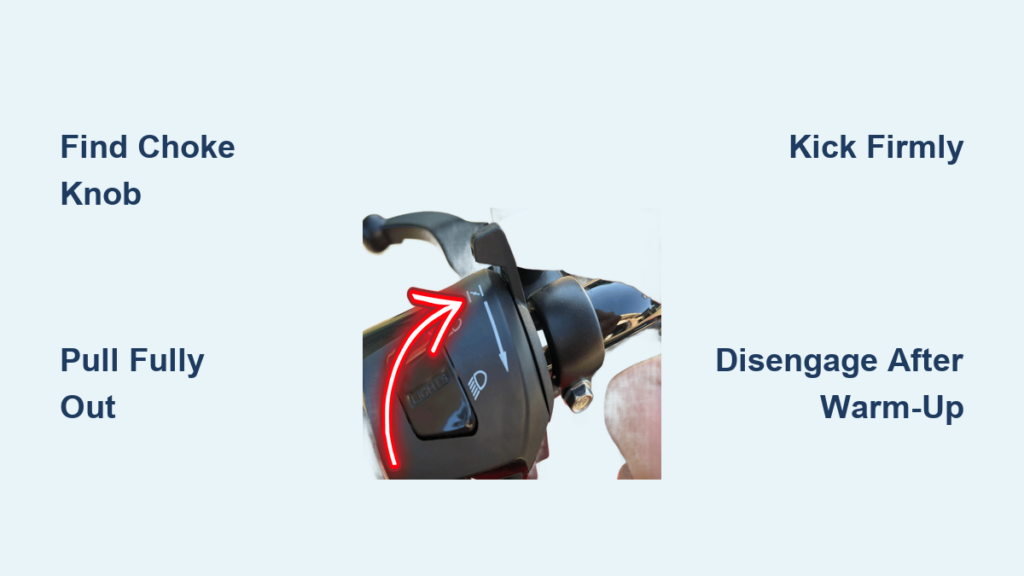
Handlebar-mounted chokes feature a lever with two distinct positions that click positively into place. The “on” position usually has the lever pointing upward or aligned with your handlebars, while the “off” position points downward toward you. You should feel this engagement physically—smooth, ambiguous movement indicates a worn cable needing replacement. Some riders modify stock setups by rerouting the choke cable to handlebar controls for easier access, though this requires carburetor removal and careful zip-tying to secure the assembly.
Verify Choke Plate Movement Visually

If you can’t determine choke function through lever movement alone, remove your air filter housing and peer directly into the carburetor throat. With the air filter out, operate the choke lever while watching the carburetor bore. When engaged, a metal plate (choke plate) will partially cover the opening; when disengaged, this plate retracts completely for unobstructed airflow. This visual confirmation eliminates guesswork about whether your choke mechanism actually functions.
Execute Perfect Cold Starts with Choke
Following the precise sequence for choke operation transforms unreliable cold starts into consistent ignition, even in freezing conditions. Skipping any step creates starting failures that waste time and drain your energy before you even begin riding.
Prepare Your Bike for Cold Starting
Before touching the choke, confirm your dirt bike sits in neutral—this prevents dangerous lurching when the engine fires and allows easy movement if troubleshooting becomes necessary. Always close the throttle completely by returning your twist grip to its resting position; manipulating throttle during cold starts frequently causes flooding. Ensure you have ample space around you for kickstarting and verify no flammable materials sit near the exhaust.
Engage Choke to Maximum Position
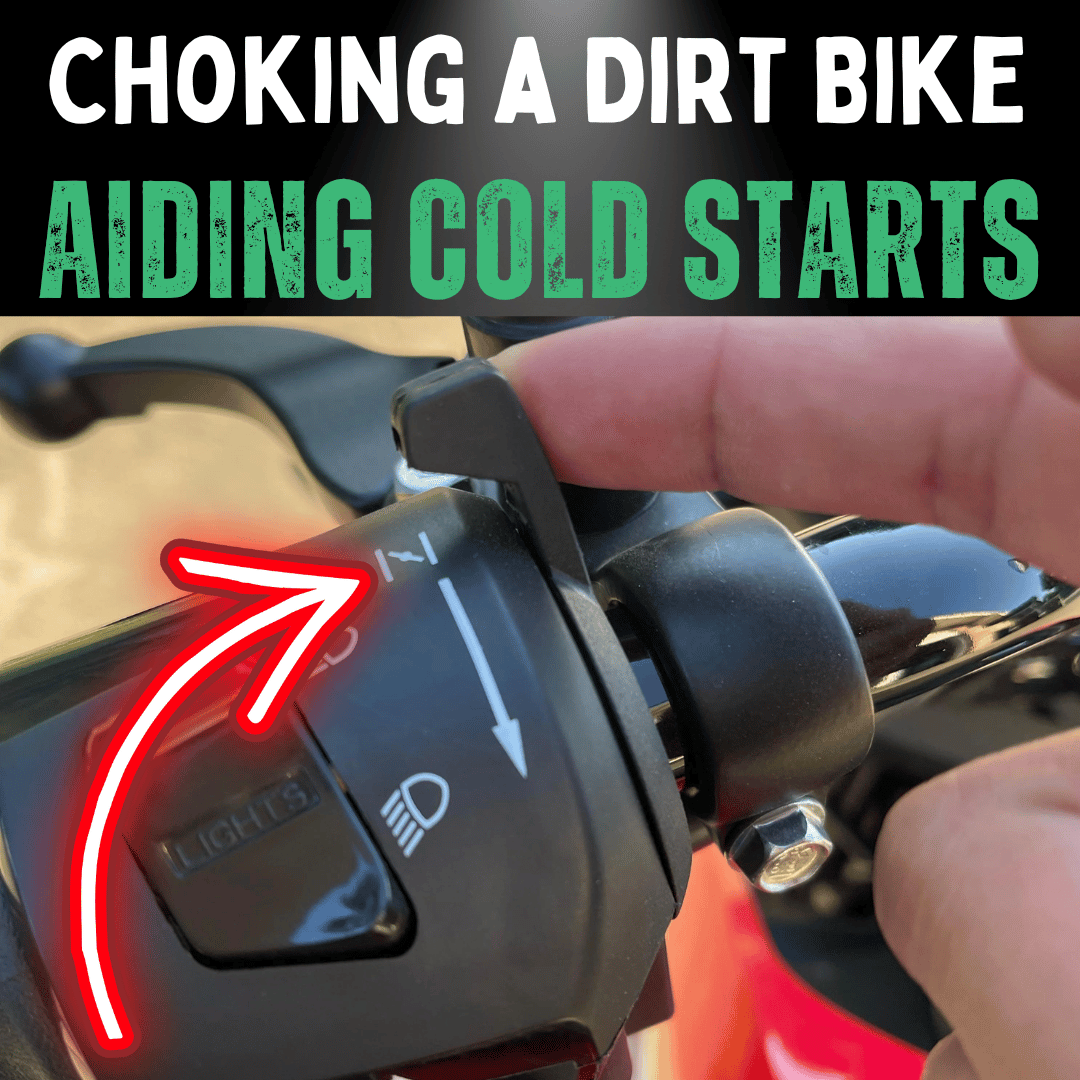
With safety checks complete, locate and fully engage your choke before attempting to start. For carburetor-mounted chokes, pull the knob outward or upward until it physically stops—this activates the enrichment circuit by restricting airflow. For handlebar-mounted units, move the lever to its upward or inline position until you feel positive engagement. Partial choke movement is the #1 cause of failed cold starts; the mechanism must reach its extreme position to create sufficient enrichment.
Kick Engine with Proper Technique
Position the kickstarter at the top of its stroke and push downward firmly through the complete range of motion in one confident motion. Keep your throttle twist grip fully closed throughout this process—do not add throttle while kicking. The engine should catch within one to three kicks when choke operation is correct. If it sputters but won’t sustain running, verify fuel flow and spark plug condition before assuming choke failure.
Allow Engine to Stabilize Before Riding
Once the engine fires, release the kickstarter immediately and let the engine settle into idle. Do not continue kicking as this risks injury or component damage. The engine will run roughly at first as the enrichment circuit does its work—this uneven idle is normal and expected during initial warm-up.
Warm Up Correctly Before Ride-Off
Proper warm-up time protects critical engine components while allowing lubricating oil to reach all moving parts. Rushing this phase causes accelerated wear that shortens engine life.
Cold Weather Warm-Up Protocol
In freezing temperatures, allow one to two minutes with choke fully engaged before disengaging. During this time, fuel vaporization improves and internal components expand to proper operating tolerances. You may need gentle throttle modulation to maintain stable idle as the engine warms. Once the idle smooths and stabilizes, your engine approaches operating temperature.
Warm Weather Shortened Procedure
Thirty seconds to one minute typically suffices for warm-up in moderate conditions. Engines start more easily in warmth and may require less choke enrichment, though full choke engagement remains advisable for the first start of the day. After warm-up, disengage the choke by returning the knob to seated position or moving the lever downward. Test throttle response gently—hesitation or bogging indicates the mixture remains too rich and needs more warm-up time.
Troubleshoot Common Choke Problems

When your dirt bike refuses to start despite proper choke operation, systematic diagnosis identifies the real issue instead of wasting time on ineffective fixes.
Engine Won’t Start with Choke On
First verify fuel delivery—check that your petcock sits in “on” position and fuel actually reaches the carburetor. Second, test your spark plug for adequate ignition; cold starts demand strong spark that weak plugs can’t provide. Third, confirm choke movement actually affects the choke plate by visual inspection through the airbox. These three checks eliminate the most common non-choke starting failures.
Recover from Flooded Engine Quickly
Flooding occurs when choke remains engaged on a warm engine or after repeated failed starting attempts. To recover: open choke fully, apply half throttle, and attempt starting. If unsuccessful, remove spark plug, clean thoroughly, hold throttle wide open while kicking several times to purge fuel, then reinstall clean plug. Severe flooding may contaminate engine oil with raw fuel, requiring oil change before continued operation.
Fix Sticking Choke Cables Immediately
Over time, choke cables develop stiffness from dirt, corrosion, or inadequate lubrication. This binding prevents full engagement or disengagement, causing starting difficulties. Premium replacement cables feature stainless steel inner wire running through PTFE liner for smooth operation without lubrication. The “bird-caging” process on quality cables creates stronger bond between wire and terminal, improving durability in harsh riding conditions.
Avoid These Critical Choke Mistakes
New riders consistently make these preventable errors that sabotage cold starts and damage engines over time.
- Partial choke engagement – Moving lever only partway creates insufficient enrichment
- Forgetting to disengage choke – Causes running problems, fouled plugs, and carbon buildup
- Choking warm engines – Guarantees flooding and starting difficulties
- Skipping warm-up time – Damages components that need proper oil circulation
Always engage choke fully before kicking, disengage completely before riding, and allow at least thirty seconds warm-up even on warm days. Making these habits automatic ensures trouble-free starts season after season.
Maintain Choke System for Reliable Starts
Inspect your choke system before every ride as part of routine pre-ride checks. Verify the lever or knob moves freely through full range with positive engagement at both extremes. Listen for grinding or binding that indicates cable degradation.
When storing your dirt bike long-term, either drain the fuel system completely or treat remaining fuel with stabilizer. Evaporated fuel residues deposit within choke circuits and restrict movement. Replace your spark plug annually—worn plugs may fire adequately warm but fail with the richer cold-start mixture.
Understanding why choke exists—enriching mixture to compensate for poor fuel vaporization in cold conditions—gives you the framework to troubleshoot any starting difficulty. With consistent technique and proper maintenance, mastering how to turn choke on dirt bike becomes second nature, ensuring reliable cold starts that get you riding faster and keep you ahead of the pack.


