

Nothing kills the fun of off-road riding faster than a dead battery leaving your Razor dirt bike completely unresponsive. When your young rider’s bike won’t start, dim lights flicker, or the motor sounds weak and sluggish, you’re likely facing a battery failure that needs immediate attention. Learning how to replace a Razor dirt bike battery correctly saves you costly service fees and gets your rider back on the trails in less than an hour. This comprehensive guide walks you through every step of the battery replacement process, from confirming your battery actually needs replacing to installing the new one and maintaining it for maximum lifespan.
Before grabbing tools and diving into replacement, take a moment to verify the battery is truly the problem. Many Razor dirt bike models—particularly the popular MX350, MX400, Dirt Rocket, and Pocket Mod series—use lead-acid or lithium-ion batteries that degrade over time, especially when exposed to extreme temperatures or left unused for extended periods. If your bike won’t power on or shows significantly reduced performance, the battery is likely the culprit. By following this guide, you’ll gain the confidence to handle this straightforward DIY repair and keep your Razor dirt bike running reliably for seasons to come.
Locate Your Razor Dirt Bike Model Number Precisely
Finding your exact Razor dirt bike model number is critical before purchasing any replacement battery. This specific identifier determines which battery configuration your bike requires and prevents costly mistakes from buying incompatible parts. Search for a white sticker typically positioned under the seat, on the battery compartment cover, or along the main metal frame connecting the handlebars to the rear wheel. Each Razor model uses distinct battery specifications that aren’t interchangeable across the product line.
Once you’ve located the model number, determine whether your bike uses a 12-volt, 24-volt, or 36-volt battery system. The MX350 and MX400 models almost always require a 12-volt battery pack, while newer Dirt Rocket versions may need either 24 or 36-volt configurations. Write down both your model number and voltage requirement before shopping for replacements. Installing a battery with incorrect voltage can cause permanent damage to your dirt bike’s motor controller and electrical system—damage that’s far more expensive to repair than simply getting the right battery the first time.
Confirm Battery Failure Before Replacement
Don’t assume a dead battery is the problem without proper verification—many electrical issues mimic battery failure. Before investing in a replacement, perform these essential diagnostic checks to isolate the actual cause. First, examine all battery terminals and wiring connections for visible corrosion, loose fittings, or damaged insulation. A simple loose connection can prevent proper power delivery even with a fully charged battery. Clean any corrosion using a wire brush dipped in a baking soda and water solution, then securely tighten all connections.
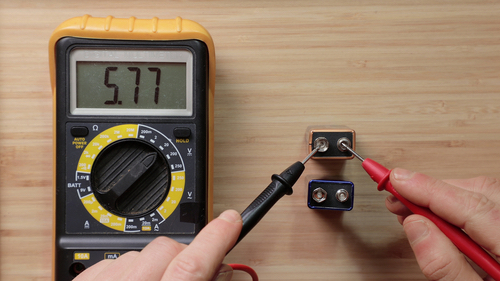
Next, test your battery’s voltage with a multimeter to determine its actual condition. A healthy 12-volt battery should measure between 12.6 and 12.8 volts when fully charged and at rest. If your reading falls below 12.0 volts, the battery is significantly discharged. More critically, test the battery under load by attempting to start the bike while monitoring the voltage—any substantial drop (below 10 volts) indicates the battery can no longer hold charge effectively and requires replacement. Another telltale sign is when your charger immediately shows a solid green light without cycling through charging mode, signaling the battery cannot accept a charge at all.
Prepare Essential Tools and Correct Replacement Battery

Gather these specific tools before beginning your Razor dirt bike battery replacement to avoid frustrating interruptions mid-process. You’ll need a Phillips head screwdriver for seat mounting bolts, possibly a flathead screwdriver for stubborn plastic clips, and a set of wrenches or socket tools (typically 10mm or 13mm) for terminal connections. Some models use zip ties to secure wiring that will need cutting and replacing, so keep several new zip ties handy.
When selecting your replacement battery, choose between OEM (original equipment manufacturer) batteries from Razor or high-quality aftermarket options. While OEM batteries guarantee perfect compatibility, reputable aftermarket brands like Mighty Max, Chrome Battery, or Upsound often deliver comparable performance at more affordable prices. Crucially, verify your replacement matches three specifications: voltage (12V, 24V, or 36V), physical dimensions (length, width, height), and terminal orientation (positive and negative post positions). Most Razor dirt bikes use sealed lead-acid (SLA) batteries, though newer models may require specific lithium-ion packs that need compatible chargers—never substitute one type for the other.
Remove Old Battery Without Damaging Components
Accessing your Razor dirt bike’s battery requires careful disassembly to avoid breaking plastic components. Start by removing the seat, typically secured by two to four mounting bolts underneath the bike. Some models feature a snap-in plastic battery cover that needs gentle prying with a flathead screwdriver—apply pressure gradually at multiple points to prevent cracking. Work slowly and deliberately to preserve all components for reinstallation.
Before disconnecting any wires, take a clear photo of the battery’s wiring configuration with your smartphone. This visual reference prevents connection mistakes during reinstallation. Always disconnect the negative (black) cable first to prevent short circuits, followed by the positive (red) cable, loosening terminal bolts with your wrench. Remove all securing brackets, straps, or foam padding holding the battery in place, then carefully lift the old battery out. Note its precise orientation and positioning, as the new battery must install identically. Properly dispose of your old battery at an automotive store or recycling center that accepts lead-acid batteries—never discard batteries in regular household trash due to environmental hazards.
Install New Battery With Correct Terminal Connections

Ensure your replacement battery arrives fully charged before installation—new batteries often ship with only partial charge, which can cause performance issues. Position the new battery exactly as the old one sat, matching both terminal locations and physical orientation. Secure it using all original brackets, straps, or foam padding to prevent vibration damage during operation—loose batteries can shift and cause electrical shorts or physical damage.
Reconnect cables in the reverse order of removal: attach the positive (red) cable first, then the negative (black) cable. Tighten terminal bolts securely but avoid over-tightening, which can crack the plastic battery casing and lead to acid leaks. Check that cables have no tension or sharp bends that might cause damage over time. Cross-reference your earlier photo to verify all connections match the original configuration. Replace any zip ties you cut during removal, and reinstall the battery cover and seat, tightening all screws to their original snugness. Test your work by turning on the power switch and confirming lights illuminate properly before attempting to start the motor.
Extend New Battery Lifespan With Proper Maintenance
Maximize your replacement battery’s service life with these essential maintenance practices. Razor dirt bike batteries perform best when used regularly—ride your bike at least once a week during active seasons to prevent sulfation buildup that permanently reduces capacity. When storing your bike for more than 30 days, fully charge the battery first, then recharge it every 30-45 days to maintain optimal health during storage periods.
Inspect battery terminals monthly for early signs of corrosion, which appears as white or blue crusty deposits. Clean terminals with a wire brush and baking soda solution whenever buildup appears, then apply a light coat of petroleum jelly to prevent future corrosion. Avoid completely draining your battery during rides—lead-acid batteries suffer permanent damage when regularly discharged below 50% capacity. For long-term storage, consider using a smart trickle charger that automatically maintains optimal charge levels without overcharging. Store your bike in a climate-controlled environment when possible, as extreme temperatures significantly accelerate battery degradation.
Resolve Common Installation Problems Quickly
Even with careful installation, you might encounter these frequent post-replacement issues that are usually simple to fix. If your bike still won’t start after battery replacement, immediately recheck all electrical connections—loose or reversed cables cause most post-installation problems. Verify your charger functions properly by testing it on another device or measuring its output voltage with a multimeter; a faulty charger can make a good battery appear defective.
When you hear a clicking sound during startup attempts, this typically indicates insufficient voltage reaching the motor rather than a bad battery. Re-clean your terminals, ensure all connections are tight, and confirm the battery has a full charge. If the bike starts but runs weakly or cuts out unexpectedly, inspect for worn motor brushes or a failing motor controller—these components can create symptoms identical to battery problems. Consult your specific model’s user manual for troubleshooting guidance, or contact Razor customer support for model-specific advice before purchasing additional parts.
Recognize When Professional Service Is Necessary
While most Razor dirt bike battery replacements are manageable DIY projects, certain situations warrant professional assistance. Lithium-ion battery packs require special handling procedures and compatible chargers—improper installation creates serious fire hazards that outweigh any cost savings from DIY repair. Some newer Razor models feature batteries integrated into sealed compartments requiring specialized tools for safe access; forcing components can cause expensive damage beyond simple battery replacement.
Electrical issues extending beyond basic battery replacement—such as controller malfunctions, motor failures, or damaged wiring harnesses—also benefit from professional diagnosis. Attempting repairs beyond your skill level risks voiding warranties or creating safety hazards. For most riders, however, the straightforward battery replacement process described here successfully restores full functionality. With the correct replacement battery, basic tools, and careful attention to detail, you’ll have your Razor dirt bike running reliably and ready for your next trail adventure in no time.


