
You’re ready for a ride, twist the key, and nothing happens—your dirt bike won’t start despite having good compression and a strong spark. When your dirt bike not getting fuel exhibits a dry spark plug with no fuel odor after cranking, you’ve hit a classic fuel delivery failure. This specific symptom tells you ignition and mechanical systems are functioning properly—the problem lies somewhere between your fuel tank and combustion chamber. The frustration of a bike that refuses to start despite seemingly perfect conditions is real, especially when you’re eager to hit the trails. This guide gives you the systematic approach needed to pinpoint exactly where fuel flow stops and restore proper function without unnecessary part replacements or guesswork.
The definitive test for fuel delivery problems involves introducing fuel directly into the cylinder. If your engine starts and runs briefly on this introduced fuel but then dies, you’ve confirmed ignition and compression work while the carburetor fails to deliver fuel properly. This simple test eliminates timing issues, compression loss, and mechanical engine problems from consideration, narrowing your focus entirely to the fuel system. By following this structured diagnostic process, you’ll identify whether the issue stems from clogged jets, incorrect float height, petcock blockages, or other common culprits affecting your dirt bike not getting fuel.
Confirm Fuel Reaches the Float Bowl Before Disassembly
Before tearing into your carburetor, verify fuel actually reaches the carburetor body. This critical first step eliminates entire systems from consideration and points you directly toward the failure location. Remove the float bowl cover or observe the overflow hose while tilting your motorcycle toward the carburetor side. Fuel should begin flowing from the overflow hose once the bowl fills to its designed level. If you see no fuel at the overflow, the obstruction exists upstream in the petcock, fuel line, or fuel filter assembly—saving you hours of unnecessary carburetor disassembly.
With the float bowl confirmed full, the next diagnostic step involves tracing fuel movement from the bowl to the engine. Spray carburetor cleaner through each carburetor bore while observing the spray pattern. The spray should emerge as a fine mist into the carburetor bore, confirming that pilot and main circuits will permit fuel passage under engine suction. If cleaner sprays through forcefully but fuel fails to flow during engine operation, the issue likely involves float height or throttle slide positioning rather than internal passage blockages. This simple test differentiates between physical obstructions and mechanical misadjustments.
Why Your Full Float Bowl Might Still Cause Starting Failure
Even with a full float bowl, your dirt bike not getting fuel can occur due to several hidden issues. The fuel level might sit below the pilot jet intake because of incorrect float height, preventing fuel from entering the pilot circuit. Alternatively, microscopic debris might be blocking internal passages that feed the jet orifices—not visible during casual inspection. Another possibility involves throttle slide positioning that creates too large of a gap at idle, disrupting the air-fuel mixture balance needed for starting. Understanding these nuances prevents wasted effort on unnecessary jet cleaning when the real problem lies elsewhere.
Clear Clogged Carburetor Jets With Proper Technique

Jet obstruction represents the most frequent cause of fuel delivery failure in dirt bike carburetors. Both pilot and main jets can become clogged with debris, varnish deposits from stale fuel, or contamination introduced during refueling. The pilot jet, responsible for fuel delivery at idle and low throttle openings, causes particular diagnostic challenges because even minor obstructions at this tiny orifice can completely prevent starting while the main jet circuit remains functional.
Effective Jet Cleaning Procedure
Remove the jets from the carburetor body using the appropriate screwdriver. Soak them in carburetor cleaner for several hours to dissolve varnish deposits. After soaking, spray clean carburetor cleaner through each jet orifice from both directions using the spray nozzle. You must see a fine, uninterrupted spray emerge from the other side—not just a dribble or partial flow. Simply holding jets up to light and visually inspecting the orifice may prove insufficient, as obstructions can exist within internal passages that feed the jet orifices. If cleaner doesn’t spray through freely after multiple attempts, replace the jet entirely rather than risking incomplete cleaning.
Diagnose and Adjust Float Height Problems

The float valve assembly controls fuel entry into the float bowl and maintains proper fuel level within the bowl cavity. Float height directly determines the fuel level maintained during operation. If the float level sits too low, the fuel level may fall below the intake of the pilot jet circuit, starving the engine of fuel at idle and low speeds even when the bowl appears full. Conversely, if the float level sits too high, fuel may overflow from the bowl through vent lines, potentially flooding the engine.
Precise Float Height Measurement Steps
Invert the float assembly and measure the distance from the float tangent to the float bowl mating surface with the needle seated. Compare this measurement against your carburetor model’s specifications. Variations of even 1mm can significantly impact fuel level and engine operation. When specifications are unavailable, comparative measurements against known-good carburetor assemblies can provide reference values. Adjust float height by carefully bending the float tab that contacts the needle, then remeasure until you achieve the correct specification. This precise adjustment often resolves seemingly complex fuel delivery issues with minimal effort.
Identify Petcock and Fuel Line Blockages Quickly
The petcock valve, located between the fuel tank and carburetor, can develop internal obstructions from fuel tank debris, sediment accumulation, or contamination. Disconnect the fuel line from the carburetor and place the end into a container. Turn the petcock to the on or prime position and observe fuel flow. Fuel should flow freely without restriction. If no fuel flows or the flow is severely limited, the issue lies in the petcock assembly, fuel filter, or fuel tank itself.
Quick Petcock Diagnostic Method
Turn the petcock to each position (on, prime, reserve) while observing fuel flow from the disconnected line. Each position should produce adequate flow. Weak flow in one position but strong flow in another indicates internal petcock blockage affecting only that circuit. In this case, cleaning the petcock internals or replacing the assembly becomes necessary rather than simply running on a different petcock position. Inline fuel filters may become completely clogged over time, restricting or eliminating fuel flow—replace clogged filters and inspect fuel lines for kinks, cracks, or internal obstructions.
Adjust Throttle Slide Position for Proper Starting

The throttle slide’s resting position significantly impacts starting fuel delivery. At idle, the throttle slide should rest with a small gap, approximately 1mm or 1/16 inch, at the bottom of the carburetor bore. If the throttle cable adjustment positions the slide too high, this gap increases, reducing idle circuit fuel delivery and making starting extremely difficult. A properly adjusted cable should leave slight slack in the throttle mechanism with the grip in the closed position.
Throttle Cable Adjustment Process
Locate the cable adjuster at the throttle housing or where the cable enters the carburetor. With the throttle grip in the fully closed position, loosen the lock nut and turn the adjuster to create approximately 1mm gap at the bottom of the carburetor bore. This gap should be visible when looking down the carburetor throat with the engine off. Once adjusted, tighten the lock nut while holding the adjuster in position. Test throttle operation to ensure smooth movement and proper return to the closed position. This simple adjustment often resolves starting issues that seem like major fuel delivery problems.
Verify Pilot Circuit Functionality
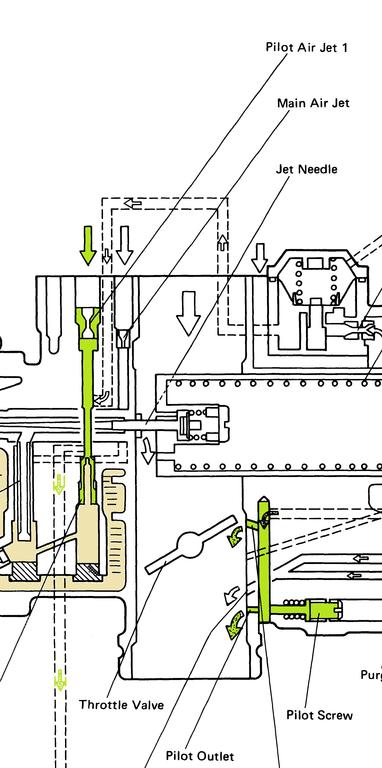
The pilot circuit provides fuel delivery for idle operation and low-speed running, continuing to function as the primary circuit up to approximately one-quarter throttle opening. During starting, the pilot circuit provides the sole fuel source until throttle opening increases. A clogged pilot jet therefore prevents starting entirely, as no fuel reaches the engine regardless of float bowl fullness.
Pilot Circuit Testing Method
With the carburetor removed, spray carburetor cleaner directly through the pilot circuit passage adjacent to the throttle slide. The spray should emerge as a fine mist in the carburetor bore, indicating that fuel will flow through this circuit during engine operation. If spray emerges only as droplets or not at all, the pilot circuit passage contains obstruction that requires thorough cleaning. Pay particular attention to the area around the pilot jet and the passages leading to the throttle slide cutaway. This test confirms whether your dirt bike not getting fuel stems from pilot circuit blockage.
Prevent Future Fuel Delivery Problems
Proper storage procedures significantly reduce fuel delivery problems upon restart. Before extended storage, run the carburetor dry by operating the bike until fuel exhaustion occurs. This prevents fuel from sitting within the bowl and passages where it can evaporate and leave varnish deposits. Alternatively, add fuel stabilizer to a full tank and run the engine briefly, allowing treated fuel to reach the carburetor and protect internal surfaces during storage.
Key prevention strategies include:
– Using fresh fuel and avoiding contaminated sources
– Checking fuel lines, filters, and petcock function during routine maintenance
– Visual examination of float bowl contents for contamination
– Maintaining proper throttle cable adjustment
– Storing your bike with the petcock in the off position
When your dirt bike not getting fuel leaves you stranded, remember this systematic approach: First confirm fuel reaches the float bowl, then verify throttle slide positioning, thoroughly clean all jets, measure and adjust float height, and inspect petcock and fuel lines. If standard corrections fail, check for intake boot cracks and reed valve damage on two-strokes. The direct cylinder fuel test remains your most reliable diagnostic tool—if the engine runs briefly on introduced fuel, you’ve confirmed fuel delivery requires your attention. By following these steps methodically, you’ll get your dirt bike back on the trail faster with confidence that you’ve addressed the real problem.


