
You’re tearing down a trail when your dirt bike suddenly loses power on a steep climb. You twist the throttle, but instead of surging forward, the engine screams while your speed drops. This frustrating scenario happens daily to riders who don’t fully understand how their dirt bike’s gears actually function. Without proper gear knowledge, you’ll waste power, overwork your engine, and miss critical trail opportunities. This guide cuts through the confusion to explain exactly how dirt bike gears operate – including why sequential shifting matters, when to change gears, and what happens inside your transmission during every shift. You’ll learn the mechanical relationship between your clutch, gearbox, and rear wheel that transforms engine power into trail-conquering momentum.
Unlike street motorcycles or cars, dirt bikes use a specialized transmission system designed for rapid power delivery and rugged terrain. Most modern dirt bikes employ a constant-mesh sequential gearbox where gears are always engaged but only transfer power when locked by dog clutches. This setup allows lightning-fast shifts without synchronizers, crucial when navigating technical singletrack. When you press the shift lever, you’re not sliding gears into place like in older vehicles – you’re activating a ratchet mechanism that rotates a shift drum, aligning specific gear sets with the output shaft. Understanding this core principle prevents common mistakes like “floating” gears (partial shifts) that cause crunching noises and premature wear. By the end of this guide, you’ll shift with precision whether you’re launching from a standstill or navigating rocky descents.
Why Dirt Bike Gears Operate Differently Than Car Transmissions
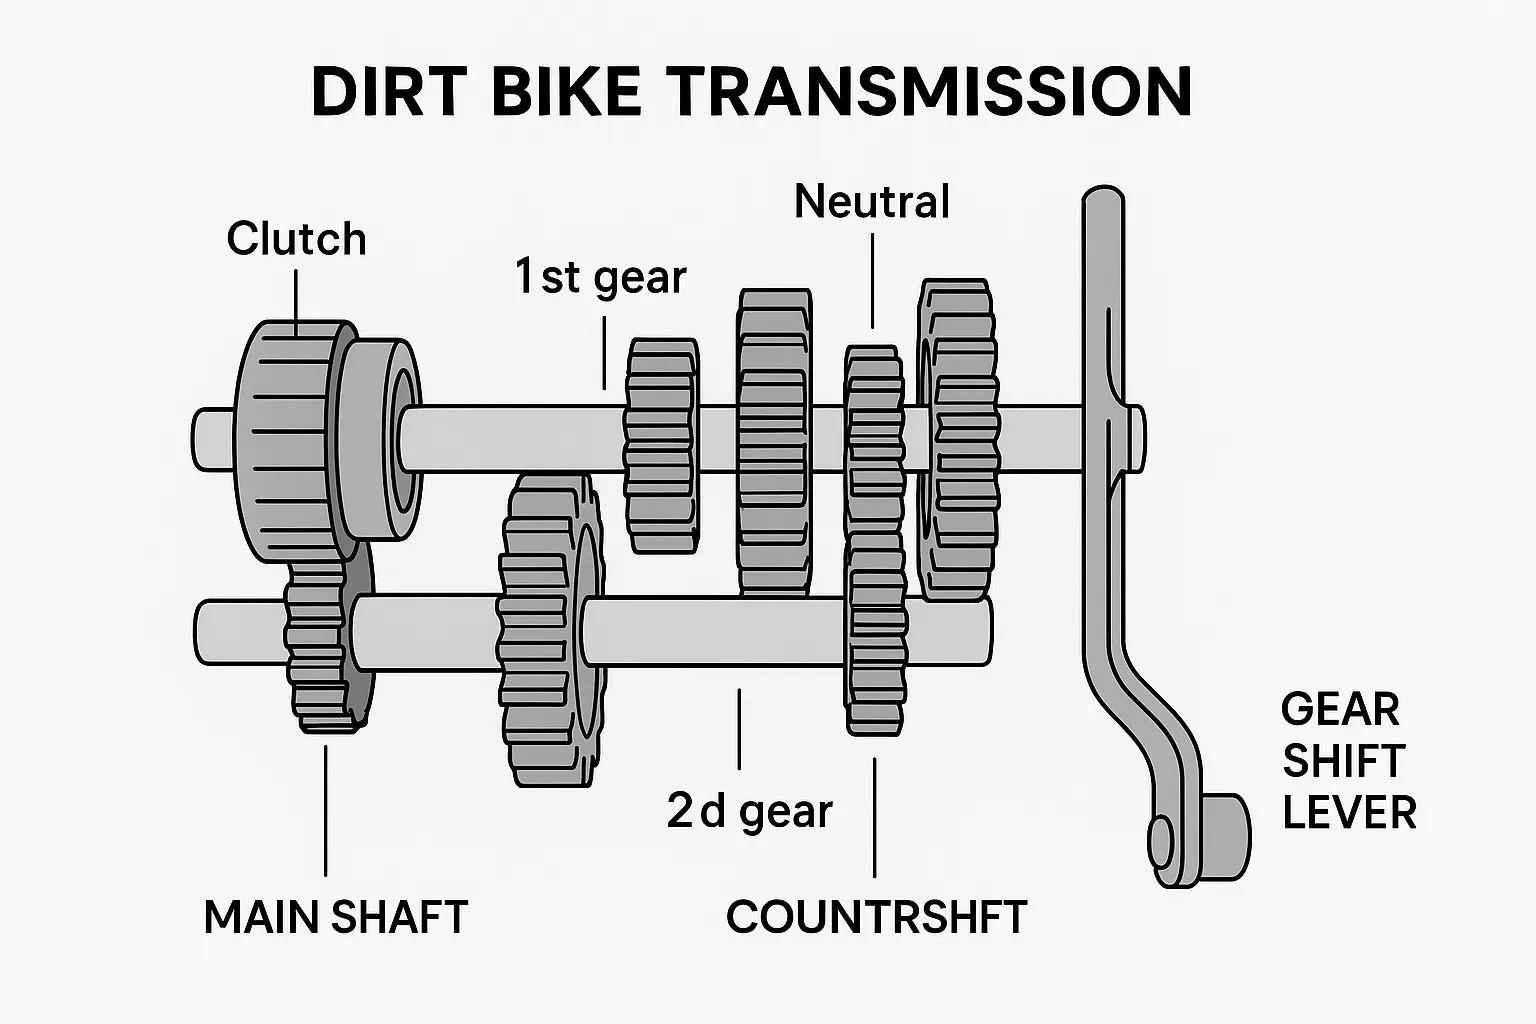
The Critical Role of Sequential Shifting Patterns
Dirt bikes use a “1-down, 4-up” or “1-down, 5-up” shift pattern where you can’t skip gears – neutral sits between first and second. This sequential design prevents accidental neutral engagement during aggressive riding. When you kick the shift lever down, a shift fork moves the dog clutch to engage first gear; each upward click advances to the next ratio. Unlike car transmissions with H-patterns, you can’t jump from third to fifth on a dirt bike. This limitation actually enhances safety during jumps or rough terrain since partial shifts won’t accidentally disengage power. Riders attempting car-like shifting techniques often damage shift forks or strip gears – always shift through each ratio sequentially even when downshifting multiple gears.
How the Clutch Enables Gear Changes Without Stopping
Your clutch isn’t just an on/off switch – it’s the hydraulic interface between engine power and gear selection. When you pull the clutch lever, you disengage the clutch pack (stacked friction and steel plates) connected to the crankshaft. This temporarily separates engine rotation from the transmission input shaft, allowing smooth gear engagement. Crucially, dirt bike clutches are “wet” systems bathed in engine oil, providing cooling during sustained slips – essential for hill climbs or technical sections where you might feather the clutch for minutes. Never attempt gear changes without fully disengaging the clutch; the resulting grinding wears down dog teeth on gears within weeks. For emergency downshifts, practice “rev-matching” by blipping the throttle to synchronize shaft speeds before releasing the clutch.
Diagnosing Common Gear-Related Performance Issues
Why Your Bike Loses Power During Acceleration
If your dirt bike feels sluggish despite high RPMs, check these three gear-specific culprits: First, verify you’re not “lugging” the engine in too high a gear – small-displacement bikes need higher RPMs (8,000-10,000) for optimal torque. Second, inspect for clutch slippage: if revs shoot up without corresponding speed increases, worn friction plates may need replacement. Third, confirm proper chain tension; a loose chain skips teeth on the rear sprocket, mimicking gear disengagement. Always test these variables on flat terrain before blaming the transmission. Pro tip: Record a video of your tachometer during acceleration – a healthy bike should show smooth RPM climbs matching speed increases without sudden drops.
Troubleshooting Grinding Noises During Shifting
That metallic crunch when shifting usually means one of three mechanical failures: Worn shift drum notches cause incomplete gear engagement (requiring transmission disassembly), bent shift forks prevent proper alignment (common after hard landings), or damaged dog teeth on gears (from frequent “dry” shifting without clutch use). To diagnose, perform this test: With engine off, rock the bike back and forth while shifting through all gears. If you feel roughness or resistance, the issue is mechanical – not clutch-related. Never ignore grinding noises; continued riding can shear shift fork pins, locking you in one gear. For immediate trailside fixes, try adjusting clutch cable free play – sometimes a dragging clutch mimics transmission problems.
Step-by-Step Gear Selection for Trail Conditions
Optimizing Gear Choice for Uphill Climbs
Low-and-slow technique for steep inclines:
1. Approach the hill in second gear (for 250cc+ bikes) or first (for smaller models) at 5,000 RPM
2. Pull clutch halfway while accelerating to maintain wheel traction
3. Shift to next gear only when RPMs drop to 4,000 – never before
4. If rear wheel spins, momentarily release throttle while maintaining clutch position
5. Downshift immediately if speed drops below 5 mph to prevent stalling
This method prevents “bogging” where the engine lacks torque to climb. On loose terrain, slightly higher RPMs (6,000-7,000) help maintain momentum through slippery sections. Avoid sudden throttle inputs – modulate with wrist flicks no wider than 1/4 inch.
Navigating Downhill Terrain Without Engine Braking
Controlled descent procedure:
– Select one gear higher than your climbing gear (e.g., third instead of second)
– Maintain slight clutch engagement to prevent rear-wheel lockup
– Use rear brake for primary speed control – not engine compression
– Downshift only after completing the descent to avoid skidding
– For rocky sections: Feather clutch while in neutral to eliminate drivetrain tension
Never descend in too low a gear – excessive engine braking causes rear-wheel hop and loss of control. On steep drops, experienced riders sometimes shift to neutral entirely, relying solely on brakes. Test this technique at low speeds first.
Preventing Costly Transmission Damage During Maintenance
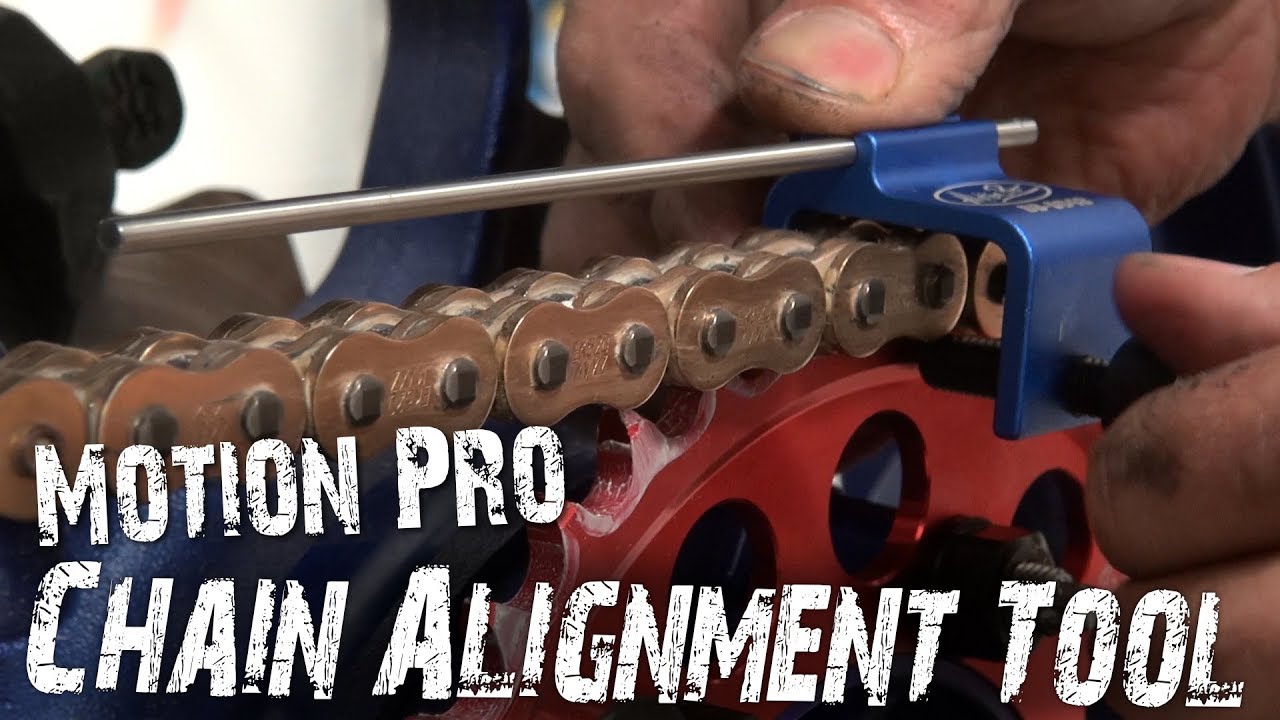
Critical Chain and Sprocket Alignment Checks
Misaligned chains destroy transmission bearings within hours. After any chain adjustment:
1. Measure chain slack at its tightest point (1.5-2 inches for most 250-450cc bikes)
2. Verify rear axle is perpendicular to swingarm pivot bolts
3. Sight from chain guide to front sprocket – alignment must be laser-straight
4. Spin rear wheel to check for “wobble” indicating bent sprocket
Even 2mm of misalignment accelerates sprocket wear by 300%. Use alignment marks on swingarm only as starting points – never rely solely on them. Replace chain and sprockets as a set; worn components accelerate new part deterioration.
Oil Selection Mistakes That Ruin Gearboxes
Using the wrong oil causes 68% of premature transmission failures according to industry service data. Always:
– Choose JASO MA2 certified oils (not automotive “energy conserving” types)
– Avoid oils with friction modifiers – they cause clutch slippage
– Change oil every 10-15 hours (not mileage-based) due to clutch debris
– Fill to exact level – overfilling causes shifting drag through fluid resistance
Never use additives claiming to “improve shifting” – they compromise clutch engagement. For cold climates, use 10W-40 instead of 20W-50 to prevent sluggish shifting at startup.
When to Seek Professional Transmission Service
Identifying Internal Gear Damage Symptoms
Certain issues require immediate professional attention:
– “False neutral” between gears – indicates worn shift drum notches
– Gear jumping out under load – damaged dog teeth or bent shift fork
– Oil with metallic glitter – gear tooth fragmentation (use magnet test)
– Inability to find neutral at stop – worn shift spindle components
Delaying repairs turns $200 fixes into $1,200 transmission rebuilds. Document symptoms with video before visiting the shop – mechanics can often diagnose from shift sounds alone.
Cost-Saving Service Timing Strategies
Schedule transmission work during off-season to avoid spring rush pricing. Always:
– Replace shift lever bushings during any transmission service ($8 part saves $200 in fork damage)
– Request new shift drum springs – they lose tension after 50 hours
– Inspect clutch basket for “hooking” (grooves from worn plates)
– Verify gear tooth contact patterns with Prussian Blue dye
Pro tip: Buy OEM gear sets in advance during sales – they’re 40% cheaper than emergency orders. Keep a spare shift fork in your trail kit ($15 part prevents abandonment.
Extending Gearbox Life Through Riding Technique
Master smooth shifting by practicing these daily:
– Anticipate terrain changes – shift before entering obstacles, not during
– Use engine braking sparingly – downshift gradually on descents
– Avoid “clutch dumping” – release lever over 0.5 seconds, not instantly
– Shift at consistent RPMs – creates muscle memory for each trail section
Record your shift points on familiar trails – most riders shift 30% too early. Install a shift light programmed to your bike’s powerband (e.g., 8,500 RPM for 450cc 4-strokes). Within two weeks, proper shifting becomes instinctive, reducing transmission stress by over 50%.
Final Note: Proper gear usage transforms your dirt bike from a frustrating machine into a trail extension of your body. Remember that sequential shifting demands respect – never force the lever, and always use the clutch. Check chain alignment after every ride and change transmission oil religiously. When in doubt about gear behavior, stop and diagnose immediately rather than risking catastrophic failure miles from the trailhead. For model-specific gear ratios, consult your owner’s manual’s technical appendix – Kawasaki KX450 owners, for example, should note their unusually tall sixth gear designed for sand dunes. Keep this truth in mind: the perfect shift happens before you need it, not when you’re already stuck. Your transmission will reward precise inputs with years of reliable service through the toughest terrain.


