When you first try to capture the aggressive lines of a motocross helmet on paper, you might end up with a shapeless oval that lacks the distinctive profile of professional racing gear. Drawing dirt bike helmets requires understanding their unique teardrop structure, angular protrusions, and functional elements that set them apart from ordinary headgear. Whether you’re illustrating for a design portfolio, creating custom graphics, or simply honing your technical drawing skills, mastering this specialized subject elevates your artwork from amateur to professional.
This guide cuts through the frustration of inaccurate helmet proportions by revealing precise construction methods used by industry illustrators. You’ll discover exactly where to position the critical 30-degree chin bar angle, how to correctly curve the visor for authentic debris deflection, and why ventilation slots follow specific airflow patterns rather than random placement. No more guessing at proportions—these techniques deliver accurate dirt bike helmet drawing results from your very first sketch.
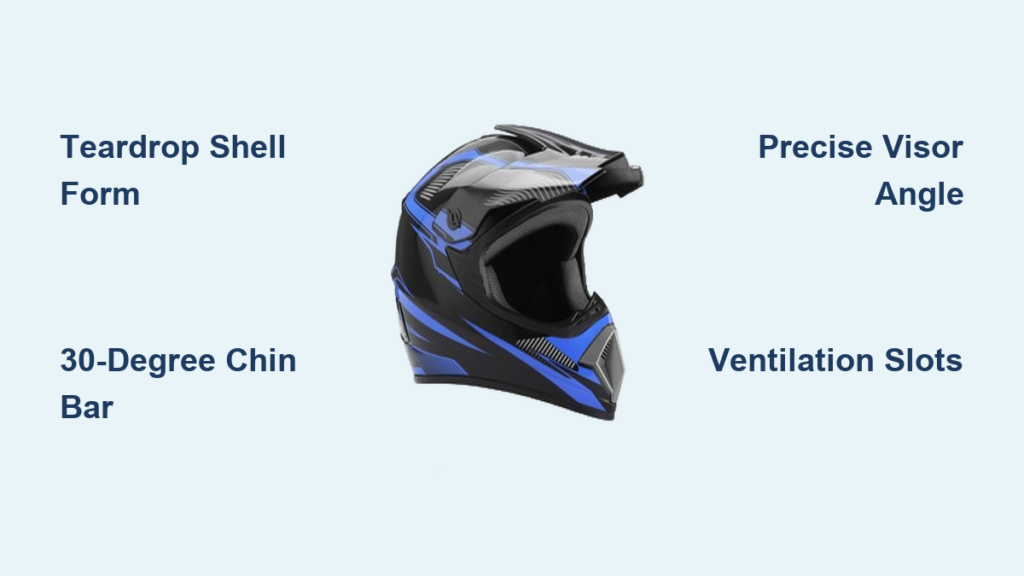
Create Accurate Teardrop Shell Form with Proper Chin Bar Angle
The foundation of any convincing dirt bike helmet drawing starts with getting the shell structure right—before adding any details. Most beginners draw perfect ovals, but real motocross helmets feature strategic extensions that serve critical safety functions.
Begin with a 14-15 inch long oval as your base shape, then immediately modify the lower front third. Draw the chin bar extending downward at a precise 30-degree angle, protruding 3-4 inches forward from the main shell. This isn’t just stylistic flair—the protrusion creates essential facial protection during crashes. Notice how the transition from main shell to chin bar should flow smoothly, without sharp angles that would compromise structural integrity.
Position your eye port center at exactly 40% from the front edge of the helmet. This specific placement ensures proper rider visibility while maintaining maximum facial coverage. The top curve should follow a smooth arc from forehead peak to rear base, but avoid perfect symmetry—real helmets flatten slightly at the crown where ventilation systems sit. These subtle asymmetries separate professional illustrations from generic helmet drawings.
Execute Perfect Side Profile Construction in 3 Key Steps
The side profile reveals a dirt bike helmet’s true aerodynamic character and functional design. This angle clearly shows the relationship between shell, visor, and rear spoiler that defines motocross helmet aesthetics.
Establish Your Construction Framework First
Start with light 2H pencil lines to sketch your base oval. Mark the chin bar starting point at the lower front quadrant, extending forward and down at that critical 30-degree angle. This initial construction determines every other measurement on your drawing, so take time to get it right before committing to darker lines.
Position Critical Components with Precision
Mark three key reference points: the eye port center (40% from front edge), visor attachment (1.5 inches above eye port), and rear spoiler start (70% back from front). These measurements aren’t arbitrary—they reflect actual engineering requirements for rider safety and performance. The rear spoiler’s 2-3 inch protrusion creates essential downforce at high speeds.
Add Functional Ventilation Architecture
Sketch forehead vents as three horizontal slots measuring 3mm height × 15mm length each. Position chin bar vents vertically as 2-3 slots at 4mm wide × 20mm long. These aren’t decorative—they follow precise airflow patterns that cool riders during intense competition. Proper ventilation placement instantly elevates your dirt bike helmet drawing from generic to authentic.
Avoid These 3 Common Helmet Drawing Mistakes
Even experienced artists make critical errors when illustrating dirt bike helmets. Recognizing these mistakes early saves hours of frustrating revisions and delivers professional-quality results faster.
Fix the Perfect Oval Trap
The most frequent error? Drawing a smooth oval without integrating the angular chin bar protrusion. Real helmets extend forward in a distinct 30-degree angle—not as a separate piece but as a continuous flow from the main shell. To correct this, imagine the helmet “growing” forward rather than having a chin bar “attached” to an oval.
Correct Visor Misalignment Immediately
Amateur drawings often feature straight horizontal visors that sit too low, resembling baseball caps rather than motocross gear. Professional helmets angle upward 15-20 degrees from horizontal for proper debris deflection. Use the line extending from the eye port’s upper edge as your guide—the visor should follow this natural trajectory.
Eliminate Flat Appearance in Side Views
Side profiles frequently lack depth, making helmets look like cardboard cutouts. Add subtle curves to shell sides using elliptical guides that follow the helmet’s 3D form. Imagine cross-sections through the helmet—you’re drawing a volumetric object, not a flat shape. This technique instantly adds realism to your dirt bike helmet drawing.
Replicate Brand-Specific Design Elements Authentically

Different manufacturers imprint distinct personalities on their helmets. Capturing these nuances transforms your dirt bike helmet drawing from generic to instantly recognizable.
Fox Racing Helmet Characteristics
Fox helmets feature aggressive angular vent designs with knife-sharp edges that demand precise line work. The visor sweeps forward dramatically, often exceeding 20 degrees of upward angle. When illustrating Fox gear, emphasize large contrasting logos (like bright orange against matte black) that dominate the side panels with bold placement.
Alpinestars Styling Techniques
Alpinestars favors rounded vent openings backed with visible mesh patterns that require careful detailing. The brand integrates logos subtly into vent arrangements rather than prominent side placements. Focus on teardrop-shaped rear spoilers and sophisticated monochromatic color schemes with texture variation that define Alpinestars’ premium aesthetic.
Bell Helmets Heritage Details
Classic rounded shell shapes characterize Bell’s design language. When drawing Bell helmets, use gentle visor curves with minimal upward angle—typically 10-15 degrees. Vent placements should appear precise and small, reflecting decades of refinement. Modern Bell helmets blend traditional styling cues with contemporary materials, so balance heritage elements with current design trends.
Optimize Digital Rendering Workflow for Professional Results
Professional dirt bike helmet drawings demand organized digital execution. A strategic layer structure separates competent work from exceptional illustration.
Implement Strategic Layer Organization
Create four essential layers: Base Shell Outline for primary construction (keep this separate for easy modification), Ventilation Details to prevent smudging when adjusting graphics, Graphics and Decals as a transparent overlay for experimentation, and Highlights and Shadows as your final effects layer. This structure lets you refine individual components without affecting the entire drawing.
Configure Precision Brush Settings
Use hard round brushes at 80-100% hardness for clean construction lines that define the helmet’s structure. Switch to soft airbrushes at 0-20% hardness for smooth gradients on curved surfaces. Apply texture brushes specifically for differentiating matte shell areas from gloss sections—this subtle variation sells the realism of your dirt bike helmet drawing.
Follow Resolution Best Practices
Work at 3000×3000 pixels minimum with 300 DPI resolution to maintain print quality while allowing web flexibility. Always start in RGB mode for screen viewing, converting to CMYK only for final print preparation. This workflow ensures your dirt bike helmet drawing looks professional across all output formats.
Apply Realistic Color Techniques That Sell Your Illustration
Color transforms technical drawings into compelling illustrations. Understanding professional color distribution prevents muddy or unrealistic schemes that undermine your dirt bike helmet drawing.
Distribute Colors According to Industry Standards
Allocate 70% of surface area to your main shell color—this establishes visual dominance. Reserve 20% for accent colors in vent areas and edges to create depth. Limit graphic elements (numbers, logos, stripes) to just 10% of the surface. Add metallic effects through strategic highlights that comprise approximately 5% of the total composition.
Mix Shadows for Authentic Depth
Create base shadows 20% darker than main colors for subtle dimension. Apply core shadows at 40% darkness with cool undertones (like adding blue to red) where light doesn’t reach. Enhance realism with reflected light that adds 10% brightness using warm tints (yellow to orange). Define edges with rim lights using pure white or 90% tints for dramatic definition that pops off the page.
Master Traditional Media Techniques for Tactile Artistry
Not every dirt bike helmet drawing requires digital tools. Traditional methods offer unique character and satisfaction that digital can’t replicate.
Progress Through Pencil Grades Strategically
Start with 2H pencils for initial construction—light lines allow easy correction without paper damage. Move to HB pencils for detail work and medium tones that establish form. Save 4B-6B pencils for dramatic shadows and bold final lines that define the helmet’s structure. Use blending stumps for smooth transitions between tones, especially on curved surfaces.
Execute Marker Rendering with Professional Results
Build depth with cool gray markers at 20%, 40%, and 60% values as your foundation. Add warm gray accents for highlight depth that creates dimension. Apply white gel pens for final highlights and reflections on gloss surfaces. Use color markers sparingly for brand-specific accents—remember that less is often more with professional marker work.
When you consistently apply these precise construction techniques and industry-specific details, your dirt bike helmet drawing will stand out with professional authenticity. Remember that accurate proportions—not just flashy graphics—define convincing motocross helmet illustrations. Start with side profiles to master the fundamental structure, then progress to complex angles as your skills develop. Every championship-winning helmet design began as a simple sketch—your next dirt bike helmet drawing could be the blueprint for the next generation of racing gear.