
Your dirt bike deserves more than haphazard tie-downs and cramped quarters during transport. A properly configured dirt bike trailer transforms chaotic loading sessions into efficient operations that protect your investment and streamline trail access. Whether you’re hauling one bike to weekend trails or managing a racing fleet, the right setup prevents costly damage and saves hours of frustration. This guide reveals exactly how to configure your trailer for maximum security, efficiency, and convenience—without wasting money on unnecessary features.
Most riders learn the hard way that generic utility trailers won’t cut it for dirt bikes. Proper dirt bike trailer setups include specialized hardware that keeps bikes stable during transport while accommodating essential gear. The difference between a professional setup and a makeshift solution often comes down to three critical factors: trailer type selection, securement system choice, and interior organization. Get these right and you’ll spend less time wrestling with straps and more time riding.
Match Your Trailer Type to Riding Frequency
Choosing between enclosed, open, and folding trailers determines your entire setup strategy and budget. Your decision should reflect how often you ride and what you’ll transport beyond the bikes.
Enclosed trailers provide complete weather protection and security but add significant weight that impacts fuel economy. The extra cost pays off for racers who need mobile workshop capabilities—walls become mounting surfaces for tool racks, and V-nose areas transform into functional workspaces. However, the obstructed rear visibility requires additional mirror setups or camera systems for safe towing.
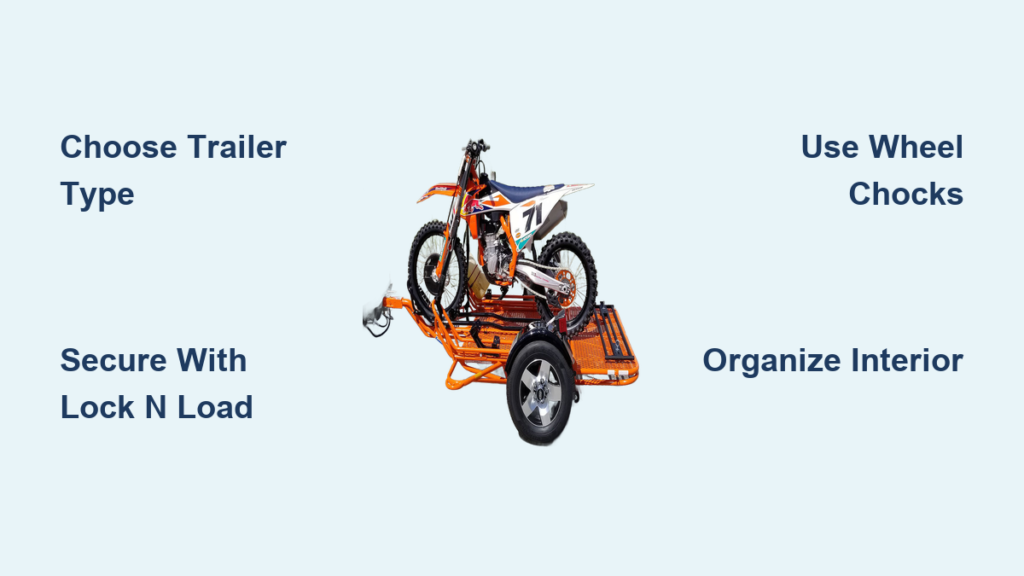
Open trailers offer the best value for weekend riders with one or two bikes. Without walls or roof, you’ll save $1,500-$3,000 compared to enclosed options while gaining natural rear visibility. The open design works perfectly with systems like the Lock N Load Pro that secure bikes without bulky webbing. Just remember to invest in quality bike covers for unexpected weather.
Folding trailers serve riders with severe storage limitations but sacrifice cargo space. These compact designs fit in small garages when folded but provide zero room for gear inside—everything must transport in your tow vehicle. The tradeoff makes sense for solo riders who only need their bike and minimal equipment at the trail.
Fit Your Trailer to Bike Count (Not Just Bike Size)
Selecting the wrong trailer size creates impossible loading scenarios and potential damage during transport. Get this wrong and you’ll struggle with every trip to the trails.
Single dirt bikes need just 4×6 to 5×8 feet of space—enough for the bike plus basic tie-downs and minimal gear. This compact size means easier storage and less demanding towing requirements for your vehicle. Avoid oversized trailers that waste money and fuel when you only transport one bike.
Two-bike configurations require minimum 5×8 feet to prevent handlebar contact during transit. Load bikes facing opposite directions (front to front) for maximum spacing. Traditional ratchet straps consume valuable width with their angled webbing, making multi-bike loading tighter. The Lock N Load Pro system solves this problem by using compact mounting plates that eliminate bulky webbing entirely.
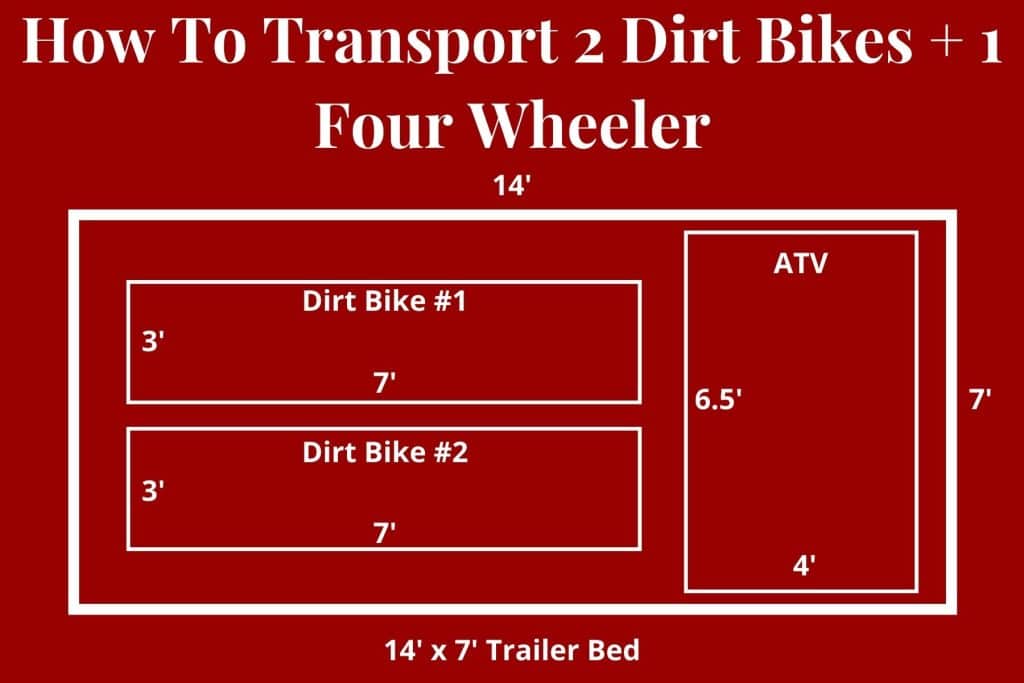
Three-bike transport demands at least 6×10 feet—6×12 feet provides superior flexibility for gear and equipment. While three bikes can technically squeeze into a 5×8 trailer, this arrangement leaves zero room for additional cargo. Using three Lock N Load Pro systems creates the most space-efficient solution compared to traditional strap configurations.
How to Position Bikes for Maximum Stability
Position bikes carefully before securing to prevent damage during transport. On open trailers, center the bike between rails with the front wheel in the chock. For enclosed trailers using Lock N Load Pro, slide the assembly toward the bike’s center after positioning. Take time to verify the bike sits level and centered—rushing this step causes problems down the road.
Critical Tie-Down Configuration Mistake Riders Make
Insufficient triangulation causes bikes to fall during transport. D-rings positioned too close together and too far forward create unstable configurations. Position outside D-rings against trailer walls with center D-rings spaced appropriately between bikes. Always check that the front wheel sits against chocks with tie-down points providing substantial angular separation.
Install the Right Bike Transport System
The method you use to secure bikes affects both safety and loading convenience. Understanding available options prevents costly damage to fork seals and suspension components.
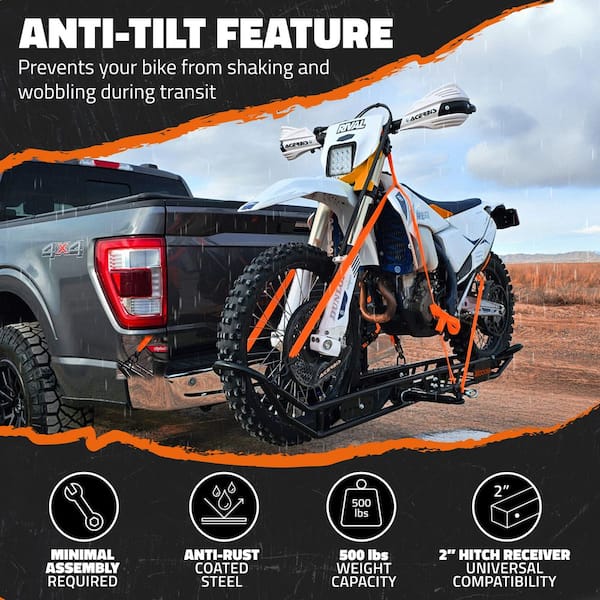
The Lock N Load Pro from Risk Racing represents the premium solution for dirt bike trailers. This system minimizes loading effort while securing bikes more effectively than traditional methods. Installation involves mounting a plate to the trailer floor, positioning the bike, and sliding the Lock N Load assembly toward the bike’s center. Extended jaws contact both footpegs evenly, securing the bike without excessive suspension compression that damages fork seals.
Traditional ratchet straps remain widely used despite their disadvantages. These systems require compressing front suspension to achieve secure mounting, potentially degrading fork seals through repeated stress. The bulky webbing creates additional effective width that complicates multi-bike loading. However, lower cost and universal compatibility keep traditional straps viable for occasional riders.
Wheel chocks work alongside tie-down straps to prevent front-wheel movement during transport. Proper chock positioning ensures the bike remains stable even during hard braking or acceleration—critical for maintaining bike alignment during transit.
Organize Your Trailer Interior for Maximum Efficiency

Enclosed trailer interiors benefit from thoughtful organization that balances transport capacity with functional workspace. Effective setups maximize every inch while keeping gear accessible.
V-nose cabinets utilize previously wasted space at the trailer front, providing storage for tools, fuel jugs, and small parts. A countertop surface in this area creates a work surface for carburetor adjustments and other maintenance tasks. Many users install removable wheel chocks in the V-nose area, allowing conversion to sleeping accommodations when needed.
E-track systems mounted to walls and floors provide infinitely configurable anchor points for securing cargo, fuel jugs, and equipment. This modular approach adapts to changing needs without requiring permanent modifications.
Protective flooring transforms trailer interiors for functionality and safety. Rubber coin flooring provides excellent traction when wet, ensuring sure-footed movement during loading in boots or shoes. Alternatively, waterproof textured paint on floors and approximately 18 inches up the walls creates complete protective surface that prevents slippery conditions.
Essential Accessories You Can’t Skip
Beyond basic transport systems, several accessories significantly improve trailer functionality and convenience.
Trailer ramps deserve careful consideration as loading safety depends on their design. Built-in ramp doors eliminate separate ramp handling but add weight. Standalone ramps require storage space but offer flexibility across different trailer configurations. Long ride-up ramps provide low loading angles that reduce strain during bike positioning.
Fuel transport requires specific solutions to prevent sliding and spills. EZ Utility Jugs include floor mounting systems that secure gas jugs in place. Matching Hose Bender and Vent Cap products include seals preventing fuel fumes from escaping into enclosed trailer interiors—a significant safety consideration.
Overhead cabinet systems maximize vertical storage space while keeping helmets, boots, and riding gear secure during transport. Trailer door cabinets provide quick access to frequently used items like oil filters and tools.
Maintenance Must-Do’s Before Every Ride
Regular maintenance prevents roadside failures that ruin riding trips. Implement these checks before every journey:
- Verify wheel bearing condition by checking for unusual noise or excessive play
- Check tire pressure (typically 50 PSI cold) and inspect sidewalls for dry rot
- Test all lighting functions including brake lights, turn signals, and running lights
- Inspect electrical connections for corrosion that could cause lighting failures
Avoid These 3 Costly Setup Mistakes
Learning from others’ errors prevents frustration and expense during your trailer setup journey.
Inadequate ventilation creates condensation problems in enclosed trailers. Small corner vents positioned diagonally from each other combined with window ventilation help manage humidity in most climates.
Neglecting floor protection leads to slippery conditions and structural damage. Even enclosed trailers benefit from textured waterproof paint or rubber flooring that protects against moisture intrusion.
Rushing the loading process causes improper bike positioning that leads to damage during transport. Take time to verify bike alignment and security before every trip—this simple step prevents most transport-related damage.
The best dirt bike trailer setup depends entirely on your specific circumstances: bike count, riding frequency, storage space, and budget. Match your trailer type to your actual needs, invest in proper securement systems, and organize for efficiency. When configured correctly, your dirt bike trailer becomes a reliable extension of your riding experience—getting you to the trails faster, safer, and with less frustration.


