
Is your dirt bike sputtering, losing power, or refusing to start smoothly? A misadjusted carburetor could be the culprit behind these frustrating performance issues that leave riders stranded on the trail. Proper carburetor adjustment ensures your engine receives the perfect air-fuel mixture for reliable power delivery and smooth operation across all riding conditions. Without the right balance, you’re either wasting fuel with a rich mixture or risking engine damage with a dangerously lean setting. This guide walks you through the precise steps to diagnose mixture problems and make accurate carburetor adjustments—whether you’re preparing for high-altitude riding, troubleshooting starting issues, or fine-tuning for maximum performance.
Identifying Common Carburetor Adjustment Problems

Before grabbing your screwdriver, you need to correctly diagnose whether your performance issues stem from carburetor mixture problems rather than other mechanical failures. Many riders mistakenly adjust their carburetor when the real issue lies elsewhere, potentially creating new problems while failing to solve the original one.
Recognizing Rich Mixture Symptoms
Black, sooty spark plug with wet deposits indicates excess fuel that isn’t fully burning in the combustion chamber. Your exhaust might emit thick, dark smoke even after the engine has warmed up, and you’ll likely notice reduced power despite strong initial acceleration. A rich condition often causes flooding during restart attempts when the engine is warm, requiring you to hold the throttle wide open to clear excess fuel. Fuel consumption will be noticeably higher than normal, and you might detect a strong gasoline smell around the exhaust.
Diagnosing Lean Mixture Issues
White or light gray spark plug with possible blistering on the electrode signals a dangerously lean condition where there’s too much air relative to fuel. Lean mixtures cause engine overheating even during moderate riding, with the cylinder head becoming too hot to touch after short rides. You’ll experience popping or backfiring through the exhaust, particularly during deceleration, and the engine may surge or hesitate at certain throttle positions. Most critically, a severely lean mixture can cause piston seizures within minutes of riding—resulting in expensive engine repairs.
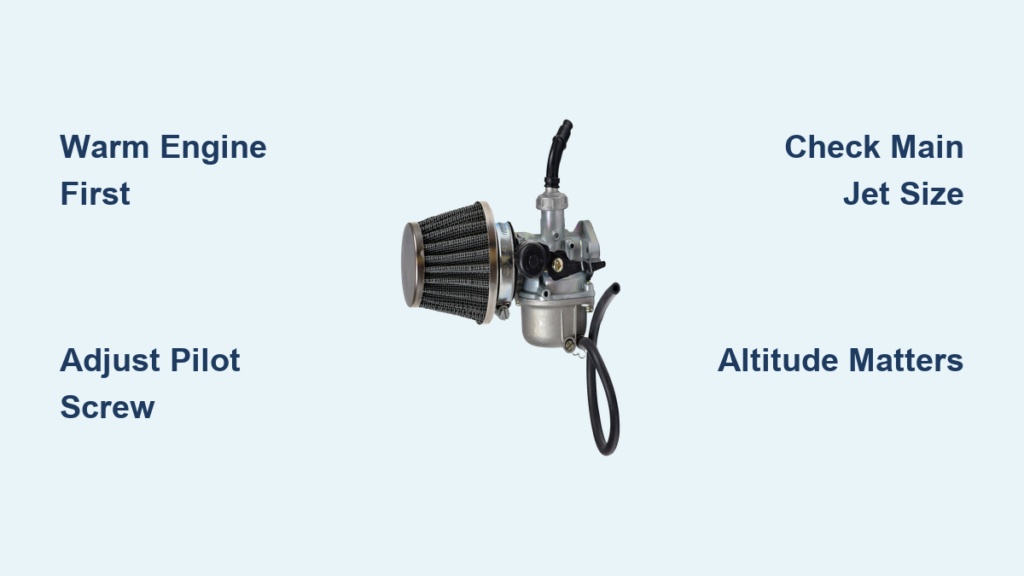
Essential Carburetor Components You Must Understand
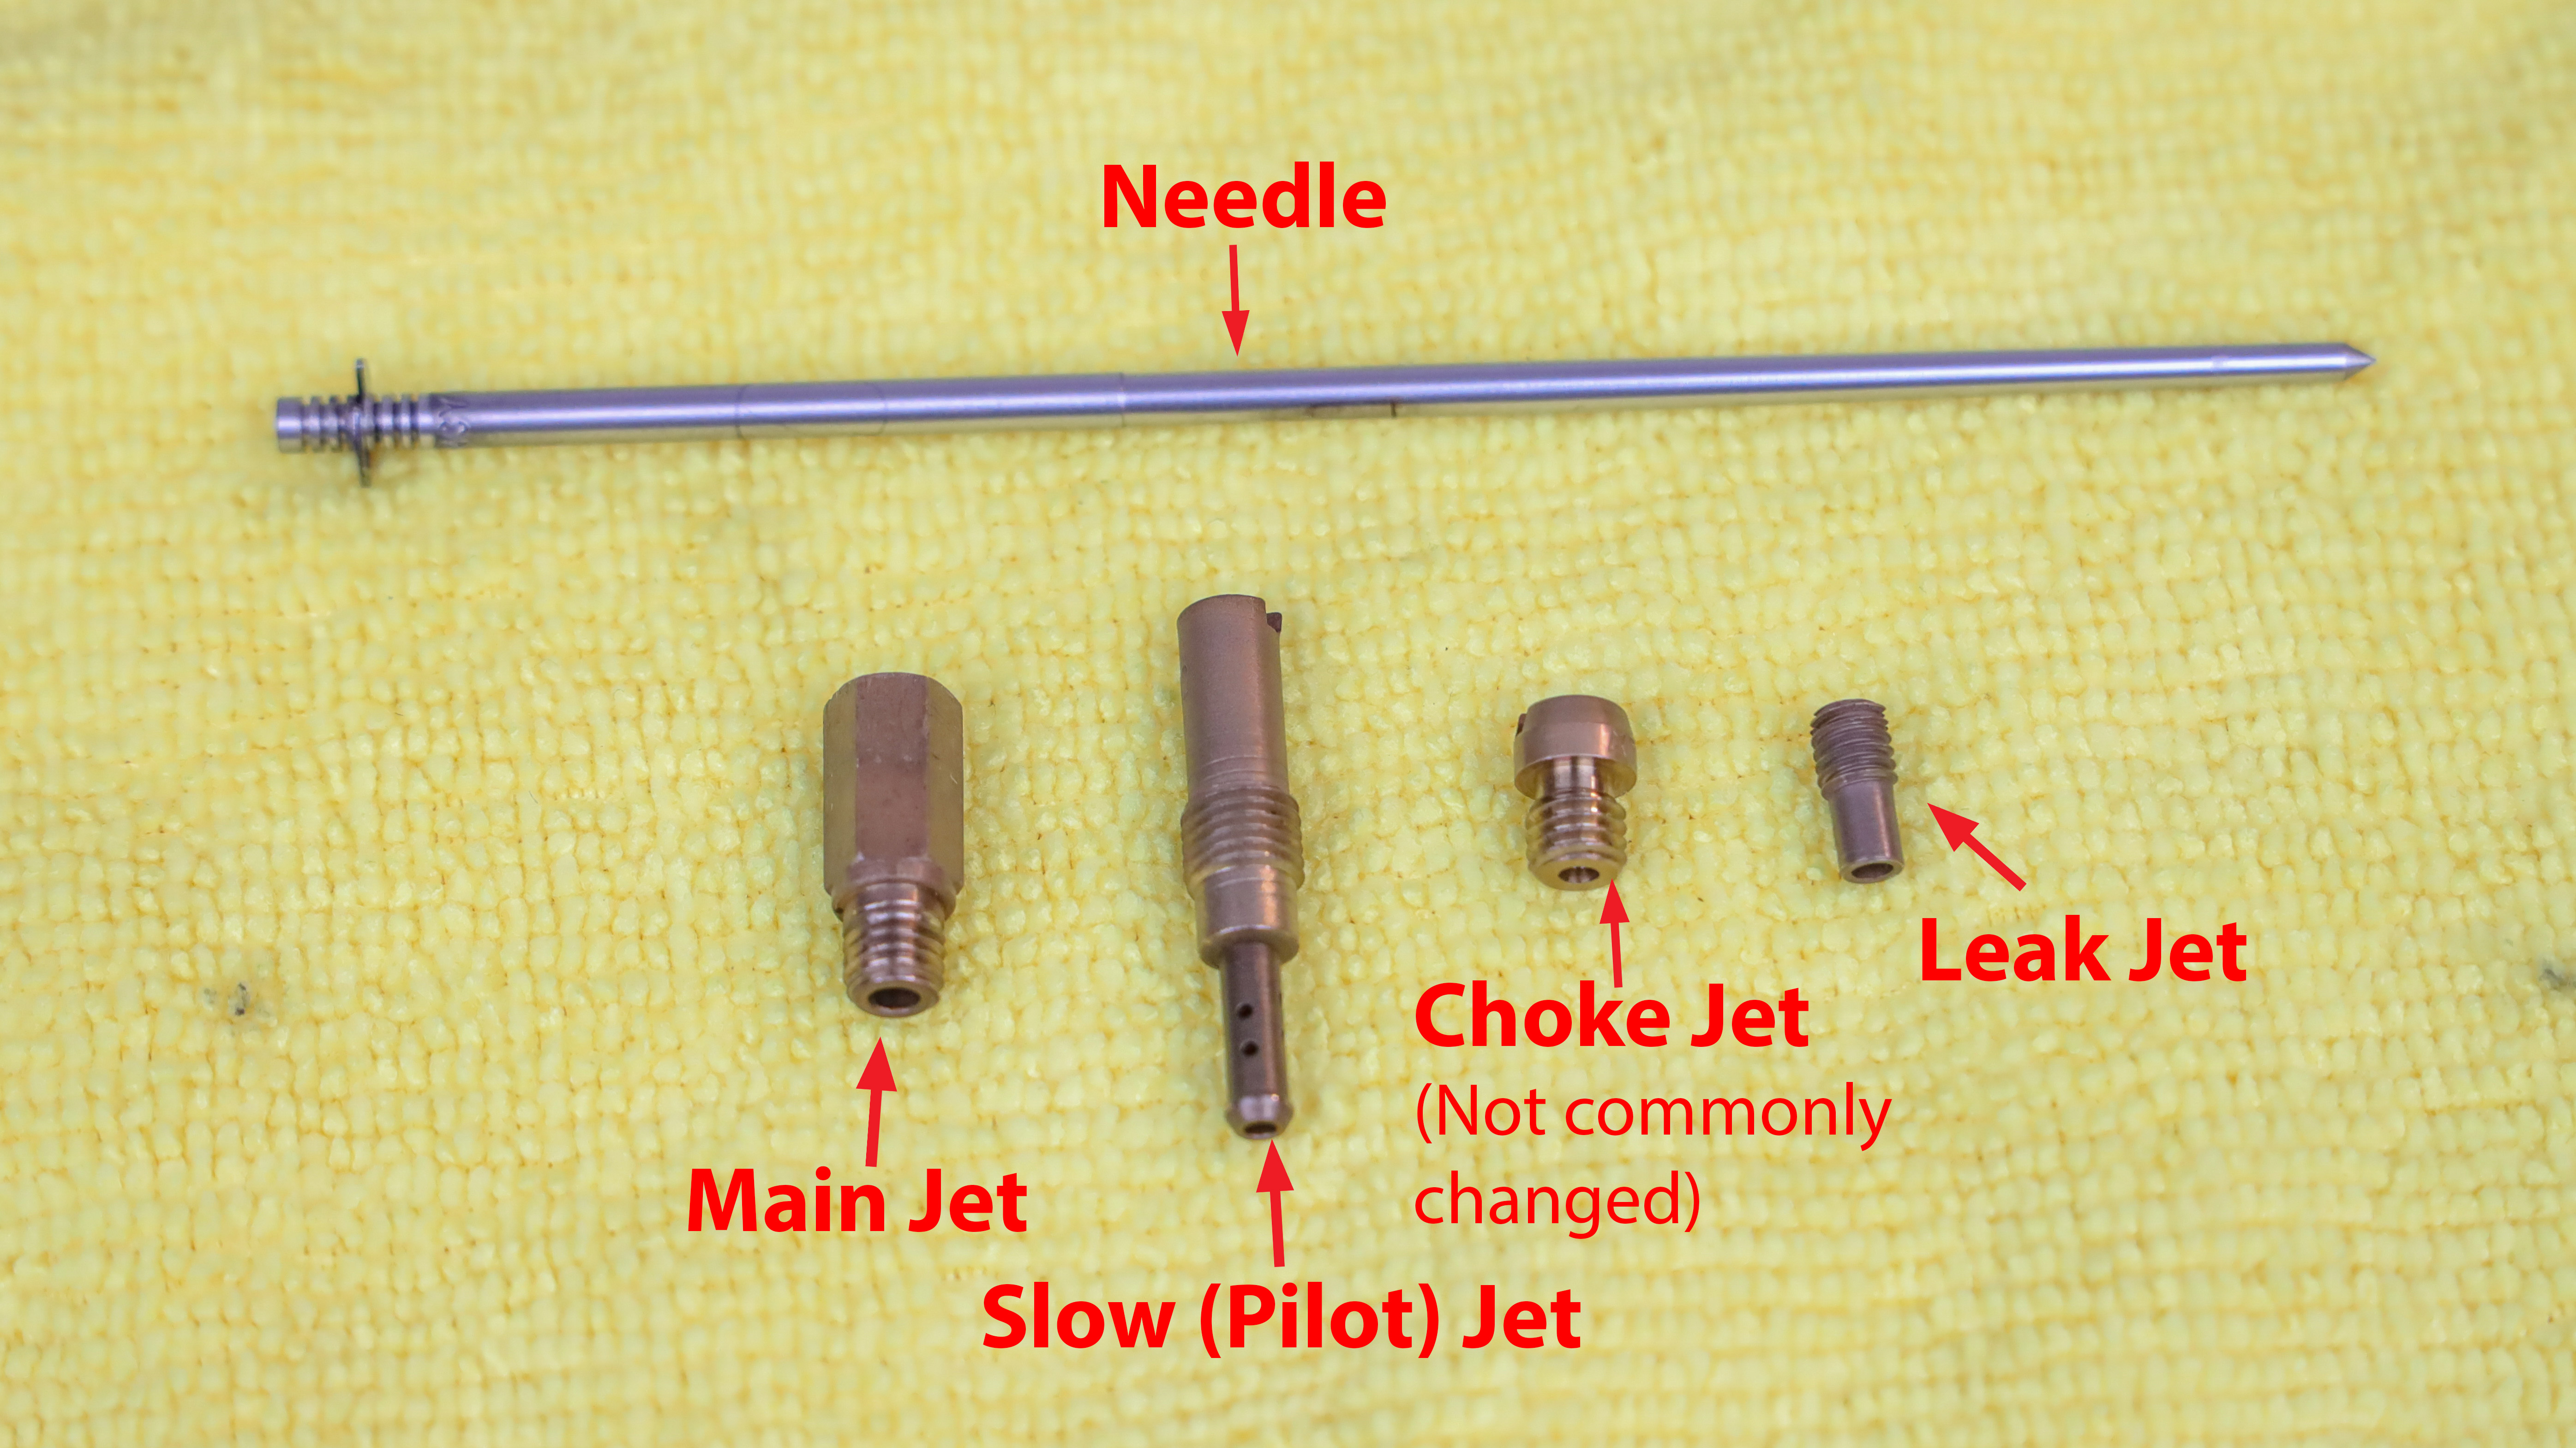
Main Jet Versus Pilot Jet Functions
The pilot jet (idle jet) controls fuel delivery during idle and low-throttle operation up to approximately 1/4 throttle position. This small brass component with a precisely drilled orifice determines your bike’s starting behavior and low-speed responsiveness. Adjusting the pilot circuit affects whether your bike idles smoothly or stalls when coming to a stop on the trail.
The main jet regulates fuel flow at 3/4 to full throttle positions where most riders experience performance issues. Unlike the pilot jet, you cannot adjust the main jet with external screws—you must physically replace it with a larger or smaller diameter jet depending on your altitude, temperature, and performance requirements. Choosing the correct main jet size makes the difference between crisp top-end power and a flat, unresponsive feeling at wide-open throttle.
Step-by-Step Carburetor Adjustment Procedure
Pre-Adjustment Preparation Requirements
Complete engine warm-up is non-negotiable before attempting any carburetor adjustments—ride your bike for at least 10 minutes to reach normal operating temperature. Cold engine settings differ significantly from running temperature specifications. You’ll need two critical tools: a flathead screwdriver with a narrow tip that perfectly fits your mixture screws, and a digital tachometer to accurately measure idle RPM during pilot screw adjustments. Never attempt adjustments with a cold engine or without proper tools, as you’ll create inaccurate settings that worsen performance.
Pilot Screw Adjustment Technique
Begin with your pilot screw turned to its factory default position (typically 1.5 turns out from lightly seated). Start your engine and let it idle. Using your tachometer, note the current idle RPM. Slowly turn the pilot screw clockwise (in) in 1/8 turn increments, waiting 10 seconds between adjustments for the engine to stabilize. When you reach the point where the idle speed begins dropping, back out counterclockwise to the position that produced the highest stable RPM. Mark this optimal position with a paint pen—this is your bike’s sweet spot for current conditions.
Main Jet Sizing Guidelines
Altitude changes require jetting adjustments—for every 3,000 feet above sea level, you generally need to drop one main jet size (smaller number). If you notice bubbling fuel in the overflow tube after riding, you’ve likely gone too rich with your main jet selection. Conversely, if your bike bogs dramatically when opening the throttle from mid-range to full throttle, you probably need a larger main jet. The correct main jet provides crisp throttle response without hesitation or popping through the exhaust when accelerating at wide-open throttle.
Critical Adjustment Mistakes to Avoid
Over-Tightening Mixture Screws
Forcing the pilot screw against its seat can damage the delicate tapered tip, creating a permanent lean condition even when “adjusted” correctly. Always turn screws gently until they lightly bottom out—never apply significant pressure. If you accidentally overtighten, you’ll need to replace the pilot screw rather than hoping adjustments will compensate for the damaged component.
Ignoring Environmental Factors
Temperature and humidity significantly affect your optimal carburetor settings. What works perfectly on a cool, humid morning will likely run too rich on a hot, dry afternoon. Always recheck your settings when environmental conditions change substantially, especially if you’re racing or riding competitively where maximum performance matters.
Altitude-Specific Carburetor Tuning
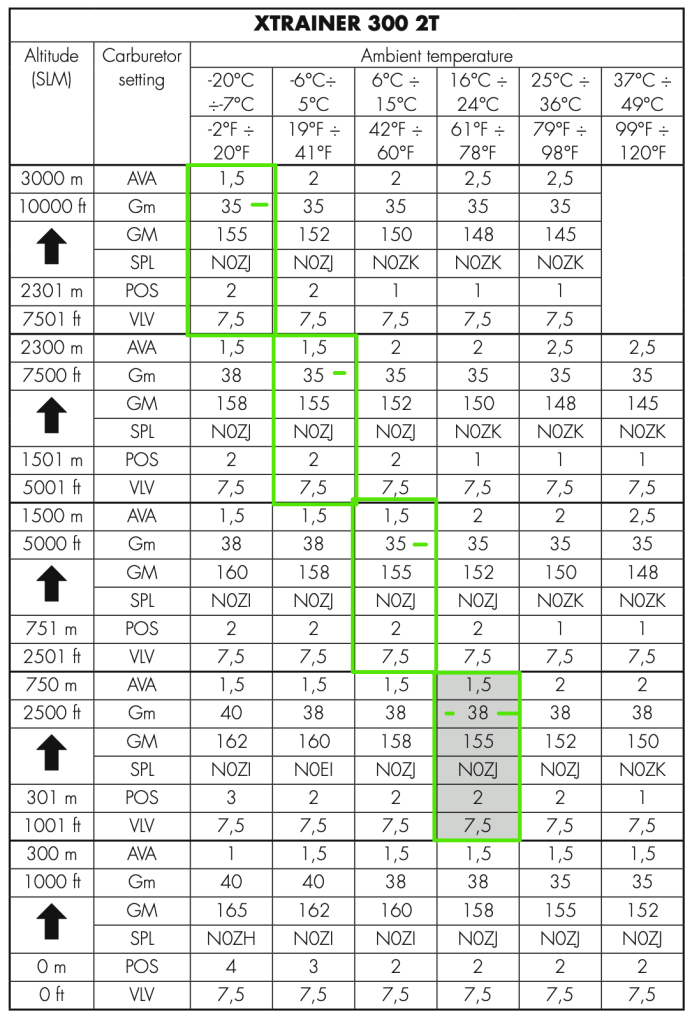
High-Altitude Adjustment Protocol
When riding above 5,000 feet elevation, begin by reducing your main jet size by two increments from sea level specifications. For example, if your bike uses a 160 main jet at sea level, try a 155 at 5,000 feet and a 150 at 8,000 feet. After changing the main jet, you’ll need to re-adjust your pilot screw as the entire fuel curve shifts with altitude changes. Test ride after each adjustment to confirm you’ve eliminated high-RPM flat spots while maintaining smooth mid-range power.
Recognizing Proper High-Altitude Settings
Your high-altitude jetting is correct when the engine accelerates smoothly through the entire RPM range without hesitation or popping. At full throttle, the bike should feel responsive without the “flat” sensation that indicates a lean condition at higher elevations. Remember that high-altitude settings will run too lean at lower elevations—you’ll need to switch back to larger jets when descending.
Maintenance Practices for Consistent Carburetor Performance
Regular Cleaning Schedule
Disassemble and clean your carburetor every 10 hours of riding time to prevent performance degradation from varnish buildup. Pay special attention to the pilot jet circuit which contains tiny passages easily clogged by fuel residues. Use carburetor cleaner specifically designed for motorcycle use and avoid compressed air which can force debris deeper into passages. Always replace the float bowl gasket during cleaning to prevent fuel leaks.
Storage Preparation Steps
Before storing your bike for more than 30 days, drain all fuel from the carburetor and run the engine until it stalls to prevent gum formation in critical passages. Never store with ethanol-blended fuel sitting in the carburetor—this causes varnish deposits that clog jets and require professional cleaning. For long-term storage, consider adding fuel stabilizer to the tank and running the engine briefly to circulate it through the system.
Final Note: A properly adjusted carburetor transforms your riding experience from frustrating to flawless, but precision matters more than speed when making these critical adjustments. Always make changes incrementally, testing thoroughly after each modification, and keep detailed notes of your settings for different conditions. When in doubt about your adjustments, consult your bike’s service manual for model-specific specifications or seek help from an experienced mechanic—forcing settings beyond recommended parameters risks expensive engine damage that far outweighs the time invested in proper carburetor tuning.


