
Your dirt bike’s gearing chart holds the key to unlocking dramatically improved performance without costly engine modifications. The right sprocket combination can make your motorcycle feel completely different on the trail—more responsive in technical sections, faster on straights, or better suited to your specific riding style. Whether you’re battling tight woods trails, tearing up a motocross track, or cruising desert terrain, understanding how to read and apply a dirt bike gearing chart represents one of the most cost-effective performance upgrades available to riders.
This guide delivers actionable insights you can implement immediately, showing exactly how small sprocket changes affect your bike’s character and providing model-specific recommendations for 2025 machines. You’ll discover why adding or removing just one tooth creates noticeable performance differences, learn which combinations work best for your riding discipline, and gain the confidence to tune your setup like a professional mechanic—without expensive guesswork.
How Your Dirt Bike’s Gear Ratio Transforms Performance
Your dirt bike’s gear ratio fundamentally determines the trade-off between explosive low-end torque and maximum top speed. Higher gear ratios (larger numbers) deliver more force to the rear wheel at the expense of top speed, while lower ratios (smaller numbers) prioritize velocity over acceleration. A 13/52 setup producing 4.00 ratio means your engine works significantly less to turn each rear wheel revolution compared to a 14/48’s 3.43 ratio.
Higher gearing (4.00+) provides immediate torque delivery ideal for:
– Technical rock gardens requiring crawling capability
– Tight woods sections where rapid throttle response matters
– Motocross tracks with frequent stop-and-go action
– Steep hill climbs demanding maximum pulling power
Lower gearing (3.50 or less) spreads power across a broader RPM range, benefiting:
– Desert racing where maintaining momentum is critical
– High-speed track sections requiring extended top-end
– Riders prioritizing fuel efficiency during long rides
– Situations where reduced engine heat prevents overheating
Professional test riders often optimize third-gear usability, especially on bikes with weak power transitions between second and third. Unlike expensive engine work, proper sprocket selection delivers immediately noticeable performance changes that make your bike feel more powerful or manageable depending on your needs.
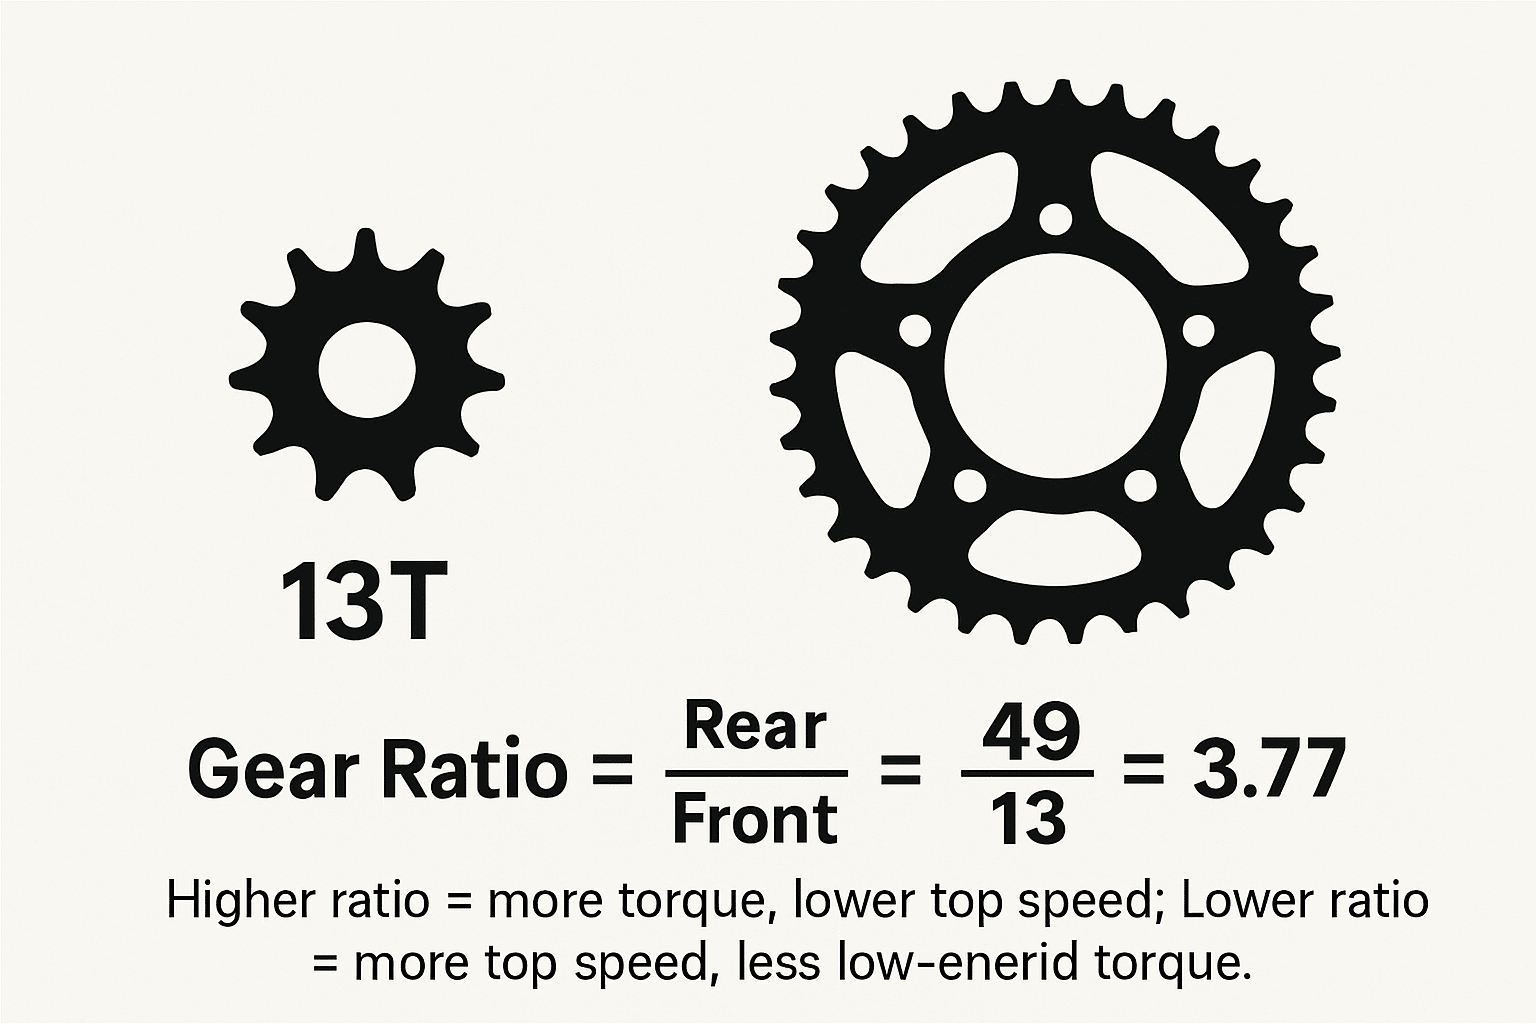
Calculating Your Exact Gear Ratio (Simple Formula)
Determining your current gear ratio requires just basic math: divide your rear sprocket’s tooth count by your front countershaft sprocket’s count. A 13-tooth front paired with a 50-tooth rear creates a 3.85 ratio (50 ÷ 13 = 3.85). This number serves as your baseline for understanding performance changes.
Follow these steps to calculate your ratio:
1. Count teeth on your front countershaft sprocket (typically 13-14 teeth)
2. Count teeth on your rear sprocket (usually 48-52 teeth)
3. Divide rear count by front count (52 ÷ 13 = 4.00)
4. Compare your result to standard ratios in a dirt bike gearing chart
Remember the critical 3:1 rule: changing one tooth on your front sprocket affects performance similarly to changing three teeth on the rear. Switching from 13-tooth to 14-tooth front equals adding three rear teeth, though chain angle differences create slight variations. This relationship helps you plan effective modifications without costly trial-and-error.
Top 5 Most Effective Sprocket Combinations for 2025
Balanced Trail Riding Setup (13/48 = 3.69)
This “happy medium” configuration works exceptionally well for riders splitting time between technical sections and faster open stretches. The 3.69 ratio provides respectable acceleration without sacrificing excessive top speed, making it perfect for general trail riding where terrain variety demands versatility.
Desert Racing Configuration (14/50 = 3.57)
The taller 3.57 ratio reduces chain wrap angle slightly, decreasing drivetrain friction while allowing your engine to operate at lower RPMs during high-speed sections. This setup particularly benefits 450cc four-strokes with abundant low-end torque that can afford to sacrifice some bottom-end pull.
Extreme Technical Terrain Setup (12/52 = 4.33)
This aggressive 4.33 ratio provides extreme torque multiplication for rock crawling and severe inclines. While top speed suffers significantly, the ability to maintain momentum through challenging obstacles makes this configuration invaluable for specialized applications.
Motocross Track Sweet Spot (13/50 = 3.85)
The popular 3.85 ratio offers strong acceleration exiting corners while maintaining enough top-end for straightaways. Many factory riders consider this their go-to configuration for average track conditions requiring both punch and speed.
East Coast Soft Dirt Optimization (13/51 = 3.92)
The slightly taller 3.92 ratio improves small-bump absorption through swingarm pivot relationships while helping riders access third gear more readily. This configuration particularly benefits riders on looser soil where traction management matters most.
Yamaha YZ250F/450F Gearing Upgrades That Actually Work
YZ250F: Fix Second Gear Weakness with 13/49
The 2025 Yamaha YZ250F arrives with stock 13/50 gearing, but experienced testers recommend switching to 13/49. This single-tooth reduction compensates for the 2024-2025 model’s reduced second-gear pulling power, allowing extended use of second gear before shifting. The YZ250F’s quick-revving engine demands frequent shifting, and the 13/49 setup alleviates this workload while improving corner exit performance.
YZ450F: Choose Between Two Winning Setups
For west coast hardpack conditions, maintain the stock 13/49 configuration. However, east coast riders with deep dirt should switch to 13/50 for better third-gear rolling speed through corners. Alternatively, the 14/52 setup delivers smoother roll-on characteristics with improved shock acceleration feel, reducing chain binding during rear suspension compression—ideal for heavier riders prioritizing chassis stability.
Kawasaki KX250/450 Perfect Sprocket Setup Guide
KX250: Maximize Corner Exit Power with 13/51
The 2025 KX250’s stock 13/50 gearing benefits significantly from upgrading to 13/51. This modification enhances third-gear roll-on power exiting corners without compromising second-gear usability. The redesigned airbox slightly reduces low-end recovery compared to 2024 models, and the extra rear tooth helps riders access the power band more quickly while maintaining acceptable chain wear.
KX450: Improve Small-Bump Absorption with 13/51
Initially met with skepticism, the 13/51 setup proves superior to stock 13/50 on the 2025 KX450. The configuration improves small-bump absorption through swingarm pivot relationships while tightening acceleration feel out of corners. Many riders previously used first gear in situations where 450s typically skip directly to second; the 13/51 gearing provides more immediate response for technical sections.
Honda CRF250R/450R Gearing Adjustments for Better Cornering
CRF250R: Boost Third-Gear Access with 13/51
While the stock 13/50 works adequately on smoother tracks, upgrading to 13/51 provides improved third-gear access through corners without sacrificing second-gear roll-on. The 2025 model’s improved transmission spacing makes this change particularly effective. CRF250R Works Edition owners need this modification only if they exceed 190 pounds body weight.
CRF450R: Enhance “Lugability” with 13/50
Honda’s 2025 CRF450R stock 13/49 configuration benefits from a 13/50 upgrade. The 50-tooth rear sprocket enhances cornering connectivity since Honda engines don’t handle riding a gear high as gracefully as competitors. While the 2025 model improves in this regard over 2024, the extra tooth still makes the bike significantly easier to manage through technical sections.
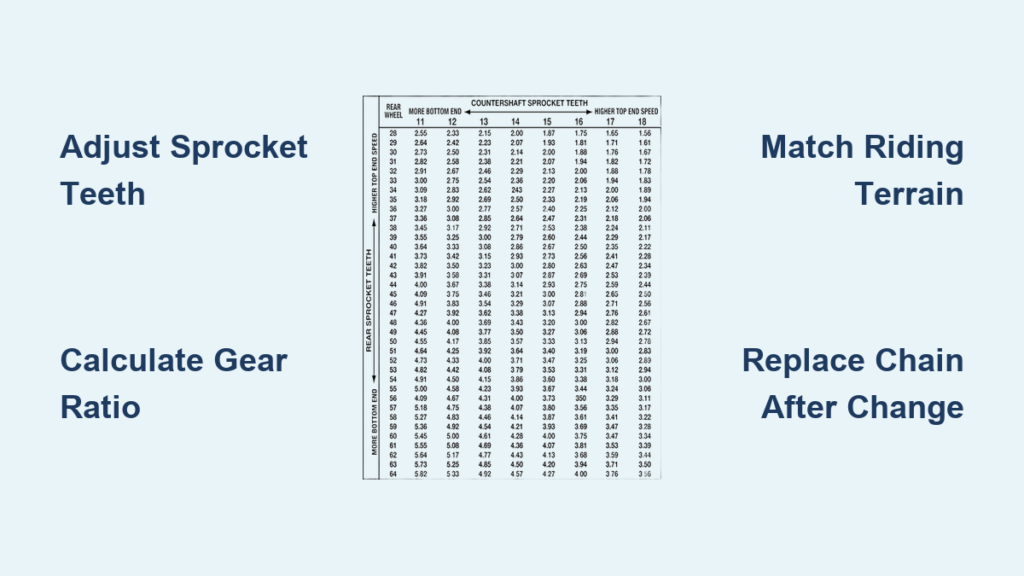
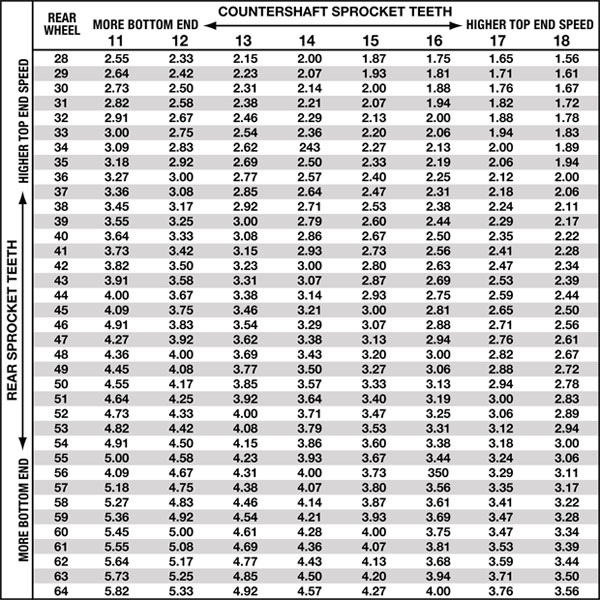
Reading & Using Dirt Bike Gearing Charts Like a Pro
Gearing charts provide visual representations of how different sprocket combinations affect performance. Instead of guessing, locate your current setup on the chart’s axes (front teeth on one side, rear teeth on the other), then trace to alternative combinations to predict performance changes before purchasing new components.
Follow these steps to use a gearing chart effectively:
1. Identify your current sprocket sizes on the chart
2. Determine your primary performance limitation (slow corner exits? weak top speed?)
3. Trace horizontally for front sprocket changes or vertically for rear sprocket adjustments
4. Calculate the new ratio and compare to your current setup
5. Consider the 3:1 rule when evaluating potential changes
Many online resources offer interactive calculators showing speed at various RPM points for each gear. For precise tuning, generate custom charts using your bike’s year, make, model, tire size, and maximum RPM to calculate final drive ratios for different sprocket combinations.
Critical Drivetrain Maintenance After Sprocket Changes
Always replace your chain when installing new sprockets—a worn chain accelerates wear on fresh sprocket teeth due to improper mesh patterns. Chains elongate over time, and this elongation causes hooked sprocket profiles that reduce power transmission efficiency.
Inspect these critical components regularly:
– Sprocket teeth for hooking or severe wear (indicates replacement needed)
– Chain for proper tension and lubrication
– Rear axle adjusters for correct alignment after sprocket changes
– Chain guides for excessive wear from altered chain path
Weight-conscious riders can reduce unsprung mass with aluminum sprockets, but remember they wear faster than steel. Trail riders should prioritize steel for longevity, while racers might prefer aluminum’s weight savings despite shorter service life.
First-Time Gearing Changes: Avoid These 3 Costly Mistakes
Mistake #1: Making Multiple Changes at Once
Beginners should change only one sprocket at a time—preferably starting with a single tooth change on the rear. This approach lets you clearly identify how each modification affects performance. Changing both sprockets simultaneously makes it impossible to determine which change created specific handling characteristics.
Mistake #2: Ignoring Chain Length Requirements
Different sprocket combinations alter total chain wrap. Check your chain tension after installation—most bikes have adjustment slots accommodating several teeth of variation, but extreme changes may require chain shortening or replacement. Proper tension prevents premature wear and ensures consistent shift quality.
Mistake #3: Discarding Original Sprockets
Keep your stock sprockets as backups for different riding conditions. A trail rider might maintain a taller setup for desert riding and a lower setup for technical woods, swapping between them seasonally. This approach eliminates the expense of multiple complete sprocket sets while preserving known-good configurations.
Dirt Bike Gearing FAQ: Quick Answers to Common Questions
What sprocket combination makes a dirt bike go faster? Achieving higher top speeds requires taller gearing—either increasing front sprocket size or decreasing rear sprocket size. A larger front sprocket provides better results than a smaller rear, as it reduces drivetrain friction by straightening the chain line.
Should I choose higher or lower gearing? Higher gearing (larger numbers) provides more torque for technical riding, while lower gearing (smaller numbers) prioritizes speed for open terrain. Match your choice to your primary riding environment—technical trails need higher gearing, while desert riding benefits from lower ratios.
Which gear ratio provides more torque? Maximum torque requires the highest practical ratio—smallest front sprocket with largest rear sprocket. This setup maximizes mechanical advantage to the rear wheel but significantly reduces top speed and increases engine RPM at any given road speed.
How do I read a dirt bike gearing chart? Locate your current front and rear sprocket sizes on the chart’s axes, find their intersection point for your current ratio, then trace horizontally or vertically to see how tooth count changes affect performance. Each movement represents a predictable shift in power delivery characteristics.
Final Gear Tuning Considerations
Dialing in the perfect dirt bike gearing chart configuration transforms your motorcycle’s character without expensive engine work. Small changes often produce substantial results—sometimes just one tooth makes the difference between a bike that feels sluggish and one that responds precisely to your inputs. Model-specific recommendations provide valuable starting points, but remember that optimal gearing varies based on rider weight, local terrain, and personal preference.
Before making changes, ask yourself:
– What specific performance issue am I trying to solve?
– Am I addressing corner exit power, top speed, or technical crawling?
– Have I tried the simplest possible change first?
Maintain proper drivetrain care after modifications to ensure consistent performance. With the knowledge from this dirt bike gearing chart guide, you can confidently select sprocket combinations that transform your riding experience—turning an average setup into a perfectly tuned machine that responds exactly how you need it to.


