
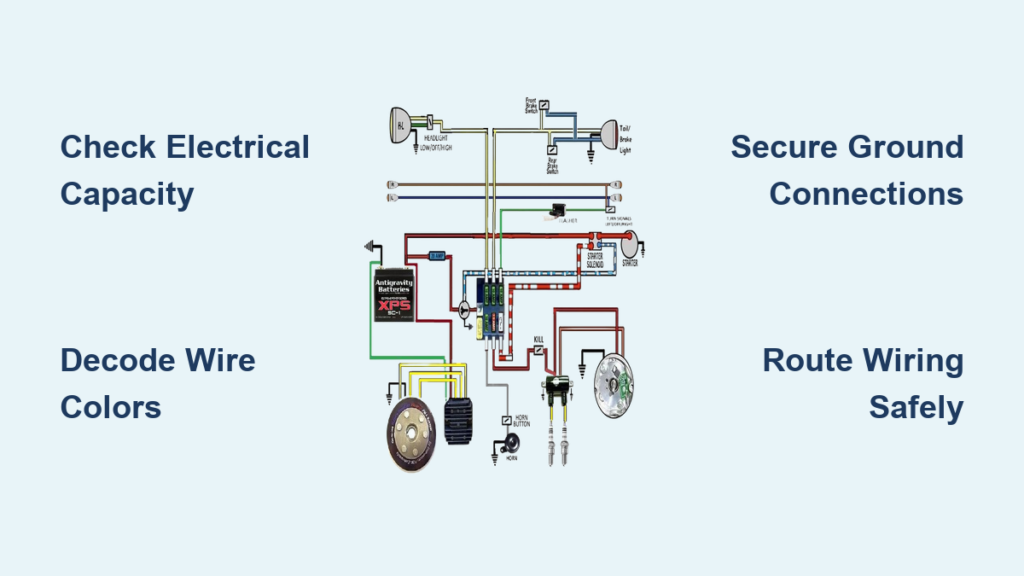
You’re barreling down a single-track trail at night, trusting your dirt bike headlight wiring to illuminate the path ahead, when suddenly your lights flicker and dim. This frustrating scenario happens daily to riders who underestimate the electrical demands of proper night riding. Most stock dirt bikes weren’t designed for serious lighting upgrades, and connecting high-wattage accessories without understanding your electrical limitations leads to dim lights, drained batteries, or worse—stranding you in the dark. This guide delivers everything you need to wire your dirt bike headlight correctly, from checking electrical capacity to troubleshooting common failures.
Yamaha’s model lineup perfectly illustrates why understanding dirt bike headlight wiring matters. The YZ450FX produces just 70 watts total electrical output (14 volts × 5.4 amps), with only about 38 watts available for lighting after accounting for the fuel pump’s 34-watt draw. Meanwhile, the WR450F generates approximately 140 watts—enough to power serious lighting setups without modifications. Installing a typical 120-watt KC Hilites racing setup on a YZ450FX without proper planning guarantees electrical problems. Following these steps ensures your lighting system performs reliably when visibility matters most.
Verify Your Dirt Bike’s Electrical Output Capacity

Before purchasing a single light pod, you must determine exactly how much power your dirt bike can realistically supply. Most riders make the critical mistake of assuming their electrical system can handle high-wattage lighting upgrades without verification.
Yamaha’s YZ450FX model produces approximately 70 watts total electrical output at 5000 RPM (14 volts × 5.4 amps), but after the fuel pump consumes 34 watts (2.4 amps × 14 volts), only about 38 watts remains for auxiliary lighting. This severely limits what you can realistically power without modifications. In contrast, WR models generate approximately 140 watts total, providing enough headroom for multiple high-intensity lights.
The consequences of exceeding your electrical capacity become obvious quickly: lights that brighten dramatically at higher RPM but dim dangerously at idle or low speeds, drained batteries that prevent restarts, and potential damage to electrical components. For serious night riding, you have three practical solutions:
- Reduce your lighting load to match available power
- Implement a split power configuration using external batteries
- Upgrade your stator and flywheel assembly to WR specifications
Decode Dirt Bike Headlight Wire Color Codes
Misidentifying wire functions causes more wiring failures than any other single factor during dirt bike headlight installation. Most manufacturers follow standard color coding conventions, but always verify with a multimeter before connecting.
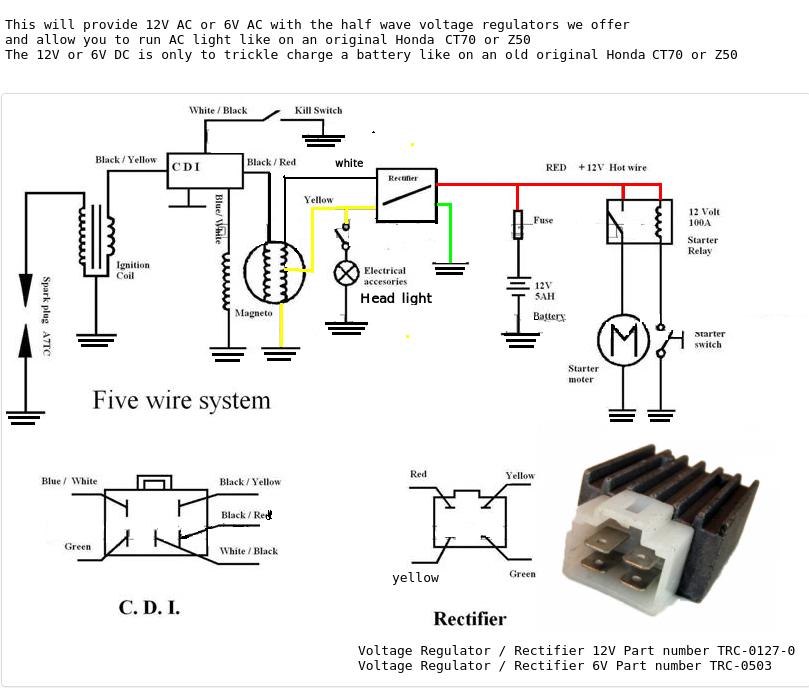
The brown wire almost always serves as the ground connection across lighting applications. This ground wire must connect to the chassis or negative battery terminal to complete the circuit—skipping this connection causes flickering or complete failure. The green wire typically functions as the hot power wire, though its specific role varies:
- In running light configurations: constant power when ignition is on
- In three-lead assemblies: often serves as the common ground
- On secondary bulbs: provides power for Euro-style running lights
Multi-function headlight assemblies use additional color codes:
– Blue wire: high beam power
– White wire: low beam power
– Brown wire on secondary bulbs: constant ignition power
Pro tip: Remove the headlight assembly cover to visually confirm where each wire terminates. This eliminates guesswork and prevents miswiring that could damage your lighting components.
Implement Reliable Power Source Configurations
Your choice of power source configuration determines whether your lighting system operates consistently or leaves you stranded with a dead battery. Each approach has specific applications depending on your riding style and electrical capacity.
Direct battery connection provides maximum available power by tapping directly into your primary power source. Route wiring from the front of the bike back along the right side (following the throttle cable path), securing with cable ties at 6-inch intervals. The critical disadvantage? Complete battery drain if lights operate too long without sufficient RPM to recharge. If using this method, install a high-durability battery like the Fire Power from WPS that withstands deep discharge cycles.
Split power configuration distributes the lighting load across multiple sources:
– 20-watt pod powered from bike battery
– 20-watt pod powered from external battery mounted on bike
– 80-watt light bar powered from portable battery in fanny pack
This approach requires more setup but provides reliable lighting for extended night rides without electrical system modifications. For a permanent solution, upgrade to a WR450F stator and flywheel assembly on your YZ450FX—this increases available power to approximately 100 watts for lighting, eliminating external battery needs.
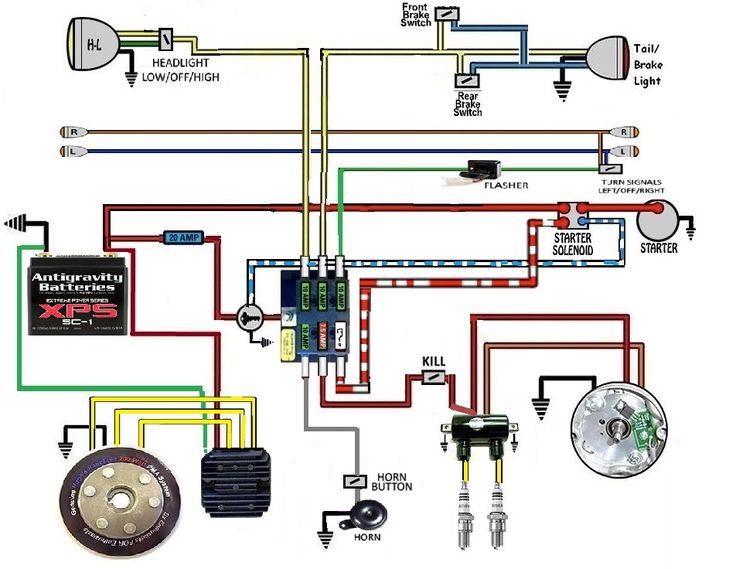
Route Headlight Wiring to Prevent Damage
Improper wire routing causes more wiring failures than poor connections. Vibration, heat, and debris quickly destroy unprotected wiring during off-road riding.
Follow these specific routing guidelines:
– Run all wiring along the right side of the bike, parallel to the throttle cable housing
– Secure wires with adhesive-backed mounts or cable ties every 6 inches
– Leave 2-3 inches of slack at connection points to accommodate suspension movement
– Use heat-resistant loom when routing near engine or exhaust components
Never secure wiring to moving parts or areas subject to debris impact. The headlight bucket area on many dirt bikes collects mud and moisture that degrades connections over time—route wires away from these trouble spots. Invest in standardized connectors across your lighting system; this allows quick swapping between bikes and power sources without rewiring.
Connect Headlight Components Securely
Poor connections cause more lighting failures than any other part of dirt bike headlight wiring. Follow these steps to ensure reliable connections:
- Identify all wire functions using a multimeter before making connections
- Strip only 1/4 inch of insulation from wire ends to prevent stray strands
- Use crimp connectors designed for automotive applications (never twist-on wire nuts)
- Apply heat-shrink tubing over all connections for vibration resistance
- Route ground wires directly to the battery negative terminal (not just any chassis bolt)
Pay special attention to ground connections—they deserve their own dedicated wire run back to the battery. The brown ground wire in your assembly needs a solid connection; poor grounds cause dim lights regardless of how well everything else is connected. Test connections by gently tugging on wires before final securing—loose connections fail when you need them most.
Troubleshoot Common Headlight Wiring Failures
Electrical problems manifest in predictable patterns that reveal the underlying issue quickly:
Complete light failure: Check these in order:
– Blown fuses (often overlooked)
– Loose battery connections
– Burned-out bulbs
– Broken wires near connection points
Flickering lights: This almost always indicates:
– Poor ground connection (wiggle wires to identify)
– Loose crimp in power circuit
– Damaged wire insulation causing intermittent shorts
Dim lights at idle that brighten at higher RPM: This classic symptom means:
– Electrical system overloaded for lighting load
– Requires reduced lighting intensity or power management changes
Intermittent operation during vibration: Indicates:
– Chafed wire with broken internal strands
– Loose connection in connector housing
– Requires wire replacement rather than repair
Upgrade Stator for Permanent Power Solutions
For frequent night riders, upgrading to a WR450F stator and flywheel assembly transforms your YZ450FX’s electrical capacity. This modification provides approximately 100 watts available for lighting—more than double the stock capacity.
The upgrade process requires mechanical confidence:
1. Remove left side cover, clutch assembly, and flywheel cover
2. Mark flywheel orientation before removal
3. Install WR stator (may require slightly enlarged mounting holes)
4. Reconnect wiring harness matching wire colors
5. Reassemble components in reverse order
After installation, monitor battery voltage during operation—fully charged systems should maintain 12.5-13.5 volts with lights on. Voltage consistently above 14.5 volts indicates potential overcharging that requires attention. This upgrade eliminates external batteries while supporting multiple high-intensity LED pods reliably.
Maintain Your Headlight Wiring System Reliably
Preventative maintenance catches problems before they leave you stranded:
- Inspect wiring monthly for chafing, cracked insulation, or corrosion
- Clean connection points with electrical contact cleaner and wire brush
- Check ground connections annually, applying dielectric grease to prevent corrosion
- Replace damaged wires immediately rather than waiting for complete failure
Build simple electrical checks into your pre-ride routine: verify all lights function properly, check for loose connections, and ensure wiring remains securely fastened. Carry emergency repair supplies including spare fuses, wire, connectors, and electrical tape for trail-side fixes.
Critical Dirt Bike Headlight Wiring Takeaways
Your dirt bike headlight wiring success depends on matching lighting demands to your electrical capacity. YZ450FX models provide only about 38 watts available for lighting after accounting for fuel pump requirements, while WR models offer approximately 100 watts—making the difference between reliable lighting and constant electrical problems.
Always verify wire functions with a multimeter before connecting, following standard color conventions (brown=ground, green=hot) but confirming actual functions. Route wiring along the right side of the bike following throttle cable housing, securing every 6 inches with sufficient slack for suspension movement.
For serious night riding, implement either split power configuration or stator upgrade to overcome stock electrical limitations. Test your complete system thoroughly at various RPMs before relying on it in darkness, monitoring battery voltage to ensure adequate charging. Regular maintenance inspections prevent the sudden failures that leave riders stranded when visibility matters most.


