
Nothing ruins a perfect riding day faster than discovering a critical issue mid-ride. Whether you’re a weekend warrior or seasoned rider, skipping your pre-ride inspection risks mechanical failure, accidents, and expensive repairs. A systematic dirt bike pre-ride checklist takes just 10-15 minutes but prevents 90% of trailside emergencies. This guide delivers the exact inspection sequence professional riders use to ensure their bike performs flawlessly from ignition to shutdown.
Critical Fluid Levels Check: Prevent Catastrophic Engine Failure
How to Verify Oil Levels Properly
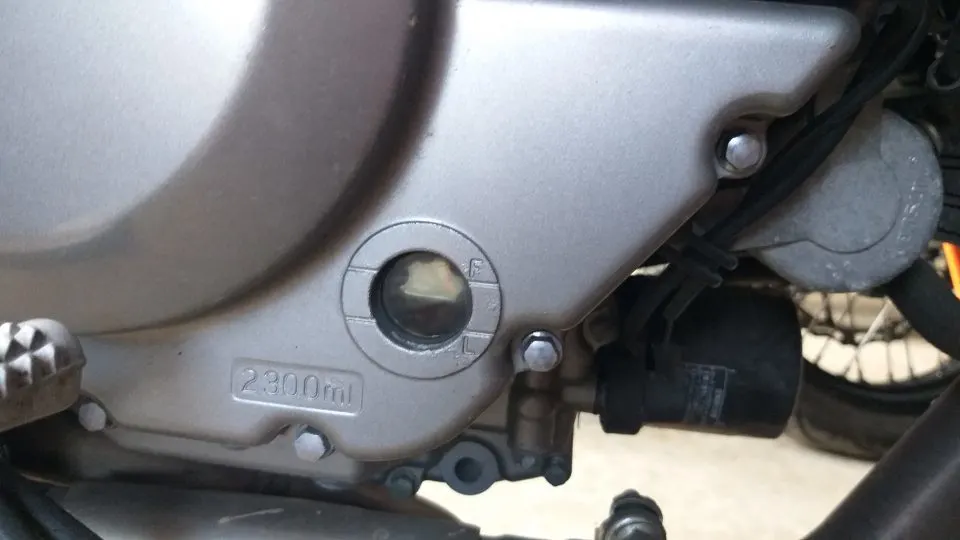
Checking your oil isn’t just about confirming it’s present—it’s about verifying it’s at the correct level and condition. Start with a cold engine for accurate readings on most 4-stroke models. Locate the dipstick, wipe clean, reinsert fully, then check again. The oil should sit between the minimum and maximum marks. For 2-stroke engines, inspect your premix ratio or oil injection system reservoir. Never assume oil levels remain constant between rides—engines consume oil during operation, especially after hard riding sessions.
Cooling System Inspection Protocol
Overheating causes more trail failures than any other single issue. With the engine cold, check coolant levels through the overflow reservoir (never open a hot radiator cap). The fluid should reach the “FULL” mark when cold. Look for telltale signs of contamination—a milky appearance indicates oil mixing with coolant, signaling potential head gasket failure. Squeeze coolant hoses to check for soft spots or cracks that could lead to leaks under pressure.
Tire and Wheel Integrity Verification
Proper Tire Pressure Measurement Technique
Most riders guess at tire pressure, but incorrect PSI dramatically affects handling and safety. Use a quality digital gauge (not the one at the gas station) when tires are cold. Trail bikes typically need 12-14 PSI front and rear, while hardpack or desert riding may require 14-16 PSI. Always check pressure with the bike on its side stand—weight distribution affects readings. Pro tip: Carry a portable air compressor with your kit; pressure drops significantly at higher elevations.
Wheel Spoke and Rim Damage Assessment
Spin each wheel slowly while watching the gap between tire and fender. Wobble indicates a bent rim or loose spokes. For spoked wheels, systematically squeeze opposing spokes to check tension—consistent “ping” sounds mean proper tension. Missing or loose spokes create weak points that worsen rapidly. Inspect rims for dents, especially near the valve stem, which can cause sudden air loss. A rim with even minor damage will fail under hard cornering.
Chain and Sprocket System Inspection
Chain Tension Measurement Method
Your chain needs precise slack—too tight accelerates wear, too loose causes derailment. With the bike on its stand, measure vertical play at the midpoint between sprockets. Most manufacturers specify 1.5-2 inches of movement. Adjust while the rear wheel is unloaded. Critical mistake: Never adjust chain tension with the bike on the ground—that gives false readings due to suspension compression.
Lubrication and Wear Pattern Analysis
Apply chain lube after cleaning, rotating the wheel to distribute evenly. Then wipe off excess—too much attracts dirt. Examine the chain for stiff links (visible as uneven movement when rotating) and check rollers for flat spots. Look at sprocket teeth—they should have uniform, symmetrical wear. Hooked or sharp teeth indicate excessive wear requiring replacement. A worn sprocket destroys new chains in hours.
Brake System Functionality Test

Hydraulic Brake Fluid Level and Contamination Check
Locate your brake fluid reservoir (usually near handlebars) and verify fluid sits between MIN and MAX lines. Clear reservoirs make this easy; colored ones require a flashlight. Fluid should be clear to amber—dark or cloudy fluid indicates moisture contamination requiring immediate flush. Squeeze the brake lever repeatedly with the bike off—consistent firmness means no air in the system. Sponginess signals air bubbles needing bleeding.
Brake Pad Thickness Measurement
Remove the inspection plug on your caliper (if equipped) or visually check through caliper slots. Most manufacturers specify minimum pad thickness of 2mm. Measure both inner and outer pads—uneven wear indicates caliper slide pin issues. Warning: Riding with worn pads damages rotors, doubling your repair costs. If you see metal backing through the pad material, do not ride.
Suspension and Steering Components Check
Fork Seal and Stanchion Inspection
Wipe fork tubes clean with a rag, then compress and extend slowly. Check for oil weeping around seals—minor dampness is normal, but visible dripping means seal failure. Run your fingers along stanchions feeling for scratches. Even small nicks will destroy new seals during installation. Check fork oil level by measuring sag when sitting on the bike—significant deviation from your baseline indicates leakage.
Steering Head Bearing Verification
Lift the front wheel off the ground and turn handlebars lock to lock. Smooth movement indicates proper bearing tension. Any notchiness or binding means bearings need adjustment or replacement. Check for play by holding the front brake and rocking the bike forward/backward—excessive movement damages triple clamps over time.
Electrical System and Controls Check
Throttle Response and Return Test
Roll the throttle slowly while watching the carburetor or throttle body. Movement should be smooth without sticking. Release the throttle—the cable must return instantly to idle position. Critical safety check: With the engine off, verify the throttle closes completely by looking through the airbox. Sticky throttles cause dangerous runaway acceleration on trails.
Lighting and Switch Functionality
Test all lights (headlight, brake light, turn signals if equipped) through their full range. Check kill switch operation by starting the bike then toggling the switch—it must kill the engine immediately. Verify neutral and gear indicator lights function correctly. Faulty switches often work intermittently before failing completely mid-ride.
Frame and Fastener Integrity Inspection

Critical Bolt Tightness Verification
Focus on high-vibration areas: axle nuts, triple clamp bolts, footpeg mounts, and engine mounts. Check with the proper torque specification—not just “hand tight.” Loose axle nuts cause wheel misalignment that destroys tires in minutes. Pro tip: Apply blue Loctite to critical bolts during maintenance—finger tight isn’t enough for off-road vibrations.
Frame Crack Detection Method
Clean the frame thoroughly before inspection. Look especially at stress points: swingarm pivot area, engine mounts, and head tube junction. Use a flashlight at a low angle to reveal hairline cracks. Paint chips alone aren’t concerning, but cracks beneath paint require immediate attention. Small cracks propagate rapidly under riding stress.
Final Operational Checks Before Ignition
Kickstand and Safety Switch Test
With the bike in neutral, kickstand down, attempt to start—shouldn’t start. Then kickstand up, should start immediately. Next, put in gear with kickstand down—engine should die when you release the clutch. This safety feature prevents accidental lurching. Many riders disable this switch, creating a dangerous situation during quick stops.
Engine Start-Up and Warm-Up Protocol
Start the engine and immediately check for unusual noises—ticking could indicate low oil, knocking suggests serious engine issues. Let the bike warm up fully (2-3 minutes) before riding. Listen for smooth idle—if RPMs fluctuate erratically, you have a carburetion or fuel injection issue needing attention before riding.
Post-Check Documentation and Maintenance Tracking
Digital Maintenance Logging System
Record all inspection findings in a dedicated app or notebook. Note chain adjustment positions, brake pad thickness, and fluid levels. This historical data reveals wear patterns—suddenly needing more chain slack indicates sprocket wear. Digital logs let you set automatic reminders for service intervals based on actual usage, not just time.
Problem Escalation Protocol for Potential Issues
Create a three-tier system for findings: “Ride Now” (minor issues), “Fix Before Next Ride” (moderate concerns), and “Do Not Ride” (critical failures). Chain with stiff links falls in “Fix Before Next Ride”—it might hold for one session but will likely fail soon. Any brake fluid leak is “Do Not Ride” regardless of severity. Be brutally honest with yourself about safety margins.
Essential Pre-Ride Gear Verification
Helmet Visor and Ventilation Check
Ensure your visor moves freely through all positions and locks securely. Test ventilation channels by blowing through intake vents—blockages reduce airflow dramatically. Check retention system webbing for fraying. A helmet with compromised ventilation causes fogging that blinds you mid-corner.
Boot and Glove Integrity Assessment
Flex your boots through full range of motion checking for stiff areas that restrict movement. Inspect soles for separation from uppers—water ingress ruins boots quickly. Test glove knuckle protection by squeezing firmly—cracks compromise impact protection. Gloves with worn palm padding reduce control during long rides.
By implementing this systematic dirt bike pre-ride checklist before every outing, you’ll eliminate preventable trail failures and extend your bike’s lifespan significantly. Remember that skipping even one item could mean the difference between an epic ride and an expensive recovery. Keep a printed version in your riding gear bag and make it non-negotiable—your safety depends on these few minutes of disciplined preparation.


