
You kick over your dirt bike, give it some choke, and it starts right up—only to immediately stall the moment you turn that choke off. This frustrating scenario affects riders of all skill levels and impacts dirt bikes across every major brand. When your bike refuses to run without the choke engaged, it’s sending you a clear message: your fuel mixture is dangerously lean. The choke works by restricting airflow and enriching the mixture, which is why your bike runs fine with it on—but that shouldn’t be necessary once the engine warms up. Understanding why your dirt bike won’t run with choke off and how to properly diagnose the issue will get you back to riding without constantly depending on that choke lever.
This isn’t just an annoyance—it’s a sign your engine is running too lean, which can cause serious damage over time. A lean mixture burns hotter than normal, potentially leading to piston damage, burned valves, or other expensive repairs. The good news? In 90% of cases, this problem has straightforward solutions you can handle yourself with basic tools. Whether you’re dealing with a recently stored bike or a machine that suddenly developed this issue, this guide walks you through every critical step to diagnose and fix your choke-dependent dirt bike for good.
Why Your Dirt Bike Needs the Choke (But Shouldn’t Depend on It)
The choke serves a specific purpose that becomes critical during cold starts. When your engine is cold, fuel doesn’t vaporize properly, requiring a richer fuel-air mixture to maintain combustion. The choke restricts airflow into the carburetor, forcing more fuel into the mixture and creating ideal conditions for cold starts. This is completely normal behavior—every properly functioning dirt bike needs some choke application when cold.
The problem emerges when your bike ONLY runs with the choke engaged, even after the engine has warmed up. This indicates your “normal” fuel mixture is actually too lean. Your engine is desperately seeking the extra fuel the choke provides, and without it, there simply isn’t enough fuel to maintain combustion at idle. The richer choke mixture happens to be closer to what your engine actually needs when something prevents the proper fuel-air ratio. In essence, your bike is telling you that something is wrong with your fuel system, air intake, or ignition—and the choke is temporarily masking that problem.
Recognizing the Classic Choke-Dependent Running Symptoms
Before diving into repairs, confirm you’re dealing with the classic “runs on choke only” pattern. The most obvious sign is that your bike starts easily with the choke fully engaged, runs smoothly while the choke remains on, but immediately stalls, hesitates, or runs roughly when you turn the choke off. You might notice the engine will run at higher throttle openings even with the choke off, but it simply cannot maintain idle speed without that extra fuel enrichment.
Watch for these additional indicators pointing specifically to a lean condition:
– Your bike requires the choke at half throttle or higher to run cleanly
– The engine feels starved for fuel, lacking power and responsiveness
– At idle, you hear sputtering or see inconsistent RPM fluctuations
– The spark plug tip appears white or light gray (a sure sign of lean running)
These symptoms together create a clear picture of a fuel system that’s not delivering adequate fuel, forcing you to rely on the choke’s enrichment circuit to keep the engine running.
Clogged Carburetor Jets: The #1 Cause of Choke Dependency
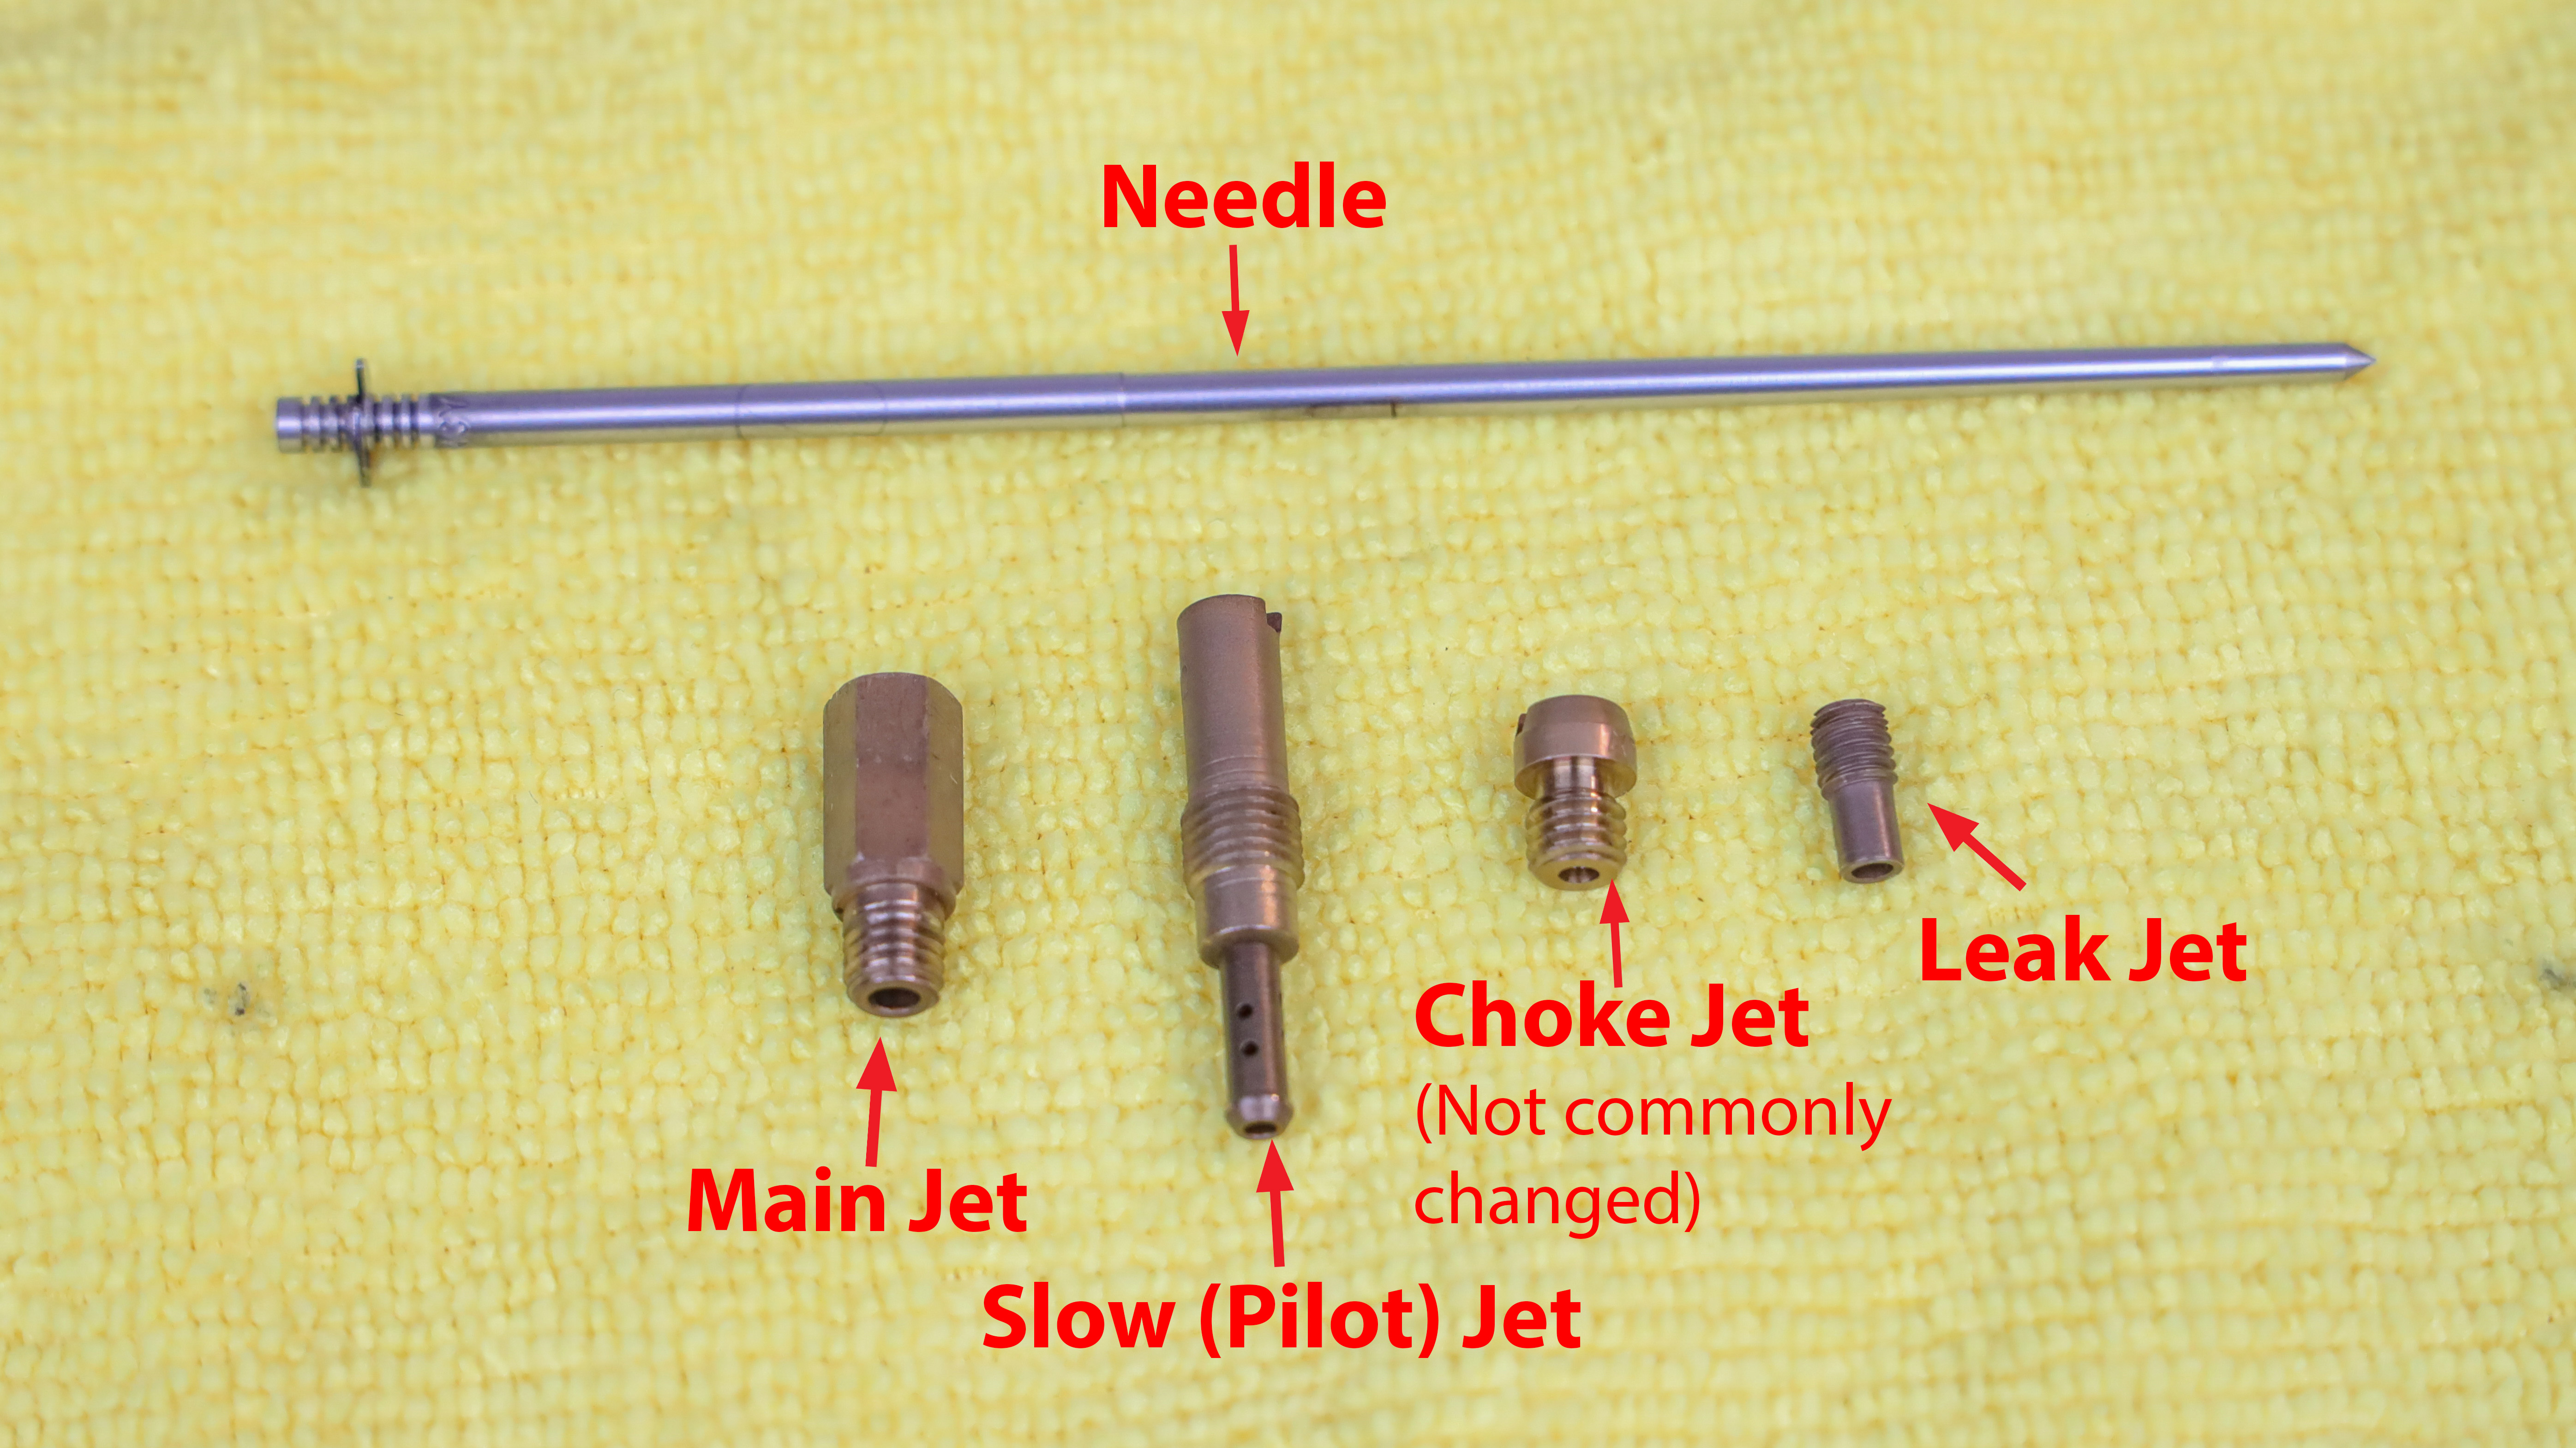
The carburetor is by far the most common cause of a dirt bike that won’t run with the choke off, with the pilot jet (also called the slow jet) being the primary culprit. This tiny component controls fuel delivery at idle and low throttle openings—when your bike is idling, it’s the pilot circuit that’s operating, and if that circuit is restricted, your bike simply can’t get enough fuel to keep running.
Stale fuel is the enemy of carburetor jets. When fuel sits in your carburetor during storage periods, it begins to break down. The lighter, more volatile components evaporate first, leaving behind a gummy, varnish-like residue. This residue builds up on the tiny orifices in your jets, progressively restricting fuel flow until eventually, the jet becomes partially or completely blocked. Even a small amount of debris from dirty fuel can compound the problem by getting lodged in these precision openings. The result is a pilot circuit that can’t deliver enough fuel, forcing you to keep the choke on just to maintain idle.
Air Leaks Creating Problematic Lean Conditions

If your carburetor is clean but your bike still only runs on the choke, an air leak in the intake system is the next most likely cause. An air leak allows unmeasured air to bypass the normal intake pathway and enter the engine directly. This extra air overwhelms the amount of fuel being delivered, creating an excessively lean mixture regardless of how well your carburetor is functioning.
The intake boot is the most common location for these leaks. This rubber connector links your air filter housing to the carburetor and is subjected to constant heat cycling, vibration, and exposure to the elements. Over time, the rubber cracks, splits, or deteriorates, creating gaps where air can leak past the seal. Even a small crack in this boot can cause significant running problems. Loose clamps holding the boot in place can also create leaks, as the vibration of the engine gradually loosens the clamp until a gap develops. Additionally, the gaskets where the boot connects to the carburetor and engine can deteriorate, and vacuum lines connected to the carburetor can crack or become disconnected.
How Spark Plug Condition Reveals Your Fuel Mixture Problem
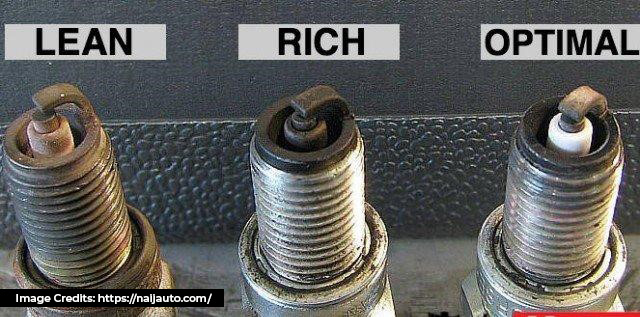
The condition of your spark plug provides a direct window into what’s happening inside your engine. Remove the plug and examine the tip carefully. A white or light gray tip confirms a lean mixture, exactly what you’d expect when your bike only runs on the choke. This pale coloration develops because the lean mixture burns at higher temperatures, essentially “bleaching” the metal. A black, dry, sooty tip would indicate a rich mixture instead, while a black, wet tip may suggest oil burning or flooding. A healthy plug tip should have a light tan or grayish color.
If your spark plug is dirty or fouled, clean it thoroughly or replace it with a new one. Ensure the spark plug gap is set to the manufacturer’s specifications—incorrect gap can affect spark intensity and combustion quality. Inspect the spark plug boot for cracks or deterioration that might allow moisture to enter or degrade the spark. Verify that your ignition coil is producing adequate spark by performing a spark test—remove the spark plug, insert it into the plug boot, ground the electrode against the engine cylinder head, and kick the engine over while watching for a strong, consistent blue spark.
Step-by-Step Carburetor Removal and Deep Cleaning Process
When troubleshooting a bike that only runs on the choke, the carburetor deserves your full attention. Start by disconnecting the throttle cable, choke cable, air intake boot, fuel line, and any vacuum lines. Remove the mounting bolts that secure the carburetor to the engine, being careful to note where everything connects so you can reassemble correctly.
Begin by removing the float bowl—the circular chamber at the bottom of the carburetor that holds fuel. Loosen the screws securing the bowl (an impact driver may be necessary for stubborn screws). Once the bowl is removed, take out the float and float valve. Remove the pilot jet, main jet, needle jet, and jet needle. These components should be held up to a light source to verify that all passages are clear—even partial obstructions can cause significant running problems.
Clean all removed components using carburetor cleaner spray. After spraying, use compressed air to blow through all jets and passages to ensure they are completely clear. This step is crucial—a jet that looks clean might still have residue lodged deep inside the passage. Never use wire or drills to clean jets, as this can enlarge the precision orifices and ruin the jet entirely. If cleaning doesn’t restore the jets to proper condition, replace them with new ones.
Proven Methods to Detect Hidden Air Leaks
If your carburetor is clean and properly functioning but the bike still only runs on the choke, methodically test for air leaks throughout the intake system. Begin by inspecting all clamps and connections. Ensure the clamp holding the air intake boot to the carburetor is tight, and verify that any bolts mounting the boot to the engine are also secure.
With the engine running, spray carburetor cleaner around the intake boot, the connection points between the boot and carburetor, and the connection between the boot and engine. Also spray around any vacuum lines and their connections. If there is an air leak at any of these locations, the spray will be drawn in through the leak, causing an immediate change in engine RPM. You’ll typically see the RPM increase as the additional fuel in the spray enriches the mixture. This technique makes it easy to pinpoint the exact location of the leak. Common remedies include tightening loose clamps, replacing split or cracked intake boots, and replacing damaged or deteriorated vacuum lines.
Critical Storage Mistakes That Cause Choke-Only Running
The best way to avoid choke-only running problems is through proper storage procedures. Never leave your dirt bike with fuel sitting in the carburetor if it will be inactive for any extended period. Set the fuel petcock to the OFF position to prevent fuel from flowing into the carburetor, then either run the engine until all fuel in the carburetor is consumed or manually drain the fuel by removing the drain screw from the bottom of the float bowl.
Clean your carburetor every 6 to 12 months as part of regular maintenance, or more frequently if you operate your bike in dusty conditions. Always use fresh fuel from a clean container, and consider using fuel stabilizers if fuel will be stored for extended periods. Inspect your air intake boot regularly for cracks, splits, or deterioration, and replace it at the first sign of damage. These preventive measures take only minutes but can save you hours of troubleshooting and repair work down the road.
The 6-Step Diagnostic Checklist for Choke-Dependent Bikes
When your dirt bike only runs with the choke on, follow this systematic troubleshooting approach:
- Verify strong spark – Clean or replace the spark plug and confirm consistent blue spark
- Inspect all intake connections – Check for cracks in the intake boot and ensure all clamps are tight
- Thoroughly clean the carburetor – Pay special attention to the pilot jet and all associated passages
- Test for air leaks – Use carb cleaner spray while engine is running to detect RPM changes
- Check fuel delivery system – Examine fuel filter, fuel line, and petcock for restrictions
- Adjust mixture settings – Verify air-fuel mixture screw is properly adjusted if your bike has one
A white spark plug tip, normal operation at higher throttle openings with choke applied, and stalling at idle when the choke is off all point to a lean condition caused by a restricted pilot circuit. The solution is almost always found in the carburetor—either through thorough cleaning or component replacement. By working through these diagnostic steps systematically, you’ll identify the root cause and get your dirt bike running properly with the choke off where it belongs.


