
If you’ve just purchased a dirt bike that arrived partially disassembled or you’re rebuilding one from components, knowing how to properly assemble your machine is crucial for both performance and safety. Many riders make the mistake of rushing through assembly without understanding the critical connections that keep your dirt bike functioning properly on the trail. A poorly assembled dirt bike can lead to dangerous failures mid-ride, from loose handlebars to detached wheels. This guide walks you through the entire assembly process with specific steps you need to follow, highlighting where most beginners make critical errors that compromise their riding experience. You’ll learn not just how to put the pieces together, but how to ensure each component is secured correctly for optimal performance and safety.
Frame Assembly and Foundation Setup
Before adding any components, you must properly prepare the dirt bike frame as your assembly foundation. Start by positioning the frame securely on assembly stands with the steering head elevated and accessible. Check that all mounting points are clean and free from shipping damage or debris that could interfere with proper component alignment.
Critical Frame Preparation Steps
The frame serves as the structural backbone of your entire dirt bike, so proper preparation prevents cascading issues later:
- Clean all mounting surfaces thoroughly with degreaser to ensure components seat properly
- Inspect for shipping damage along weld points and mounting brackets before proceeding
- Apply anti-seize compound to all bolt threads to prevent future corrosion and facilitate maintenance
- Verify frame alignment by checking that swingarm pivot points are parallel and undamaged
Many riders skip the cleaning step, not realizing that factory grease or shipping residue can cause components to slip under riding stress. Always take time to prepare your frame properly—this 15-minute investment prevents hours of troubleshooting later when components mysteriously loosen during your first ride.
Installing the Engine and Power Components

The engine installation requires precise alignment with the frame mounting points to prevent vibration issues and premature wear. Begin by preparing the engine mounting bolts with the appropriate thread locker as specified by your manufacturer—never use generic hardware store bolts as they may not withstand riding stresses.
Engine Mounting Sequence Matters
Follow this specific sequence to avoid misalignment:
- Position the engine carefully into the frame cradle, aligning all mounting points
- Hand-thread all mounting bolts before tightening to prevent cross-threading
- Tighten bolts in a star pattern to the manufacturer’s specified torque values
- Double-check that the countershaft sprocket aligns perfectly with the rear wheel sprocket
Common mistake: Riders often overtighten engine bolts immediately, causing frame stress points. Always follow the manufacturer’s specified torque sequence—typically starting loose and working up to final torque in multiple passes.
Front Suspension and Fork Installation
Proper front suspension setup directly affects your handling and control. Start by installing the fork tubes into the triple clamps with the specified torque on the pinch bolts. The upper and lower triple clamp alignment must be perfect to prevent binding and uneven wear.
Fork Assembly Checklist
- Set proper oil levels according to your weight and riding style before installation
- Align fork legs so that the axle slots face the same direction
- Torque triple clamp bolts to specifications—typically 15-18 ft-lbs for most 250-450cc bikes
- Install fork guards before mounting wheels to avoid difficult access later
When tightening triple clamp bolts, always do so with the front wheel installed and the bike resting on its suspension. This ensures the forks aren’t bound in a twisted position, which would create dangerous handling characteristics.
Wheel Mounting and Alignment Process

Wheel installation seems straightforward but contains several critical steps many riders overlook. Before mounting either wheel, inspect the axles for straightness and check that the wheel bearings spin freely without play.
Front Wheel Installation Steps
- Slide the front axle through the fork legs (don’t fully tighten yet)
- Position the wheel with the correct side facing forward (check rotor placement)
- Insert the axle through the wheel hub
- Hand-tighten the axle nut while holding the opposite end
- Position the wheel straight and tighten the fork pinch bolts
- Finally, torque the axle nut to specifications with the fork suspension compressed
Pro tip: Place a zip tie around the fork stanchion as a temporary travel indicator before final tightening—this helps verify proper suspension movement after assembly.
Handlebar and Control Installation
Handlebar positioning significantly impacts your riding comfort and control. Before mounting, determine your ideal riding position based on your height and riding style—most beginners install handlebars too low, causing fatigue.
Handlebar Mounting Procedure
- Select appropriate bar height using the triple clamp bar mounts
- Position controls so brake and clutch levers fall naturally under your fingers
- Torque bar mounts to 12-15 ft-lbs (never overtighten as this can crack handlebars)
- Route cables and hoses with enough slack for full steering movement
Critical safety check: After installation, turn the handlebars fully left and right to ensure cables and hoses don’t get pinched or stretched at extreme angles. Many riders discover this problem only after a component fails during a sharp turn.
Exhaust System Mounting Techniques
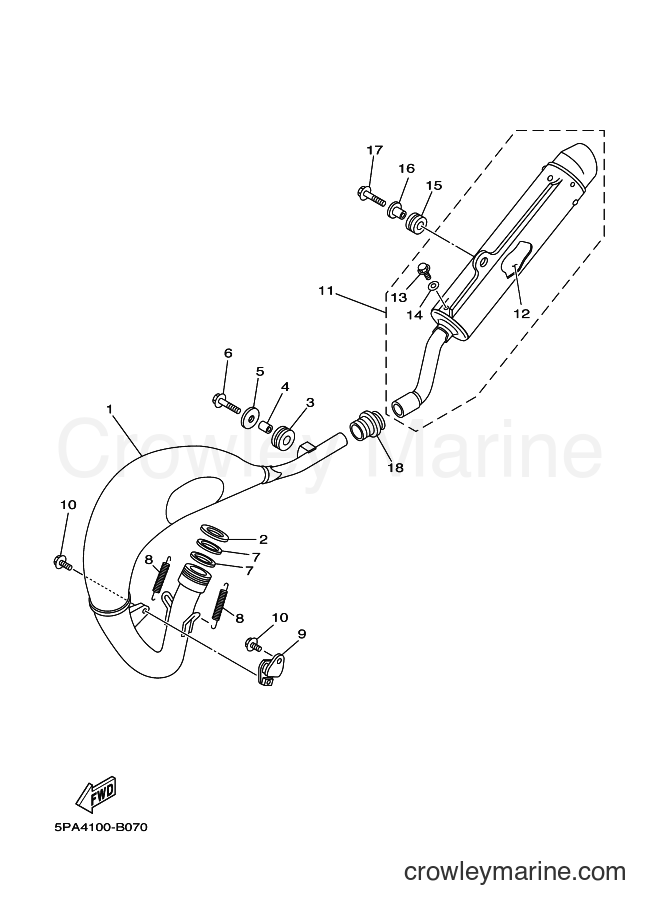
The exhaust system requires careful installation to prevent vibration damage and ensure proper performance. Start by positioning the header pipe onto the cylinder head studs before connecting the muffler section.
Exhaust Installation Sequence
- Install header gaskets on cylinder head (replace with new ones if provided)
- Position header pipe and hand-tighten flange nuts
- Connect mid-pipe to header, ensuring alignment before tightening
- Mount muffler to frame brackets with rubber isolators
- Complete all connections before final tightening
Common mistake: Riders often fully tighten the header-to-cylinder connection before aligning the entire system, causing stress points that lead to cracks. Always position the entire exhaust system loosely first, then tighten connections progressively.
Final Adjustments and Safety Checks
Before riding your newly assembled dirt bike, complete these critical final checks that many beginners skip:
- Verify all bolts with a torque wrench—don’t rely on “feeling” tight enough
- Check chain tension and alignment (should have 1.5-2 inches of play)
- Bleed brake systems if fluid was disturbed during assembly
- Test all controls through full range of motion
Pre-Ride Inspection Checklist
- Suspension settings match your weight and riding conditions
- Tire pressure set to manufacturer specifications
- All fasteners properly torqued with safety wire where required
- No fluid leaks from engine, forks, or shock
- Wheels spin freely without brake drag
Expert note: Take your first test ride in a controlled environment like a parking lot. Start with slow circles to check for unusual noises or handling issues before attempting any trail riding.
Maintenance Tips to Prevent Assembly-Related Issues
Proper assembly is just the beginning—regular maintenance prevents components from loosening over time. After your first 5-10 miles of riding, recheck all critical fasteners as vibrations settle components into their final positions.
Critical Post-Assembly Maintenance Schedule
- After first 5 miles: Recheck engine mounts, axle nuts, and handlebar clamps
- After first 20 miles: Verify chain tension and suspension settings
- After first 50 miles: Complete full torque check of all major components
- Ongoing: Inspect for loose fasteners before every ride
Keeping a maintenance log specifically tracking when you last checked each critical connection will help prevent dangerous failures caused by gradual loosening during riding.
Final Note: Proper dirt bike assembly requires patience and attention to detail—rushing through the process compromises both performance and safety. By following these specific steps and paying attention to the often-overlooked details highlighted throughout this guide, you’ll create a solid foundation for enjoyable and safe riding. Remember that manufacturer specifications always override general guidelines, so consult your specific bike’s service manual for torque values and assembly details unique to your model. When in doubt about any assembly step, consult a professional mechanic rather than risking improper assembly that could lead to dangerous failures on the trail.


