
Replacing your dirt bike chain is one of the most critical maintenance tasks for serious riders. A worn or improperly installed chain can lead to catastrophic failure mid-ride, leaving you stranded on the trail or worse—causing a dangerous accident. When your chain stretches beyond its service limit, you’ll notice poor shifting, excessive noise, and that unsettling “slap” against the swingarm. Most experienced riders know the telltale signs: visible rust buildup, stiff links that don’t bend smoothly, or rollers that have worn down to sharp edges. This guide walks you through the complete chain replacement process so you can get back to riding with confidence and safety.
Essential Tools for Dirt Bike Chain Replacement
Before you begin, gather all necessary tools to avoid mid-project delays. Having everything ready prevents frustration and ensures you don’t cut corners during the procedure.
Required Tools Checklist
- Chain breaker tool (specific to your chain type)
- New chain compatible with your bike’s specifications
- Replacement master link or rivet pins
- Chain lubricant (specific to off-road conditions)
- Torque wrench (critical for rear axle)
- 17-22mm sockets (varies by model)
- Pliers for clip removal
- Clean rags and degreaser
- Safety glasses and work gloves
Pro Tip: Always purchase OEM or reputable aftermarket chains designed specifically for dirt bikes—never substitute with generic motorcycle chains that aren’t built for off-road impacts and debris exposure.
Critical Safety Precautions Before Starting
Working with chains involves significant safety risks that many beginners overlook. Dirt bike chains operate under tremendous tension and can cause severe injury if mishandled. Always position your bike securely on a stand that supports the frame, never just the swingarm. Confirm the rear wheel can rotate freely before beginning work. Disconnect the spark plug to prevent accidental engine start during the procedure. Most importantly, never place any body parts in the path of potential chain movement—when under tension, a snapping chain can cut through flesh like a hot knife through butter.
Step-by-Step Chain Removal Process
Removing the old chain requires precision to avoid damaging surrounding components. Rushing this phase often leads to unnecessary complications during reinstallation.
Breaking the Old Chain Properly
Position your bike securely on a stand with the rear wheel elevated. Shift the transmission into neutral to allow free wheel rotation. Locate the master link on your current chain—most dirt bike chains use either clip-type master links or rivet-type connections. For clip-type links, use pliers to carefully remove the retaining clip without bending the side plates. When using a chain breaker tool, align the pin perfectly with the chain rivet to avoid damaging the tool or chain. Apply steady pressure until the pin begins to protrude, then complete removal by hand. Never force the chain breaker tool beyond manufacturer specifications, as this can damage both the tool and your chain.
Inspecting Critical Components During Removal
As you remove the old chain, conduct a thorough inspection of related components. Check the sprockets for hooked or excessively worn teeth—replace them if the tips have become sharp or noticeably pointed. Examine the chain guide for cracks or excessive wear that could damage your new chain. Verify the swingarm pivot moves smoothly without binding. Pay special attention to the countershaft seal area for any oil leaks that could contaminate your new chain. Document any issues you find so you can address them before installing your new chain.
Installing Your New Dirt Bike Chain
Proper installation makes the difference between a chain that lasts through multiple riding seasons and one that fails prematurely.
Measuring and Cutting to Correct Length
New chains typically come longer than needed and require precise cutting. Wrap the new chain around the rear sprocket and front countershaft without running it through the rear derailleur or chain guides. Pull the chain tight and count the number of links needed to connect with a slight amount of slack (usually two extra links beyond connection point). Most dirt bikes require specific chain lengths based on model year and modifications—consult your service manual for exact specifications. When cutting, remember that rivet-type master links require different link counts than clip-type connections.
Threading the Chain Through Critical Pathways
Begin by feeding the chain through the front chain guide, being careful not to scratch the engine case. Route the chain around the countershaft sprocket, then through the tensioner assembly. Guide the chain along the upper run toward the rear sprocket, ensuring it passes through all guides and tensioners in the correct sequence. The lower run should flow smoothly through the rear chain guide without binding. If you encounter resistance, stop and recheck your routing—forcing the chain can damage guides or cause premature wear.
Final Assembly and Critical Adjustments

The final steps determine whether your chain performs reliably or becomes a constant source of frustration.
Connecting the Master Link Correctly
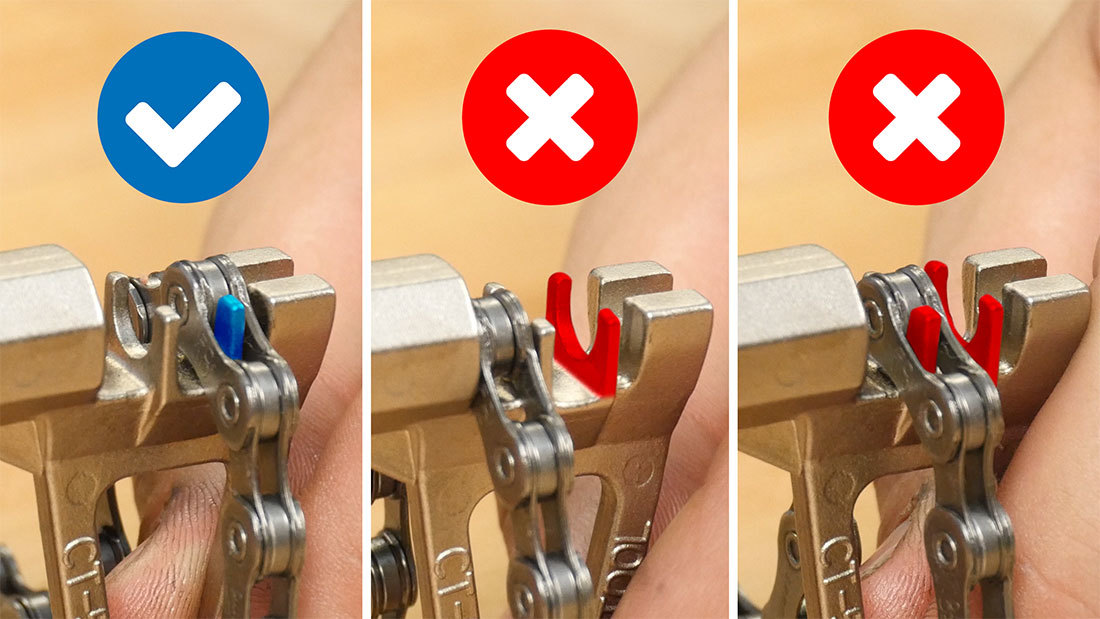
Master link installation varies significantly between clip-type and rivet-type connections. For clip-type links, ensure the open end of the clip faces away from the direction of chain travel. The clip should snap into place with a distinct click and sit flush against the link plate. For rivet-type master links, use the proper riveting tool to peen the pins to manufacturer specifications—under-peening risks the link coming apart, while over-peening damages the chain. Never ride with a master link that doesn’t feel completely secure—this is the most common cause of catastrophic chain failure.
Setting Proper Chain Tension
Chain tension is the most frequently mishandled aspect of chain replacement. With the bike on the stand, measure slack at the midpoint between sprockets. Most manufacturers specify 1.5-2 inches of total up-and-down movement for dirt bikes. Adjust both rear axle adjusters equally to maintain proper wheel alignment. After setting initial tension, bounce the rear suspension through its full travel to ensure consistent tension throughout the swingarm arc. Tighten the rear axle to factory torque specifications—typically 80-100 ft-lbs depending on model—and double-check chain tension after riding for 10-15 minutes.
Post-Installation Testing and Break-In

Your work isn’t complete until you’ve properly tested the new chain installation.
Critical First Ride Procedures
On your first ride with the new chain, keep speeds moderate and avoid hard acceleration for the first 30-60 minutes. This allows the chain to properly seat on the sprockets. Stop after 10 minutes of riding to recheck chain tension—new chains typically stretch slightly during initial use. Listen for any unusual noises that might indicate improper routing or tension. Pay attention to shifting quality—rough shifting often indicates incorrect tension or misalignment.
Essential Break-In Maintenance
During the first 500 miles, check chain tension before every ride and lubricate after each ride. Dirt bike chains require more frequent maintenance than street bike chains due to exposure to mud, water, and abrasive elements. Use a quality off-road specific chain lube that won’t wash off in wet conditions or attract excessive dirt in dry conditions. After each ride, clean the chain with a dedicated chain cleaner and soft brush before applying fresh lubricant.
Preventing Common Chain Replacement Mistakes
Many riders unknowingly sabotage their new chain’s lifespan through preventable errors.
Critical Mistakes That Destroy New Chains
Riders frequently make these costly errors: installing the chain backward (some chains have directional arrows), over-tightening to prevent “slap,” using improper lubricants like WD-40 instead of proper chain lube, and neglecting to check sprocket wear when replacing the chain. Perhaps the most dangerous mistake is failing to properly secure the master link clip, which can lead to sudden chain separation at speed.
Professional Maintenance Schedule Recommendations
Establish a maintenance routine that extends chain life: check tension before every ride, clean and lubricate after every ride, replace chains before they reach maximum wear (typically every 20-40 hours of riding depending on conditions), and always replace sprockets as a set with the chain. Keep a maintenance log noting mileage or hours for each service—this helps identify wear patterns specific to your riding style and conditions.
Final Note: A properly installed and maintained dirt bike chain should deliver reliable performance through multiple riding seasons. By following these precise replacement procedures, you’ll avoid the most common pitfalls that lead to premature chain failure. Remember that chain maintenance isn’t just about convenience—it’s a critical safety factor that directly impacts your control of the motorcycle. After completing your chain replacement, schedule your next tension check before your next ride and establish a consistent maintenance routine that matches your riding conditions.


