
That first moment straddling a dirt bike, engine rumbling beneath you with open terrain ahead, delivers an unmatched thrill—but only if you know how to control the machine. Learning how to drive a dirt bike properly separates exhilarating adventures from frustrating wipeouts, especially since these powerful machines respond differently than street motorcycles or bicycles. Unlike paved roads, dirt terrain constantly changes beneath your tires, demanding split-second adjustments to throttle, balance, and body position that can overwhelm beginners. This guide cuts through the confusion with actionable steps used by professional riders, helping you progress from nervous novice to confident trail conqueror in the safest, most efficient way possible. You’ll discover why skipping fundamentals leads to preventable crashes and how mastering just three critical skills in your first hour can accelerate your learning curve dramatically.
Gear Up Before You Grip the Handlebars
Skipping proper protective equipment creates the single biggest risk for new dirt bike riders—many beginners try to “just try it out” with minimal gear, only to regret it after their first fall. Your helmet must meet U.S. DOT standards at minimum, but SNELL-certified models provide superior impact protection during high-speed crashes where standard helmets might fail. Off-road specific helmets include a crucial chin guard that prevents facial injuries from branches, handlebar impacts, or landing face-first in dirt after a crash—never substitute a street motorcycle helmet for off-road riding. Eye protection is non-negotiable; even light wind can cause tears that blur vision at critical moments, while dust clouds from other riders can completely obscure your view.
Pro Tip: Test helmet fit by opening your mouth wide—properly fitted helmets will press down on your cheeks. If your goggles fog, apply anti-fog treatment before riding rather than risking impaired vision on the trail. Full body armor might feel cumbersome at first, but knee braces prevent ligament tears during hard landings, while chest protectors absorb impacts from handlebar strikes. Over-the-ankle boots with internal support prevent ankle rolls during landings, and quality gloves maintain grip even when hands sweat during intense riding sessions. The “all the gear, all the time” philosophy isn’t just for professionals—it’s what keeps recreational riders riding season after season.
Locate and Master Each Control Before Starting

Many beginners stall repeatedly or lurch forward unexpectedly simply because they haven’t memorized control locations before starting the engine. The clutch lever on the left handlebar disengages power to the rear wheel when pulled in—keep your index and middle fingers wrapped around it while riding. The right handlebar hosts the throttle, which you twist toward you to accelerate; practice finding the “sweet spot” where the engine maintains idle without stalling. Your left foot operates the gear shift lever, with downward pressure selecting lower gears and upward pressure shifting higher. Most dirt bikes feature two braking systems: a powerful front brake operated by squeezing the right handlebar lever, and a smoother rear brake controlled by pressing down with your right foot.
Critical Mistake: New riders often confuse the front brake lever with the clutch. Test each control while the bike is off until you can operate them without looking. Note that adult dirt bikes consistently place the clutch on the left and shifter on the left side—this standardization means once you learn one bike, you can quickly adapt to others. Spend five minutes familiarizing yourself with these controls before starting the engine; this small investment prevents embarrassing stalls and dangerous lurches when you first attempt to ride.
Execute the Perfect Start Every Time
Following the FINE-C procedure prevents 90% of starting frustrations that plague beginners. First, turn the fuel petcock to “On” (F)—many modern fuel-injected bikes skip this step, but carbureted models won’t start without it. Turn on the ignition switch (I), then confirm neutral by wiggling the shifter (N)—you should feel slight movement without resistance. Verify the engine stop switch is off (E), and engage the choke if the engine is cold (C). For kickstart models, flip out the lever, place your left foot firmly on the ground, and step down smoothly with your right foot—avoid stomping hard, which can damage the starter mechanism. Electric start models simply require pressing the button while holding the clutch.
Troubleshooting Tip: If your bike won’t start after several attempts, let it rest for two minutes to prevent flooding. After starting, push the choke and kickstarter back in, then pull the clutch while shifting into first gear. Gradually release the clutch while adding slight throttle—this delicate balance determines whether you roll forward smoothly or stall immediately. Practice this sequence five times before attempting to ride, building muscle memory for those critical first moments.
Find the Clutch Bite Point for Smooth Movement
Throttle and clutch coordination represents the make-or-break skill for new dirt bike riders, requiring precise timing that feels unnatural at first. The “bite point” occurs when the clutch begins transferring power to the rear wheel—detect this subtle engagement by slowly releasing the clutch while maintaining steady throttle. Most beginners stall by releasing the clutch too quickly or applying too little throttle; conversely, too much throttle while releasing causes sudden lurches that can throw you off balance. Start practice sessions on flat, smooth terrain free of obstacles, focusing solely on moving forward without stalling.
Pro Technique: Place your left foot on the footpeg immediately after moving (don’t drag it), keeping weight centered over the bike. If you feel yourself accelerating too quickly, simply release the throttle—it automatically returns to idle position, slowing the bike without needing brakes. Practice this clutch-throttle dance for 15 minutes daily, and you’ll develop the coordination needed for more advanced techniques within a week.
Shift Gears Like a Seasoned Rider
Mastering gear changes transforms jerky, stressful riding into fluid trail navigation. Dirt bikes use a “one down, four up” pattern: first gear is down, neutral sits halfway between first and second, then second through fifth gears shift upward. Practice finding neutral while stationary until you can locate it blindfolded—this prevents stalling when stopping. While moving, pull the clutch, lift the shifter with your foot to change gears, then release the clutch while adding slight throttle. Listen to your engine: high-pitched screaming means shift up, while struggling/bogging indicates shift down.
Critical Insight: Never shift while leaning in corners—complete gear changes during straight sections. Beginners often forget to pull the clutch when shifting, grinding gears and causing premature wear. Practice shifting through all gears in an open field before tackling trails, focusing on smooth transitions rather than speed.
Control Speed with Proper Braking Technique
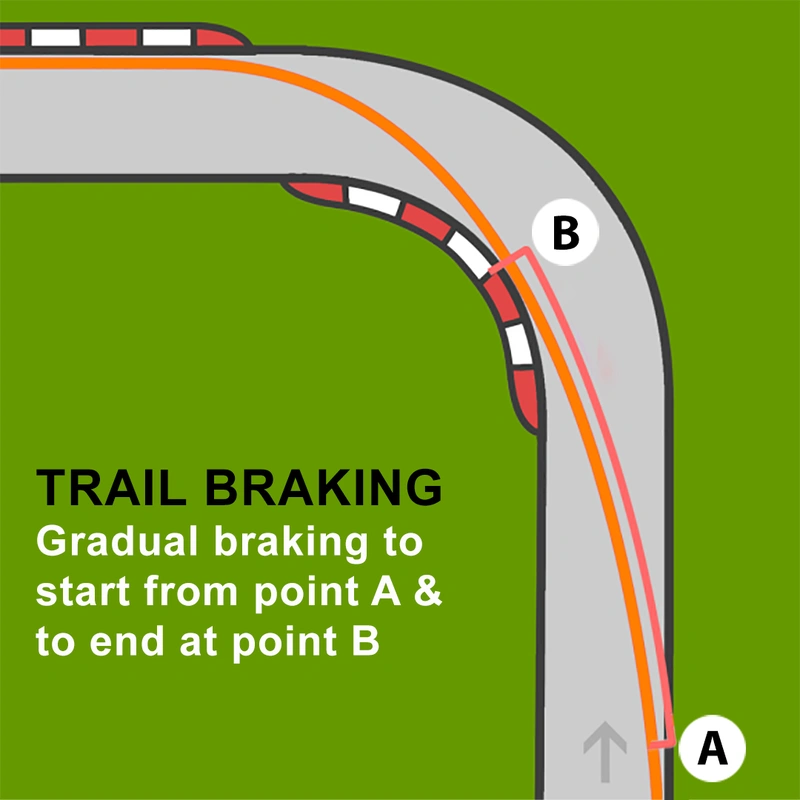
Front brake overuse causes more beginner crashes than any other mistake—this powerful brake can lock the front wheel and send you over the handlebars if squeezed too aggressively. Start by using only the rear brake (right foot lever) for stopping, which provides smoother deceleration. As you gain confidence, gradually introduce the front brake with light, progressive pressure. On loose terrain like sand or gravel, reduce front brake usage significantly since reduced traction increases lockup risk.
Emergency Tip: In panic situations, focus on “rolling” the throttle closed rather than grabbing brakes—this engine braking technique maintains traction better than sudden braking. Always practice emergency stops in a safe area to build muscle memory for when you need it most.
Stand to Conquer Any Terrain
/cloudfront-us-east-1.images.arcpublishing.com/octane/F4LBB4BI5RCPZKDV746NTN2L54.jpg)
Sitting while riding limits your control and increases crash risk—proper standing position gives you active control over the bike’s movement. Keep knees and elbows bent, feet centered on footpegs, and body weight slightly forward over the handlebars. Your arms shouldn’t bear weight; instead, grip the tank with your knees while standing. This position lets your legs absorb bumps like additional suspension, keeps your center of gravity optimized for quick corrections, and prepares you for jumps or obstacles.
Common Error: Beginners often straighten their legs on rough terrain, which transmits every bump directly to their spine. Maintain that slight knee bend at all times—it’s tiring at first but becomes natural with practice. When cornering, shift weight to the outside footpeg while leaning the bike into the turn, keeping eyes focused where you want to go, not at the ground immediately ahead.
Progress Through Structured Practice Sessions
Mastering how to drive a dirt bike follows a predictable progression that skips no critical steps. Dedicate your first sessions to straight-line riding and stopping in a flat, open area—no corners or obstacles. Once comfortable with basic movement, practice smooth gear changes through all gears. Next, set up a simple cone course to practice body positioning and turning. Only after these fundamentals feel natural should you attempt trails with obstacles.
Time Estimate: Most riders achieve basic competence in 10-15 hours of structured practice, but confidence on challenging terrain takes 30-50 hours. The Motorcycle Safety Foundation’s DirtBike School provides accelerated learning with certified instructors who correct bad habits before they become ingrained. Even one professional session can shave weeks off your learning curve while dramatically improving safety.
Final Note: Always follow the SEE strategy (Search, Evaluate, Execute) when riding—continuously scan ahead for hazards, assess potential risks, and execute your plan before reaching trouble spots. Proper dirt bike riding isn’t about avoiding crashes entirely (they happen to everyone), but about minimizing their frequency and severity through proper technique, gear, and judgment. With consistent practice using these fundamentals, you’ll transform from a nervous beginner to a confident rider ready for any trail within months, not years.


