
Governing a dirt bike’s throttle is essential for parents introducing young or inexperienced riders to the sport. Whether your child is transitioning from a four-wheeler to their first two-wheeled machine or you’re helping a beginner build confidence on smaller displacement bikes, restricting top speed and aggressive acceleration creates a safer learning environment. This guide covers every proven method for throttle limiting, from simple homemade solutions to factory-approved modifications, helping you choose the right approach for your situation and progressively unlock power as skills develop.
The techniques explored here work through three fundamental mechanisms: physically limiting throttle rotation, reducing engine breathing capability, or altering ignition timing to flatten power delivery. Understanding these approaches allows you to select the most appropriate method based on your bike’s configuration, your mechanical comfort level, and how adjustable you need the limitation to be. Proper throttle governance prevents overwhelming beginners with power they can’t control while maintaining the learning experience that makes dirt biking so rewarding.
Why Beginners Need Throttle Limiting
Young riders face a steep learning curve when transitioning to dirt bikes. Two-wheeled vehicles require balance, coordination, and throttle control that four-wheelers simply don’t demand. A beginner who grabs a handful of throttle on an unrestricted bike can quickly find themselves overwhelmed by acceleration they can’t control, potentially causing dangerous situations or discouraging them from continuing the sport they were excited to learn.
Throttle governors address this problem by capping maximum speed and softening initial throttle response. This limitation gives new riders time to develop muscle memory for clutch engagement, shifting, and body positioning without facing the full power their machine is capable of delivering. The controlled power band allows beginners to focus on fundamentals rather than fighting an intimidating power delivery that can wheelie unexpectedly or accelerate faster than they’re prepared for.
Beyond beginner training, throttle limiting serves riders of various experience levels. Parents who want to let their children ride at family properties with speed restrictions, instructors conducting training courses, or experienced riders helping friends learn all benefit from the margin of safety that throttle limitation provides. The best methods allow for progressive adjustment, letting the bike’s performance grow alongside the rider’s developing abilities.
Modify Your Throttle Tube for Immediate Control
Understanding the Throttle Tube Modification Process
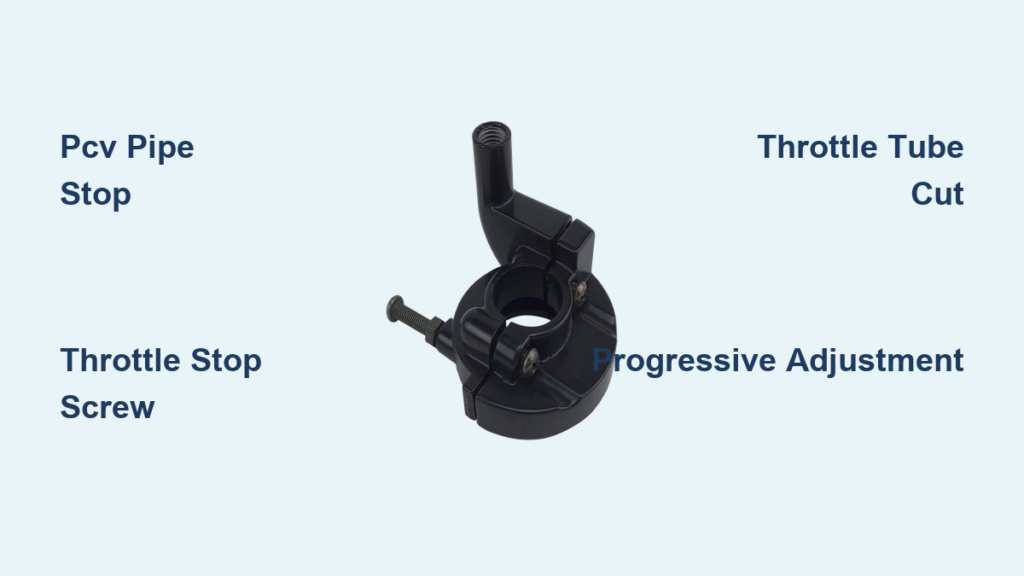
Throttle tube modification works by changing the leverage geometry, requiring more wrist rotation to achieve full throttle opening. This approach involves acquiring a replacement throttle tube and using a Dremel tool to grind the throttle line catcher closer to the handlebar. By reducing the catcher’s radius, you effectively shorten the cable pull required for any given throttle position—meaning the rider must rotate through a greater angle to reach wide-open throttle.
The primary advantage of this modification is complete reversibility. You can save the original throttle tube and reinstall it once your young rider has gained sufficient experience. However, the drawbacks are significant enough that many experienced riders advise against this method for beginners. The modified throttle geometry forces an unnatural hand movement—the rider must essentially release the throttle, rotate their hand forward, and then pull back aggressively to achieve full throttle. This motion becomes particularly problematic when a beginner is losing balance or falling off the back of the bike, as it’s not a natural reflex action.
Additionally, this modification affects the entire throttle range rather than just the top end. The bike feels sluggish at partial throttle openings where beginners actually need smooth, predictable power delivery for learning slow-speed maneuvers. For these reasons, throttle tube modification is generally considered less suitable for teaching proper throttle control techniques to children.
Install a PCV Pipe Slide Stop for Adjustable Limiting

Step-by-Step PCV Pipe Installation Guide
The PCV pipe method has earned widespread approval among experienced riders who use it to safely introduce their children to dirt biking. This technique involves placing a small piece of polyvinyl chloride pipe on top of the carburetor slide to physically limit its upward travel, creating a progressive and adjustable throttle limitation.
Implementation begins by unscrewing the carburetor top to access the slide assembly. A small piece of PCV pipe is placed directly on top of the slide with a slot cut along its length to accommodate the throttle cable passing through the center. The pipe’s length determines maximum throttle opening—longer pieces restrict more severely, while shorter pieces allow greater throttle travel. As your young rider’s skills improve, you simply trim approximately a quarter inch from the pipe’s length to incrementally increase available throttle.
This method is considered bulletproof by experienced practitioners who have used it extensively on various youth dirt bikes including 65cc and 85cc two-stroke models. The PVC material never contacts fuel since it sits above the slide, addressing concerns about plastic degradation from gasoline exposure. The progressive adjustability allows matching the bike’s performance to the rider’s developing abilities over months or years of practice.
When implementing this technique, position the pipe inside the spring assembly, resting directly on top of the slide rather than on top of the spring itself. This placement ensures consistent engagement and prevents the spring from pushing the limiter out of position during operation.
Enhance Your OEM Throttle Stop Screw
Finding and Installing the Correct Replacement Screw
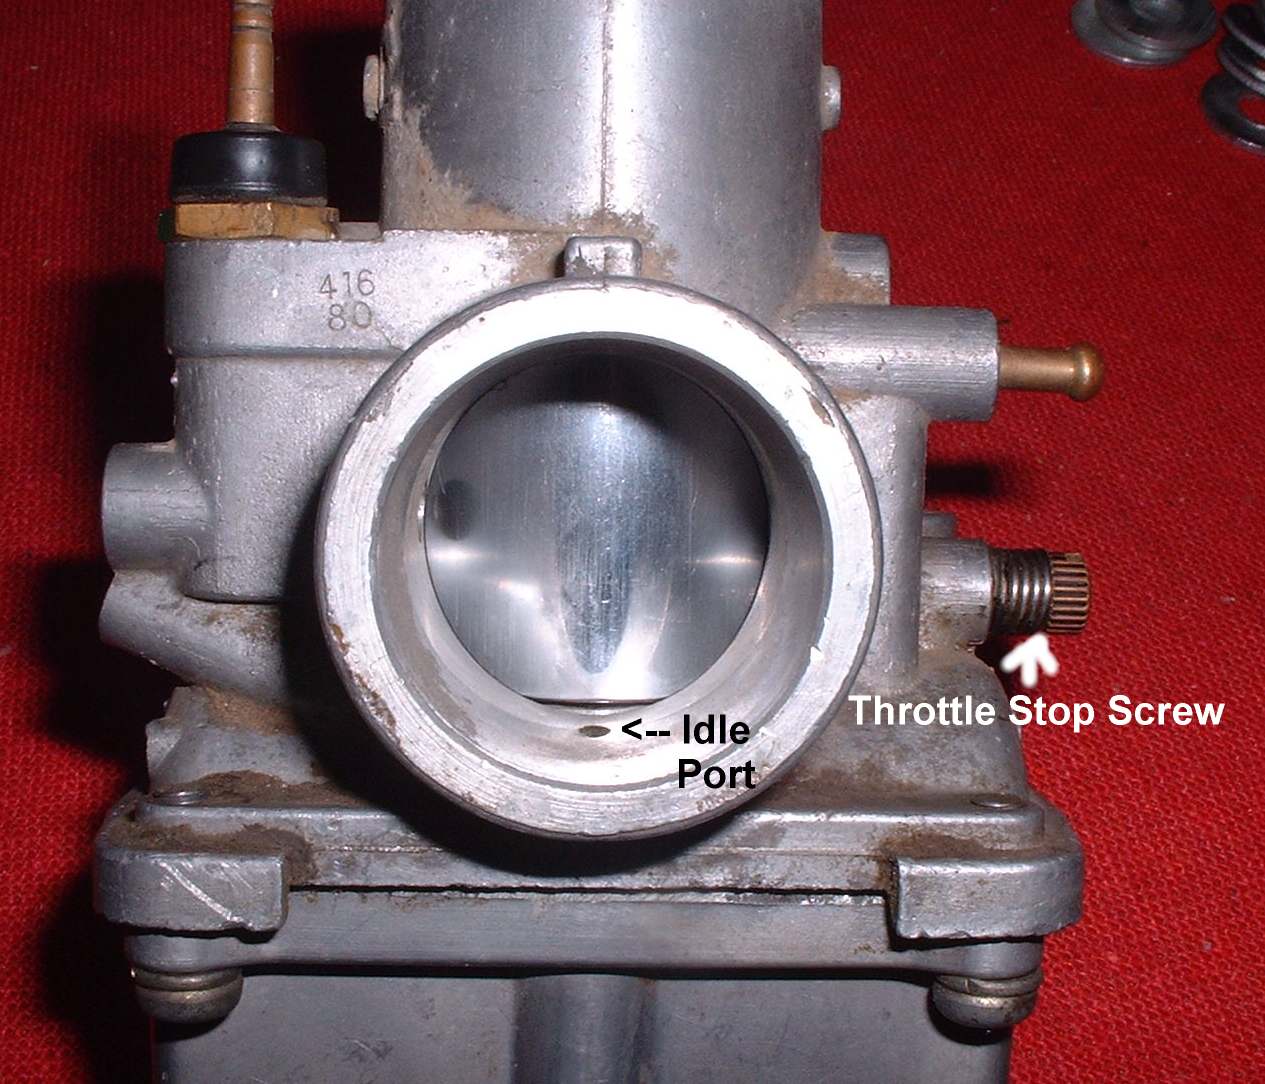
Many carbureted dirt bikes come equipped with a factory throttle stop screw designed to set the minimum idle position. This same screw can limit maximum throttle opening by substituting a longer replacement screw with matching thread pitch, providing simple adjustability without permanent modification.
The implementation begins by locating the throttle stop screw on your carburetor—typically found on the side or top of the carb body with an adjustment slot and spring loading. After determining the OEM screw’s specifications including thread pitch and length, visit a hardware store to find a slightly longer bolt with compatible threading. A screw that limits the bike to approximately half throttle works well for beginners, though you should tailor the restriction to your rider’s size, experience level, and the bike’s inherent power characteristics.
By threading this longer screw into the carburetor, it physically blocks the slide from reaching full upward travel. Screwing the bolt in further increases restriction while backing it out provides more throttle response. As skills develop, gradually back the screw out until it reaches its original position, restoring full throttle performance. This method proves particularly effective on models like the WR250F and WR450F, which have throttle stop screws positioned favorably for this modification.
Not all carburetor designs accommodate this technique equally well. Some bikes have throttle stop screws positioned in locations or with thread specifications that don’t suit this approach. Examine your specific carburetor model before purchasing replacement hardware to ensure compatibility.
Choose the Right Governing Method for Your Needs
Selecting the appropriate throttle limiting method depends on several factors unique to your situation. Your mechanical comfort level influences which options are practical—you might tackle a PCV pipe installation yourself but prefer professional help for ignition timing modifications. The bike’s configuration matters too; carbureted models offer more limiting options than fuel-injected machines.
Consider how adjustable you need the limitation to be. If you’re teaching a child over multiple seasons, progressively adjustable methods like the PCV pipe or throttle stop screw enhancement let you match the bike’s performance to developing skills. Fixed limitation methods work well when you know the exact restriction level needed and don’t anticipate changing it frequently.
Think about reversibility as well. Methods that require cutting or permanently altering components may not suit you if you plan to sell the bike or transition the young rider to a larger machine. Most throttle limiting modifications are reversible, but some require more effort to return to stock configuration than others.
For most beginners, the PCV pipe slide stop method offers an excellent balance of effectiveness, adjustability, and simplicity. Throttle stop screw enhancement provides similar benefits with potentially cleaner installation on compatible models. Mechanical cable stoppers work well for riders who want to maintain the most natural throttle feel throughout the limited range.
Safety Considerations When Governing Your Dirt Bike
Regardless of which governing method you choose, several safety principles apply universally. Test any modification thoroughly in a controlled environment before allowing young riders to operate the bike. Check all limiters regularly to ensure they haven’t loosened, shifted, or failed during operation.
Understand that governed bikes may behave unpredictably at the limiter’s engagement point. The sudden loss of acceleration potential when reaching the throttle limit could startle an inexperienced rider. Train your young rider to expect this characteristic and practice in areas where sudden deceleration won’t cause problems.
No throttle governor replaces proper supervision, appropriate protective gear, and suitable riding environment selection. Mechanical modifications supplement responsible riding practices and parental oversight—they don’t replace them. Ensure your young rider always wears a properly fitted helmet, goggles, boots, and protective clothing regardless of how limited the bike’s performance might be.
Consider the riding environment carefully. Even a governed dirt bike can be dangerous on inappropriate terrain. Start learning in flat, open areas away from traffic, obstacles, and hazards. Progress to more challenging terrain only after demonstrating competence at basic skills.
Progressively Develop Riding Skills with Adjusted Throttle Limitation
The most effective approach to introducing young riders combines mechanical limitation with progressive skill development. Start with significant restriction and gradually reduce it as competence develops, matching the bike’s performance to growing abilities. This progression helps young riders build confidence through demonstrated competence rather than suddenly facing full power at an arbitrary milestone.
Methods allowing incremental adjustment support this development model best. The PCV pipe method lets you trim small amounts as skills improve. Throttle stop screw enhancement allows gradual adjustment through simple turns. Both approaches let you make changes in response to demonstrated ability rather than arbitrary timeframes.
Some smaller displacement bikes don’t require throttle limiters at all. A four-stroke XR100, for example, reaches only around 55 mph at full throttle—a speed many parents consider acceptable for responsible young riders. In these cases, proper training, appropriate protective gear, and suitable riding environment selection may be more appropriate than mechanical modification.
Honest assessment of your rider’s readiness matters more than any mechanical solution. A mature 12-year-old with good judgment may need less limitation than a smaller but less focused 8-year-old. Match your approach to the individual rider rather than applying generic solutions. The goal isn’t to keep them on a permanently governed bike, but to use these techniques as training wheels that come off when they’re truly ready for full power.


