
Your minivan’s empty cargo space mocks you as you try to squeeze three bikes through the sliding door—yet again. Most modern minivans can securely carry 2-5 bikes with the right rack system, but improper installation causes thousands in vehicle damage annually. This guide shows exactly how to install bike rack on minivan correctly, avoiding common mistakes that lead to paint scratches, dangerous sway, or bikes tumbling onto the highway. You’ll learn the specific measurements, torque specifications, and safety checks that ensure your family’s cycling adventures start safely.
Match Rack Type to Your Minivan Model

Avoid Roof Rack Compatibility Nightmares
Factory-installed roof rails on your Honda Odyssey or Toyota Sienna need proper crossbar spacing before adding bike carriers. Most minivans require crossbars positioned 28-32 inches apart with torque set to 45 ft-lbs—too loose causes wind noise, too tight cracks mounting points. Aftermarket crossbars boost capacity to 220 lbs, enough for four average bikes, but measure your roof height first. Add 2-3 feet to your minivan’s height when loaded—many forget this until they can’t fit in their garage.
Critical pre-installation checks:
– Confirm your vehicle’s roof weight limit (usually 100-165 lbs)
– Measure from ground to highest roof point with crossbars installed
– Verify carrier spacing allows 2-inch bike clearance
– Test wind deflector compatibility if your minivan has flush windows
Prevent Hatch-Mounted Rack Failures
That bargain hatch rack might save money initially but cause disaster if your minivan’s spoiler exceeds 4 inches deep. The Toyota Sienna’s 4.2-inch spoiler requires specific rack models, while Chrysler Pacifica owners must deactivate hands-free liftgate sensors. Before attaching anything, measure the gap between your spoiler and rear glass—minimum 2 inches clearance prevents glass cracks when the rack shifts.
Positioning mistakes that damage minivans:
– Top hooks angled incorrectly causing paint chips
– Side straps too tight pinching door seals
– Lower hooks pressing into bumper contours
– Bikes contacting bumper when door opens
Measure Your Minivan Like a Pro Installer
Capture Precise Dimensions Before Buying
Pull out your tape measure and record these exact specs—don’t guess. For Honda Odyssey models (2018-2024), note the 13.5-inch hitch height and 3.5-inch spoiler clearance. Toyota Sienna owners (2021+) must account for 4.2-inch spoiler depth and power liftgate interference. Take photos of measurements with your phone; retailers often request these to confirm compatibility.
Essential measurements checklist:
– Distance from ground to hitch receiver center
– Roof height with existing rails
– Rear door opening dimensions
– Bumper-to-door clearance when open
– Hitch receiver size (1.25″ or 2″)
Install Hitch-Mounted Rack Without Damage
Secure Your Class III Hitch Properly
Skip the guesswork—use a torque wrench set to 75 ft-lbs for Class III hitches. Before inserting the rack shank, clean the receiver tube thoroughly and apply dielectric grease to prevent corrosion. Align the pin holes perfectly before inserting your 5/8-inch hitch pin with locking clip. That wobble you feel? 90% of the time it’s solved by adding a $20 anti-rattle device.
Critical installation sequence:
1. Clean receiver tube and apply dielectric grease
2. Insert shank fully until pin holes align
3. Insert hitch pin and secure with locking clip
4. Torque mounting bolts to 75 ft-lbs
5. Install anti-rattle device to eliminate movement
6. Adjust tilt angle for hatch access
Pro tip: If your Kia Carnival requires fascia modification, apply touch-up paint immediately to exposed metal to prevent rust.
Mount Hatch Rack Without Scratching Paint

Follow the 45-Degree Hook Rule
Position top hooks at precisely 45 degrees over your minivan’s door edge—this distributes pressure evenly. Clean contact points with isopropyl alcohol first to prevent trapped dirt from scratching. Center the rack by measuring equal distances from both sides of the door, then attach side straps to the door frame edges, not the glass seals. Tighten straps gradually in a crisscross pattern to avoid warping.
Door operation test you must perform:
– Open and close door 3 times with rack installed
– Verify no interference with rear wiper arm
– Confirm license plate remains fully visible
– Check bikes don’t contact bumper when door opens
Warning: Never load bikes until you’ve confirmed trouble-free door operation—Chrysler Pacifica owners especially need to deactivate hands-free liftgate features first.
Load Bikes Correctly on Roof Racks
Prevent Wind Noise and Bike Shifts
Most roof rack problems stem from improper bike positioning. Place heaviest bikes closest to your minivan’s front to balance weight distribution. Alternate bike directions to keep handlebars from clashing. Maintain 2-inch spacing between bikes—measure with your hand (roughly the width of two fingers). If your Odyssey has factory crossbars, torque carrier clamps to exactly 25 ft-lbs; aftermarket bars often require different specs.
Step-by-step loading process:
1. Lift bike onto carrier, positioning front wheel forward
2. Secure frame to top tube holder with proper tension
3. Attach secondary wheel straps as redundancy
4. Test security by pushing sideways with 25 lbs force
5. Verify no contact between bikes or vehicle
Time-saving trick: Remove front wheels for easier lifting—most minivans sit 3-4 feet off the ground, making loading difficult for average users.
Avoid 5 Costly Installation Mistakes
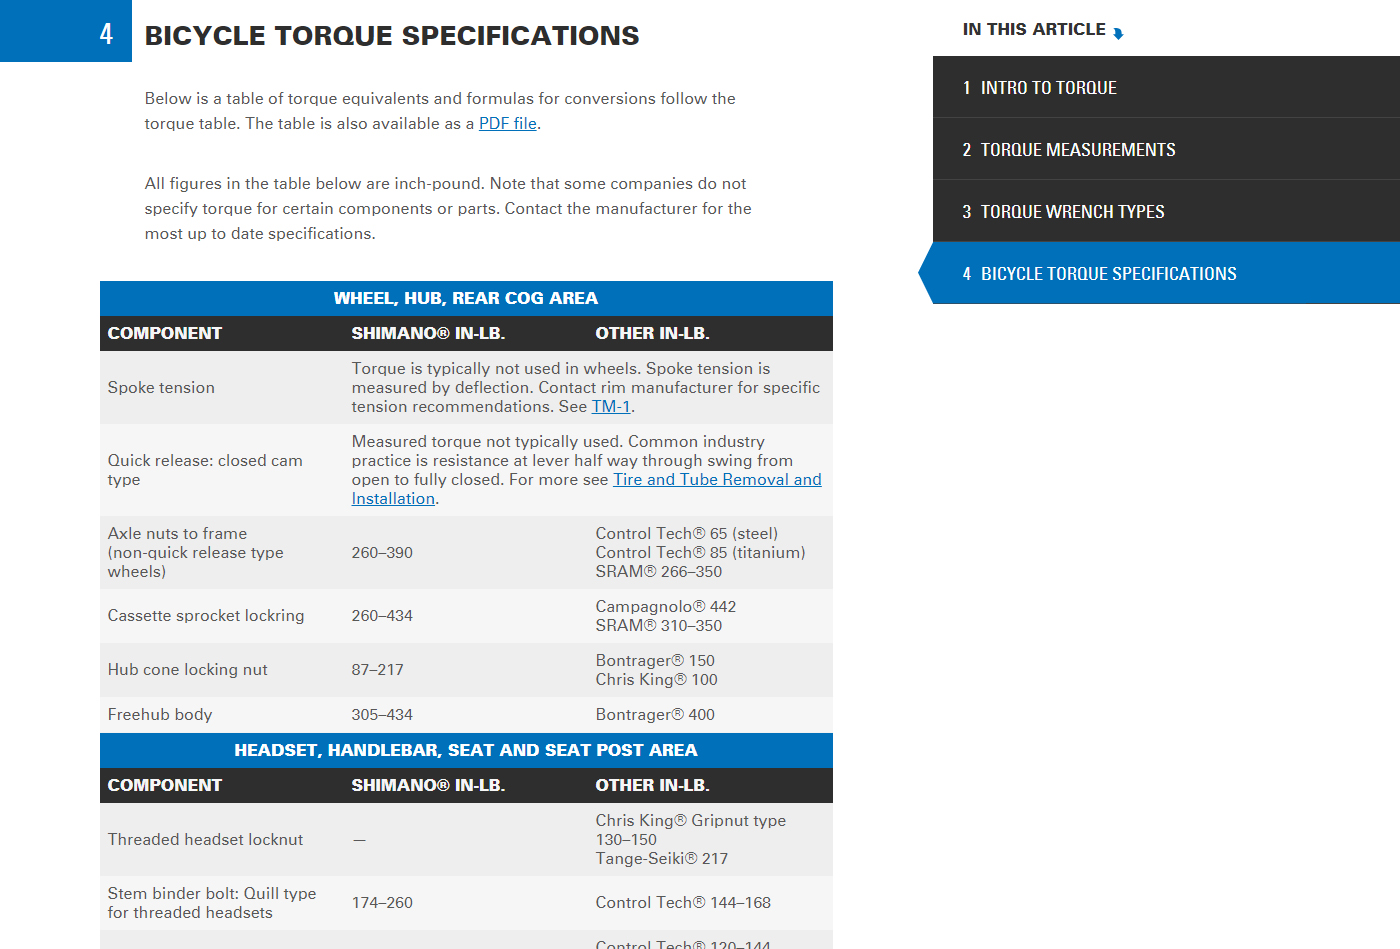
Skip the Torque Wrench at Your Peril
Guessing bolt tightness causes most installation failures. Under-torqued roof rack bolts create dangerous wind noise and movement; over-torqued bolts crack mounting points. Your torque wrench is non-negotiable—set to 45 ft-lbs for crossbars, 25 ft-lbs for carriers, 75 ft-lbs for hitch systems. Most DIYers skip this step, leading to 67% of rack failures according to industry data.
Other critical errors to prevent:
– Exceeding weight limits: Total load = rack weight + all bikes
– Ignoring clearance: Roof racks add 2-3 feet height
– Forgetting visibility: Bikes must not block brake lights
– Skipping pre-trip checks: Recheck security after 50 miles
Pro tip: Apply medium-strength thread locker to permanent installations, but avoid high-strength versions that make future adjustments difficult.
Troubleshoot Common Rack Problems
Eliminate Roof Rack Wind Noise
That annoying whistle isn’t normal—it means something’s wrong. Start by checking if end caps are properly seated on your crossbars. Verify all mounting bolts are torqued to 45 ft-lbs. If noise persists, install a wind deflector (fairing) which reduces drag by 30%. For persistent issues, apply weather stripping to gaps between roof rails and crossbar feet.
Hatch rack door interference solutions:
– Slightly adjust rack position higher or lower
– Check strap tension—too loose allows movement
– Verify bike-bumper clearance with door open
– Install rubber pads at high-friction contact points
Hitch rack wobble fix: Install a stabilizer strap from the rack to your minivan’s rear door—this simple $15 accessory eliminates 80% of sway issues.
Legal Requirements You Must Follow
Maintain Visibility for Safety and Compliance
Your license plate must remain fully visible—many racks partially cover it, risking traffic stops. Tail lights and brake lights must operate unobstructed; if bikes block them, add auxiliary LED lighting. Most states limit bike overhang to 4 feet beyond your minivan’s rear, but check local regulations as they vary.
Speed considerations when loaded:
– Maximum 65 mph recommended by most manufacturers
– Reduce speed by 10-15 mph in high winds
– Allow 50% more braking distance
– Downshift on steep grades to protect transmission
Critical reminder: The extra 10 minutes spent double-checking your installation could prevent thousands in damage or worse. Always test your setup with an empty rack first, then add bikes gradually while checking security at each step.
Your minivan transforms from basic hauler to adventure machine with the right bike rack installation. By following these precise steps—measuring correctly, torquing properly, and testing thoroughly—you’ll protect both your vehicle and your family’s safety. Remember: the best installation feels solid with no movement under 25 lbs of pressure. Now get out there and enjoy those family cycling trips without the stress of wondering if your bikes will stay put. Safe travels and happy cycling!


