
Adding a brake light transforms your dirt bike from a pure off-roader into a street-legal machine capable of safely navigating public roads. Whether you’re converting a competition bike for trail access or upgrading an older dirt bike for weekend adventures, installing a brake light requires careful component selection and proper electrical connections. This guide walks you through every critical step of the installation process, ensuring your brake light functions reliably across demanding off-road conditions while meeting street legal requirements. Most riders can complete this project in 2-3 hours with basic mechanical skills, turning their dirt-only machine into a versatile dual-sport companion.
Choose the Right Brake Light Switch for Your Bike

Selecting the appropriate brake light switch is the most critical decision in your installation project. The two primary options—hydraulic and mechanical switches—each offer distinct advantages suited to different brake configurations. Understanding these differences ensures you choose the optimal component for your specific dirt bike.
Hydraulic Switch Installation for Disc Brake Bikes
Hydraulic brake light switches replace the banjo bolt on your master cylinder, detecting pressure changes in brake fluid to activate the light when you apply the brakes. These switches provide exceptional durability because they mount securely within the brake system rather than externally, protecting them from crash damage and debris exposure. The K&S Technologies hydraulic switch (typically around $20) stands as the most recommended option within the dirt bike community.
Thread pitch verification proves essential with hydraulic switches. K&S Technologies produces switches with two distinct specifications: 10mm x 1.0 pitch for Brembo braking systems common on European and high-end Japanese motorcycles, and 10mm x 1.25 pitch for Nissan-produced master cylinders found on standard Japanese bikes. Installing a switch with incorrect thread pitch either won’t fit or will damage your master cylinder threads. The primary tradeoff with hydraulic switches involves a slight activation delay compared to mechanical options, as sufficient pressure must build to trigger the internal mechanism before the light illuminates.
Mechanical Switch Solutions for All Brake Types
Mechanical switches operate through physical contact rather than hydraulic pressure, making them compatible with both drum brake and hydraulic brake applications. These switches mount near the brake lever or pedal, using a spring mechanism that completes the electrical circuit when the brake is engaged. Front brake applications typically use a momentary normally open switch mounted beneath the lever, activating when lever pressure compresses the switch.
For rear drum brake applications, spring-activated switches connect to the brake arm, pulling the switch closed as the pedal depresses. The Baja Designs mechanical brake switch represents one commercially available option that adapts to various applications, though older dual sport motorcycles provide compatible switch sources at lower cost. One significant drawback to mechanical switches involves their vulnerability during crashes—the external mounting position makes them susceptible to being knocked out of adjustment or damaged entirely when the bike falls.
Gather Essential Tools and Components

Proper preparation streamlines the installation process and prevents mid-project trips to the store. Essential tools include metric wrenches for banjo bolt removal and switch installation, wire strippers and crimpers for electrical work, a soldering iron for permanent connections, and basic hand tools for switch mounting.
Electrical Supplies Checklist
Professional-grade installations require specific wiring supplies to ensure long-term reliability in the harsh dirt bike environment:
- 16 or 18 gauge stranded copper wire for primary circuits
- Rosin-core electrical solder (never acid-core plumbing solder)
- Dielectric grease to protect all electrical connections from moisture
- Heat shrink tubing for final insulation of soldered joints
- 14 gauge wire if using high-current incandescent bulbs
Avoid crimp-style connectors for permanent installations, as vibration gradually works connections loose on dirt bikes. Forum discussions across multiple dirt bike communities consistently reference crimp connection failures, with experienced builders unanimously recommending solder-and-heat-shrink as the only reliable method. If you must use crimp connectors temporarily, marine-grade heat-seal connectors provide better vibration resistance.
Install Your Hydraulic Brake Light Switch
Hydraulic switch installation provides the most robust solution for dirt bikes equipped with disc brakes. This process replaces your existing banjo bolt with a pressure switch that detects hydraulic pressure changes, completing the brake light circuit when you apply the brakes.
Remove Existing Banjo Bolt Properly
Begin by locating the banjo bolt on your front or rear brake master cylinder—this bolt connects the brake line to the master cylinder body. Place a container beneath the work area to catch any brake fluid that escapes during removal. Carefully loosen the banjo bolt using appropriate metric wrenches, supporting the brake line to prevent straining the connection. Completely remove the bolt and set it aside with its washers, noting the orientation and number of washers for proper reassembly.
A small amount of brake fluid will drip from the open connection, so have shop towels ready to contain the mess. This fluid damages paint and surfaces, so work on a protected surface and clean any spills immediately. Take this opportunity to inspect the banjo bolt and washers for damage or excessive wear, as these components should be replaced if they show any signs of deterioration.
Install Pressure Switch with Correct Sealing
Thread the pressure switch into the master cylinder bore by hand, ensuring the switch body seats properly against the washers. Hand-tightening ensures you don’t cross-thread the delicate switch threads, then use wrenches to secure the switch to the specified torque value—typically around 15-20 Nm for most applications. The washers must position correctly on either side of the banjo fitting to maintain proper sealing.
Most switches include specific washer configurations designed for their mounting pattern, so follow the included instructions precisely. Incorrect washer positioning causes brake fluid leaks that compromise both your brake system and electrical function. After installation, check for leaks by applying the brake several times and inspecting the connection point.
Wire Your Brake Light Electrical System Correctly
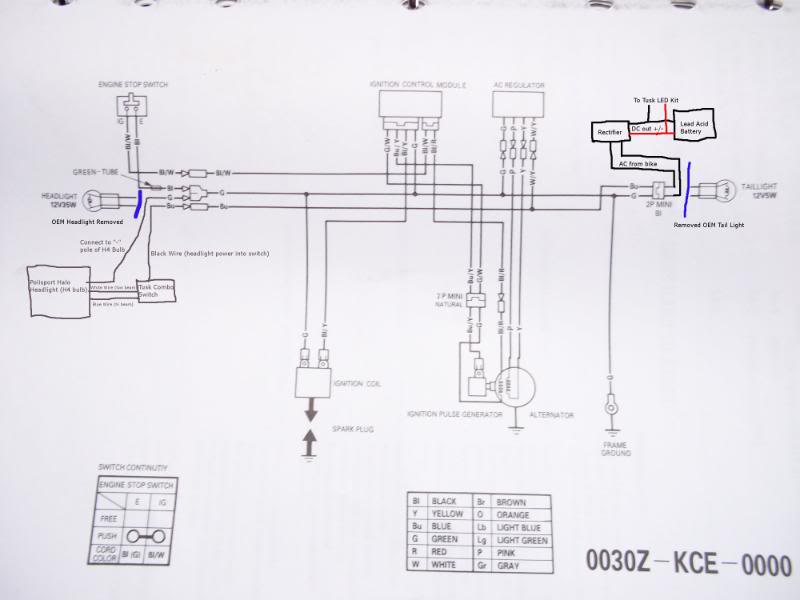
Wiring configuration depends heavily on your bike’s existing electrical system and tail light setup. Competition-oriented dirt bikes typically lack electrical systems entirely, requiring dedicated battery power, while dual sport conversions usually incorporate stators and rectifiers that provide convenient power sources.
Connect Power Source Appropriately
For bikes with existing electrical systems, the brake light can connect directly to the 12-volt system, either through the headlight circuit or a dedicated fused connection. Both AC and DC power sources work adequately for incandescent bulbs since lights don’t differentiate between current types. The stator-powered headlight circuit provides a convenient connection point on most dual sport conversions.
Bikes without electrical systems require dedicated battery power for the brake light. A 9-volt battery can power low-draw LED brake lights for occasional trail use, though this arrangement isn’t recommended for regular street use due to battery reliability concerns. Permanent installations benefit from adding a small battery and charging system. LED brake lights consume minimal power, making them ideal for battery-powered applications.
Configure Tail Light Circuit Correctly
Your existing tail light configuration significantly impacts wiring complexity. Motorcycles with dual-filament bulb sockets (1157-type bulbs with separate running light and brake light filaments) offer the simplest installation—simply run a switched wire from the brake light switch to the appropriate contact in the socket.
Single-filament sockets require either the resistor method or complete tail light assembly replacement. The resistor approach reduces normal running light brightness, with the brake switch bypassing the resistor to restore full brightness when braking. LED cluster replacements like the DRC unit provide a low-profile alternative that integrates multiple bright LEDs for attention-grabbing illumination.
Test Your Installation Before Road Use
Thorough testing before road use ensures your installation functions correctly under actual riding conditions. Rushing this phase risks discovering problems while traffic surrounds you, creating dangerous situations. Take time to verify every aspect of the installation, from switch activation timing to brightness adequacy in various lighting conditions.
Verify Switch Activation Timing
Have an assistant observe the brake light while you operate each brake independently. The light should illuminate with minimal lever or pedal travel, ideally activating just as braking begins rather than requiring significant movement. Test both front and rear brakes if you’ve installed switches on both, confirming parallel wiring functions correctly from either brake activation.
Mechanical switches may require adjustment after initial testing, as settling and vibration can affect activation timing. Fine-tune the switch position or linkage to achieve activation at the desired point in lever/pedal travel. Recheck after the first few rides, as initial vibration may require additional adjustment.
Check Brightness in Daylight Conditions
Test the brake light in bright daylight to verify brightness adequacy, as lights that appear adequate in garage conditions may prove insufficient in bright sunlight. The brake light should command attention from following traffic, clearly indicating deceleration. LED installations typically provide ample brightness, while incandescent bulbs may require higher-wattage filaments for adequate visibility.
If using the resistor method for single-filament conversions, verify the brightness differential between running and brake modes is clearly visible without being jarring. The running light should be noticeably dimmer than the brake light, creating an obvious visual cue when you apply the brakes.
Maintain Reliable Brake Light Operation
Ongoing maintenance ensures your brake light installation provides reliable performance throughout your ownership of the bike. While hydraulic switches require minimal attention, mechanical switches need periodic adjustment as components wear and mounting hardware loosens.
Establish a Regular Inspection Routine
Inspect brake light function during every pre-ride inspection, checking that the light activates properly when brakes are applied. Mechanical switches require more frequent attention—check adjustment monthly or whenever you notice activation timing drift. Hydraulic switches benefit from periodic inspection for brake fluid leaks around the switch seal, though they require no adjustment once properly installed.
Electrical connections should be inspected annually for corrosion or degradation, with dielectric grease reapplied as needed. Verify wire routing remains secure away from moving components and heat sources, replacing any damaged wire loom or cable ties that have degraded.
Troubleshoot Common Issues Quickly
Vibration-induced connection failure represents the most common electrical problem on dirt bike brake light installations. If your brake light flickers or fails intermittently, suspect a loose connection. The fix involves locating the failed connection (often at the switch, tail light socket, or ground connection) and resoldering with proper technique.
Switch failures can occur from crash damage, water intrusion, or simple wear over time. Hydraulic switches offer superior impact resistance due to their internal mounting location, while mechanical switches’ external position makes them vulnerable to damage during falls. Keep spare switches on hand for remote riding situations where failure would leave you stranded.
Final Considerations for Street-Legal Operation
Your completed brake light installation should provide years of reliable service with minimal maintenance, transforming your dirt bike into a street-legal machine capable of safe highway travel. Complete dual sport conversion kits from manufacturers like Trick Dual Sport offer premium solutions including turn signals, horns, and integrated lighting for riders seeking comprehensive street legal equipment.
Remember that brake light installation affects only your visibility to following traffic—it doesn’t change your dirt bike’s fundamental handling characteristics or braking performance. Ride within your abilities and maintain appropriate following distances that account for your bike’s off-road heritage. With proper installation and maintenance, your brake light provides the visibility enhancement necessary for safe street operation while maintaining all the performance that makes dirt bikes so capable on the trail.


