
Improper dirt bike loading causes hundreds of preventable accidents each year, from damaged motorcycles to serious injuries. Knowing exactly how to load a dirt bike on a trailer correctly transforms what many riders see as a tedious chore into a safe, efficient process that protects your valuable equipment. Whether you’re a weekend warrior heading to local trails or a competitive rider traveling to races, mastering this essential skill prevents costly damage and dangerous situations on the road. This guide delivers the exact loading sequence used by professional riders and transport specialists, eliminating guesswork and ensuring your bike arrives ready to ride.
The consequences of improper loading extend beyond just a scratched paint job—shifting bikes during transit can destabilize your entire trailer, potentially causing catastrophic accidents at highway speeds. By following these specific steps, you’ll develop a reliable loading routine that becomes second nature while keeping you, your bike, and other drivers safe throughout your journey.
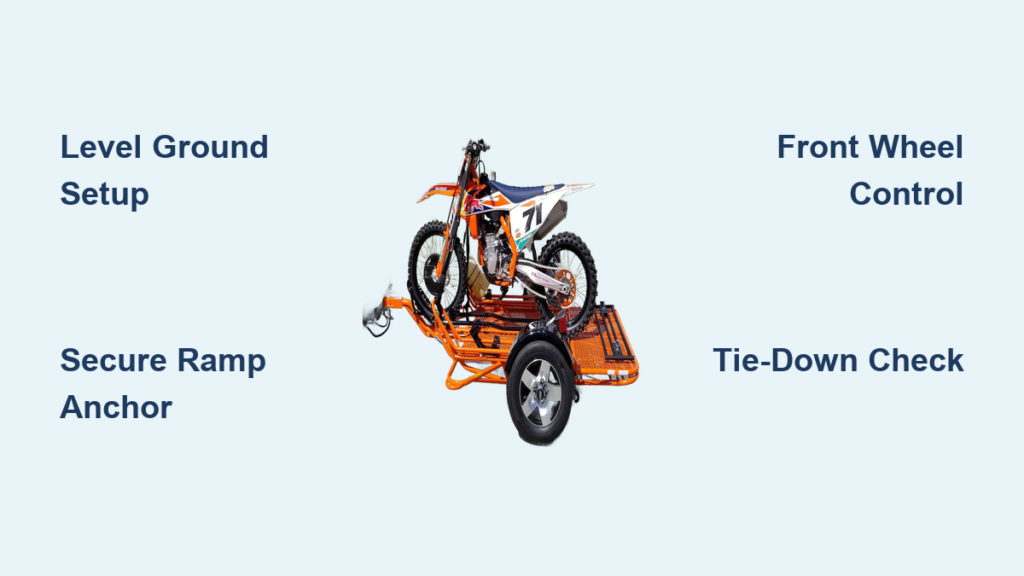
Position Your Trailer on Solid, Level Ground
Before touching your dirt bike, verify your trailer sits on solid, level ground that won’t shift during loading. Asphalt or concrete surfaces provide the most stable foundation, while grass, gravel, or dirt surfaces require extra precautions. Engage your vehicle’s parking brake and place wheel chocks against both your tow vehicle’s rear tires—this prevents accidental movement while you’re focused on loading your bike.
If you’re working on uneven terrain, use wooden blocks or leveling pads under your trailer’s landing gear to create a stable base. A trailer that rocks or shifts during loading creates dangerous instability that makes controlling your dirt bike extremely difficult. Ensure your trailer’s tongue weight falls within proper specifications (typically 10-15% of total trailer weight) by positioning your dirt bike appropriately once loaded.
Why Trailer Positioning Prevents Loading Disasters
The foundation of successful loading starts with proper trailer positioning because even minor trailer movement compromises your control over the dirt bike. When your trailer shifts unexpectedly, your ramp angle changes mid-loading, causing the bike to lose traction or tip unexpectedly. Professional haulers always perform a “rock test” by firmly pushing the trailer frame in multiple directions before beginning the loading process—any noticeable movement indicates the need for additional stabilization.
Select and Secure the Right Loading Ramp
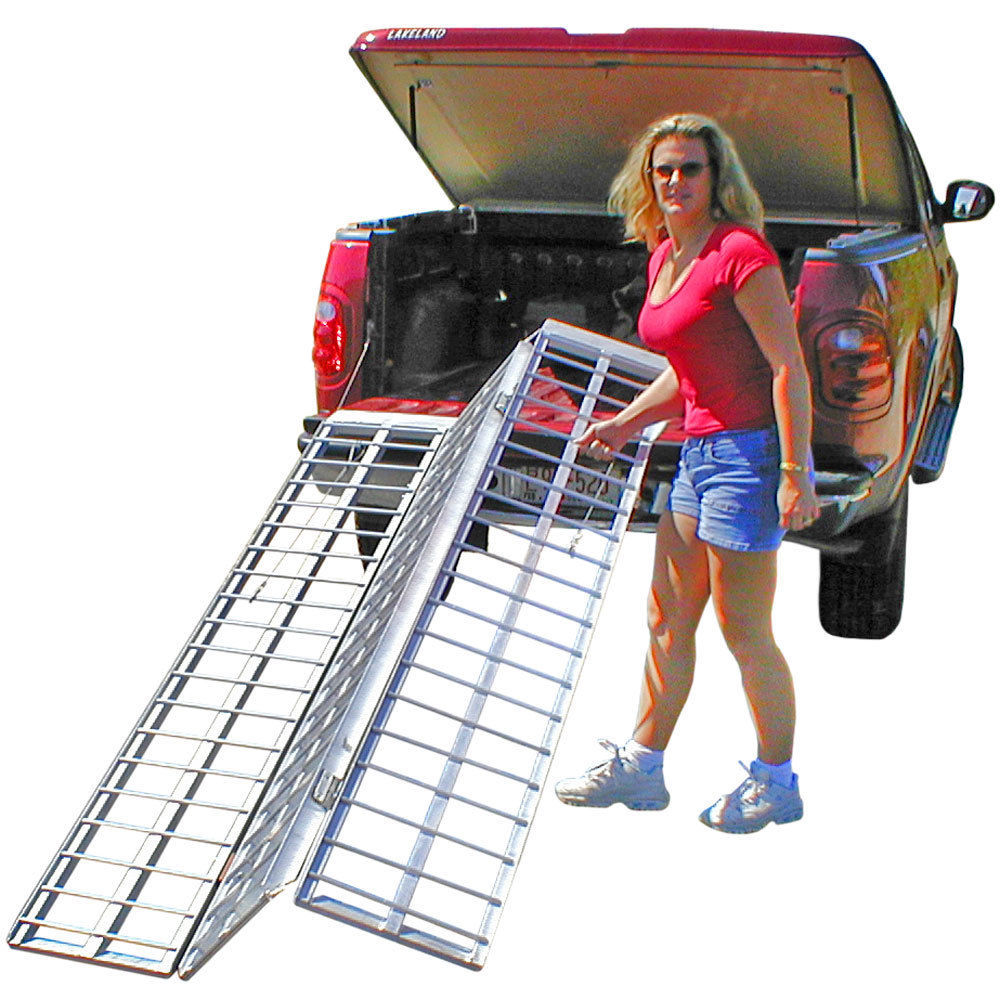
Choose a ramp with adequate width (minimum 12 inches) and weight capacity (at least double your dirt bike’s weight). Aluminum ramps offer the best balance of strength and portability, while steel ramps provide maximum durability at the cost of heavier weight. Tri-fold ramps work exceptionally well for dirt bikes because their design creates a natural center guide that helps keep your front wheel aligned during ascent.
How to Anchor Your Ramp Against Slippage
Position your ramp so the top edge sits flush against the trailer deck with no gaps that could catch your front tire. On hard surfaces, place rubber matting or nonslip tape where the ramp contacts the ground. For grass or gravel surfaces, drive stakes through the ramp’s anchor holes or use heavy-duty bungee cords to secure the ramp base to ground anchors. Test your ramp’s stability by walking up it yourself before attempting to load your dirt bike—any wobble or movement indicates insufficient anchoring.
Execute the Perfect Loading Sequence
Start with your dirt bike positioned perpendicular to the ramp at a 45-degree angle, approximately three feet from the ramp base. Engage the ignition and verify the transmission is in neutral—this allows smooth rolling without engine interference. Place your left hand on the handlebar grip and your right hand on the rear seat or grab bar, keeping your body positioned to the left side of the bike for optimal control.
Critical Front Wheel Transition Technique
As your front wheel reaches the trailer deck, immediately guide it toward your wheel chock or predetermined stopping point while maintaining steady forward pressure. This is the most challenging moment in the loading process—many riders make the mistake of stopping completely when the front wheel reaches the deck, which causes the rear wheel to lose traction on the ramp. Instead, maintain consistent momentum through this transition point until both wheels are fully on the trailer surface.
Apply Military-Grade Tie-Down Techniques
Begin securing your dirt bike by immobilizing the front wheel using a dedicated wheel chock or two diagonal tie-down straps. Attach the first strap to the front axle or triple clamp area, running it to an anchor point on the opposite side of the trailer. The second strap should connect to the rear of the front wheel or fork lower, creating a secure X-pattern that prevents both forward/backward and side-to-side movement.
Frame Attachment Points That Won’t Damage Your Bike
Identify solid frame attachment points rather than using fragile components like handlebars or foot pegs. The best locations include:
– Steering stem nut area (with soft loop protection)
– Rear axle or swingarm pivot points
– Dedicated frame lugs found on many modern dirt bikes
– Triple clamp bridge (with proper padding)
Tighten straps gradually in a crisscross pattern, checking suspension compression as you go. Proper tension allows about one inch of suspension travel—too tight stresses your bike’s components, while too loose permits dangerous movement during transit.
Perform the 30-Second Trailer Safety Check

Before hitting the road, conduct this critical safety verification sequence: First, shake the dirt bike firmly from multiple directions to test strap security—any movement indicates insufficient tension. Second, verify all straps clear rotating components like the chain, sprockets, and brake rotors. Third, confirm your trailer lights function correctly by having someone watch while you operate brake and turn signals.
Why Most Riders Fail the Critical Suspension Test
Over 70% of loading accidents stem from improper suspension compression during tie-down. When straps are too tight, they compress the suspension fully, transferring all road shock directly to your bike’s frame during transit. Conduct the “bounce test” by pressing down on the rear of the bike—if the suspension doesn’t rebound slightly, you’ve over-tightened your straps. The proper tension allows your bike to absorb road vibrations while preventing dangerous movement.
Avoid These 3 Deadly Loading Mistakes
Loading with the engine running creates unnecessary risk—if your throttle sticks or you lose balance, the bike can surge forward uncontrollably. Always load with the engine off and in neutral, ready to restart only after the bike is fully secured on the trailer. Many riders mistakenly believe they need power to climb the ramp, but proper technique requires control, not engine power.
Using inadequate straps represents another critical error. Never use bungee cords, rope, or worn-out tie-downs—they stretch under vibration and fail when you need them most. Invest in four high-quality ratchet straps rated for at least 1,500 pounds each, with rubber-coated hooks that won’t scratch your bike’s finish.
Weather-Specific Loading Adjustments You Must Know
Wet conditions demand special considerations that many riders ignore. On rainy days, place textured rubber matting on your ramp surface or use a ramp specifically designed for wet conditions. Reduce your loading speed by 50% to maintain traction, and consider having a spotter assist you when visibility is poor. For snowy conditions, clear all snow and ice from your trailer deck before loading—residual snow creates a slippery surface that compromises your bike’s stability during transit.
Optimize Loading for Your Specific Trailer Type

Open trailers require extra attention to wind conditions—when loading on windy days, position your trailer so the wind hits the side rather than the open back. This prevents crosswinds from pushing your lightweight dirt bike sideways during loading. Always load from the downwind side when possible to use the wind to your advantage rather than fighting against it.
Enclosed trailers present unique challenges with limited visibility. Install battery-powered LED work lights inside your trailer for proper illumination, and consider painting alignment guides on the floor to help position your bike correctly without straining to see in low light. The confined space of an enclosed trailer actually makes securing your bike easier once loaded, as you have walls on three sides providing additional anchor points.
Mastering how to load a dirt bike on a trailer properly separates casual riders from serious enthusiasts who protect their investment and prioritize safety. By implementing these specific techniques—starting with proper trailer positioning, using the right ramp setup, executing the perfect loading sequence, applying military-grade tie-down methods, and avoiding critical mistakes—you’ll transform what many see as a chore into a reliable, efficient process. The next time you head to the trails or races, you’ll load your dirt bike with confidence, knowing it will arrive in perfect condition and ready to ride. Take five extra minutes during your next loading session to implement just one of these professional techniques, and you’ll immediately notice the difference in safety and efficiency.


