
Struggling to touch the ground on your dirt bike? You’re not alone. Thousands of riders face this challenge daily, especially shorter riders who find themselves tiptoeing at stops or feeling unstable during technical maneuvers. The solution often lies in properly lowering your dirt bike rear shock—a modification that, when done correctly, can transform your riding experience while maintaining safety and performance. Many riders waste money on dangerous quick-fix solutions that compromise handling, but the right approach involves precise technical adjustments that preserve suspension function while achieving your desired ride height. This guide reveals the professional methods used by suspension experts to safely and effectively lower dirt bike rear shock systems.
When executed properly, lowering your dirt bike rear shock creates a more confidence-inspiring platform without sacrificing critical suspension travel. However, incorrect modifications can lead to dangerous bottoming issues, compromised handling, and even catastrophic component failure. Understanding the technical nuances behind suspension geometry and leverage ratios separates safe, effective lowering from risky amateur attempts. Whether you’re a weekend trail rider or a competitive racer, this comprehensive guide will help you achieve the perfect ride height while keeping your bike performing at its best.
Why Shorter Riders Need Proper Rear Suspension Adjustment
Riders under 5’8″ often struggle with stock dirt bike seat heights, leading to anxiety at stops and compromised body positioning during technical riding. When you can’t confidently flat-foot your bike, your entire riding experience suffers—you spend more mental energy worrying about stability than focusing on the trail ahead. Lowering your dirt bike rear shock provides immediate benefits: better ground reach, improved confidence during technical sections, and more secure stops at intersections or on steep terrain.
Beyond rider accommodation, strategic rear shock lowering can enhance specific performance characteristics. A lower center of gravity improves stability during high-speed sections, while altered suspension geometry affects how your bike responds to acceleration forces. For track riders, fine-tuned lowering can optimize weight transfer during jumps, while trail riders benefit from improved cornering stability on uneven terrain. The key is understanding your specific riding needs before making any modifications—don’t lower simply because others do, but because it solves a specific problem in your riding experience.
The 25mm Safety Threshold for Effective Lowering
Professional suspension technicians universally recommend limiting your dirt bike rear shock lowering to 25mm (approximately 1 inch) as the maximum safe adjustment for most riding applications. This precise measurement provides noticeable improvement in rider confidence without significantly compromising ground clearance or suspension travel. Every millimeter beyond this threshold exponentially increases the risk of bottoming out, reduced cornering clearance, and compromised suspension performance during aggressive riding.
Factory-lowered motorcycle models present a special consideration—these bikes already feature reduced suspension travel from the manufacturer, so additional lowering should be strictly limited to show bikes where safe operation isn’t a priority. For riders who need more than 25mm of lowering for physical reasons, consider pairing rear shock adjustment with seat modifications rather than pushing the suspension beyond safe limits. Remember: the goal isn’t just to sit lower, but to maintain optimal suspension function that keeps you safe while riding.
Why Lowering Links Create Dangerous False Security
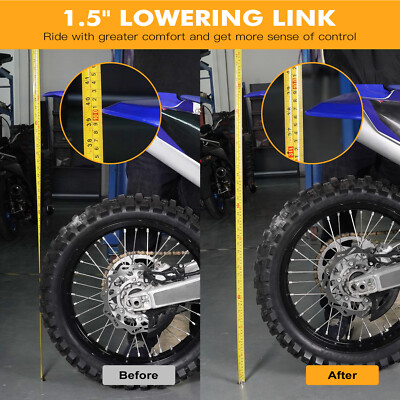
Never install lowering links on your dirt bike rear shock—this common amateur solution creates a serious safety hazard that has caused numerous crashes. These aftermarket components merely change the static mounting position of your shock without actually reducing suspension travel. The dangerous consequence? Your bike appears lower when stationary, but during riding, the wheel can still travel upward through its full range and contact the fender, potentially stopping the rear wheel mid-ride.
This deceptive “fix” addresses only visual aesthetics while ignoring fundamental suspension dynamics. When you hit a bump that compresses your suspension, the tire maintains its full travel path toward the fender, creating a ticking time bomb for catastrophic failure. Professional suspension tuners universally reject lowering links because they fail to account for leverage ratios, spring rates, and damping requirements that proper lowering demands. Save yourself from dangerous surprises and avoid this risky shortcut entirely.
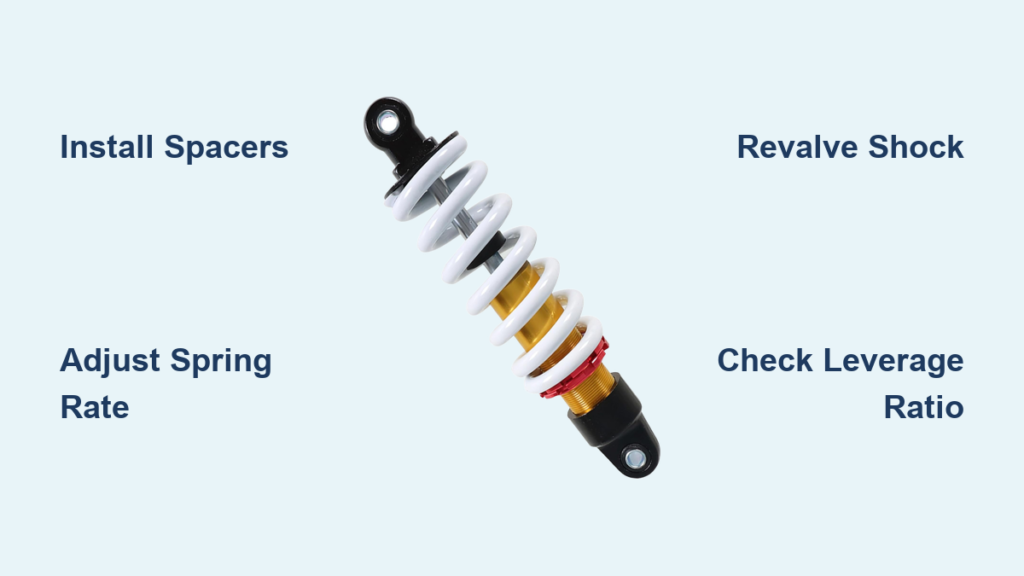
Internal Spacer Installation: The Only Safe Method
The correct approach to lowering your dirt bike rear shock involves internal modification using precisely machined spacers that effectively shorten the shock itself. Unlike dangerous lowering links, this method reduces both static height and total suspension travel proportionally, maintaining proper suspension dynamics throughout the entire range of motion. A major advantage of internal spacers is complete reversibility—you can return your suspension to stock configuration if needed, preserving your bike’s resale value.
Professional shops like Race Tech manufacture lowering spacers that allow shock shortening in precise 1mm increments, enabling fine-tuned adjustment to achieve your exact desired height. Crucially, these spacers don’t come pre-sized for specific models because the correct length depends on your bike’s unique leverage ratio, rider weight, and intended use. Attempting this modification without professional guidance often leads to improper spacing that compromises handling or creates safety hazards. For reliable results, trust this critical adjustment to experienced suspension technicians who understand the complete lowering process.
Mastering Leverage Ratio Calculations
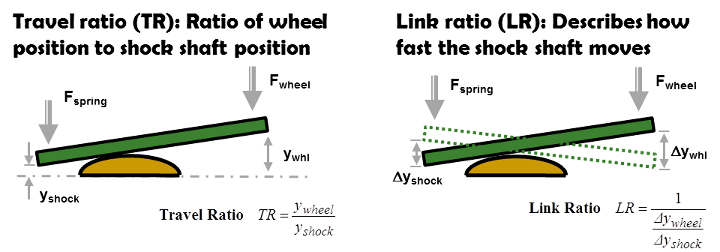
Understanding your dirt bike’s leverage ratio is non-negotiable when lowering the rear shock—it’s the mathematical key that determines your actual lowering amount. Modern dirt bikes feature leverage ratios between 3.1 and 4.0, meaning the suspension linkage multiplies the shock’s movement at the wheel. This geometric relationship means shortening your shock by 3mm might actually lower your rear end by 9.3mm at the wheel with a 3:1 ratio.
For accurate results, professional suspension tuners calculate spacer length using your specific bike’s leverage ratio. The formula is straightforward: desired lowering amount ÷ leverage ratio = required spacer thickness. Without this calculation, riders risk over-lowering by significant margins that compromise both safety and performance. This is why professional installation is essential—improper spacer thickness creates handling issues that aren’t immediately apparent but become dangerous during aggressive riding.
Spring Modifications for Optimal Performance
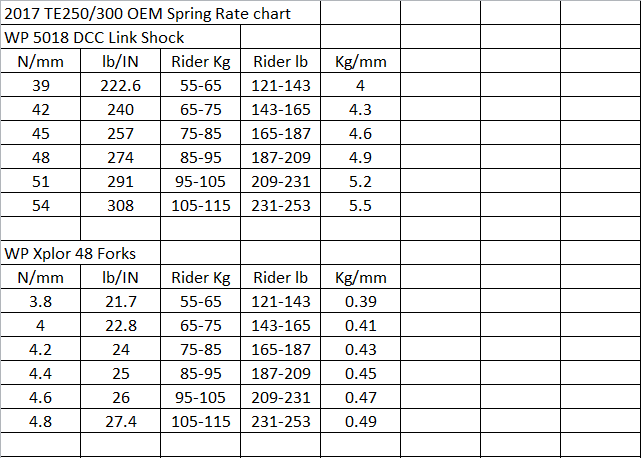
When you shorten your dirt bike rear shock with spacers, shorter springs become necessary to maintain proper suspension function and prevent premature bottoming. You have three options: carefully cutting stock springs to length, installing high-performance aftermarket springs, or using purpose-built springs designed specifically for lowered applications. Important physics note: shortening a spring increases its stiffness, which may help or hurt your setup depending on your weight and riding style.
Calculating Required Spring Rate Increases
The mathematical relationship between reduced travel and required spring stiffness follows precise principles that ensure proper suspension behavior. When suspension travel decreases by 20%, spring stiffness must increase by 25% to maintain appropriate damping characteristics. For a 50% travel reduction, stiffness must double (100% increase). These proportional increases compensate for the reduced range of motion, ensuring your suspension responds correctly to impacts throughout its modified travel range.
Essential Revalving for Lowered Suspension
Professional suspension technicians strongly recommend complete revalving when lowering your dirt bike rear shock. Simply shortening the shock without adjusting damping creates suspension that feels either too harsh or bottoms out excessively. When you lower the rear end, the suspension begins deeper in the leverage ratio curve, fundamentally changing how it responds to bumps and loads throughout the compression stroke.
Without proper revalving, your bike will exhibit unpredictable handling characteristics that can catch even experienced riders off guard. Gold Valves or equivalent high-performance components ensure damping forces remain appropriate throughout the modified travel range, providing consistent performance and protection against bottoming. This critical step transforms a basic height adjustment into a comprehensive suspension upgrade that enhances both safety and ride quality.
Solutions for Non-Rebuildable Rear Shocks
Some dirt bike models feature rear suspension that cannot be disassembled for internal spacer installation. For these problematic applications, custom-built shocks like Race Tech’s G3-S Series provide the only safe lowering solution. These purpose-engineered units incorporate the desired lowering amount while maintaining proper spring rates, valving, and reliability—something improvised solutions can never achieve.
Never attempt to modify non-rebuildable shocks with makeshift solutions. The risks of component failure and compromised safety far outweigh any perceived benefits of a lower seat height. Consult with a professional suspension shop about custom shock options designed specifically for your motorcycle model and riding requirements.
Professional Installation: Your Safety Investment
Lowering your dirt bike rear shock should only be performed by experienced suspension tuners who understand the complete process, including leverage ratio calculations, spring rate adjustments, and valving modifications. This isn’t a DIY project for those without proper training, specialized tools, and technical knowledge. Improper installation can result in suspension that feels unpredictable, wears prematurely, or fails dangerously during operation.
The investment in professional installation pays dividends in safety, performance, and peace of mind. A qualified technician will assess your specific motorcycle, calculate the appropriate spacer length, determine correct spring requirements for your weight and riding style, and perform the complete transformation with proper valving adjustments. For expert consultation, contact Race Tech’s service department at 951.279.6655 (option 5 or extension 117).
Maintaining Your Lowered Rear Suspension
After properly lowering your dirt bike rear shock, regular maintenance becomes even more critical. Reduced travel means less margin for error before bottoming occurs, so monitor your suspension function closely and check for changes in handling characteristics after each ride. Pay special attention to how your bike responds to bumps and jumps, and be alert to any signs of bottoming, harshness, or unusual noises.
Schedule periodic professional inspections of spring preload, damping settings, and overall suspension function to catch potential issues before they become safety hazards. The investment in regular maintenance protects both your safety and the longevity of your suspension components, ensuring your lowered dirt bike continues to perform reliably session after session. Remember: proper lowering isn’t a one-time modification but part of an ongoing commitment to optimal suspension performance.


