
Hauling your dirt bike in a pickup truck without proper securing is a recipe for disaster—imagine hitting a bump and watching your $8,000 machine crash into your tailgate at 55 mph. Every year, thousands of dirt bikes suffer costly damage during transport because riders skip critical securing steps or use improper techniques. Whether you’re heading to the local trailhead or embarking on a cross-country adventure, knowing how to secure a dirt bike in a truck properly protects your investment and ensures safe arrivals. This guide reveals the proven techniques professional haulers use to keep dirt bikes locked down tight, from equipment selection to the diagonal loading method that creates natural stability without complicated rigging.
The process involves three critical phases: preparation and equipment selection, loading technique, and tie-down strategy. Each phase builds upon the previous one, creating a complete system that keeps your dirt bike stable regardless of road conditions. By following this guide, you’ll learn how to maximize your truck’s anchor points, understand tensioning techniques that prevent strap creep, and discover why diagonal positioning creates superior stability compared to traditional parallel loading.
Essential Equipment for Dirt Bike Transport

Before you attempt to load your dirt bike, gathering the right equipment ensures a smooth and safe transport experience. The three fundamental tools you need are a loading ramp, ratchet tie-down straps, and understanding of your truck’s anchor points. Loading ramps provide the necessary inclined plane to transition your dirt bike from ground level into the truck bed, with foldable models offering the best combination of portability and ease of storage. These ramps typically feature weight ratings exceeding 400 pounds, which accommodates virtually all dirt bike models, but verifying the rating against your specific bike’s weight remains important for safety—remember to include the weight of any accessories and a full fuel tank in your calculations.
Ratchet tie-down straps serve as the primary securing mechanism and differ significantly from standard tie-downs you might find in a garage. The ratcheting mechanism allows for precise tensioning that eliminates the slack which typically develops during transit with simpler straps. Each strap features metal hooks on one end for attaching to anchor points in your truck bed and soft loop ends for connecting to your motorcycle’s frame or handlebars. The soft loops prevent scratching and damage to painted or chrome surfaces, distributing load more evenly than metal hooks that could gouge your bike’s components. For most dirt bikes, two-inch wide straps with a 3,000-pound break strength provide the ideal balance of security and practicality.
Wheel chocks represent an optional accessory that many experienced transporters find unnecessary when using proper loading and tie-down techniques. These wedge-shaped devices prevent wheels from rolling, but the diagonal loading method described in this guide combined with strategic tie-down placement provides sufficient stability without requiring additional equipment. This becomes particularly advantageous when transporting multiple dirt bikes, as the absence of wheel chocks allows more flexible positioning within the truck bed. If you do choose to use wheel chocks, position them against the rear wheel when loading parallel to the truck bed, but remember they shouldn’t replace proper tie-downs—they’re supplemental only.
Before each transport session, inspect all equipment for signs of wear or damage. Ratchet mechanisms should operate smoothly without binding or slipping, and straps should be free of fraying, tears, or UV damage that compromises strength. Your loading ramp should have secure hinge points and show no signs of structural fatigue or bending—give it a firm shake to check for looseness before committing your bike’s weight to it.
How to Verify Tie-Down Strap Quality
When purchasing straps, look for clear labeling of the working load limit (WLL), which should be approximately one-third of the breaking strength. For a typical 250-350 pound dirt bike, straps with a 1,500-pound WLL provide adequate safety margin. Check for UV-resistant polyester webbing rather than nylon, which stretches more and degrades faster in sunlight. The metal hardware should be powder-coated or chrome-plated to resist corrosion, and all stitching should be triple-stitched with UV-resistant thread. Give the strap a thorough visual inspection before each use—any sign of fraying, cuts, or damaged hardware means it’s time for replacement.
Proper Loading Ramp Setup and Angle

Proper site selection and truck positioning form the foundation of successful dirt bike transportation. Parking your truck on a flat, level surface is critical because it ensures the loading ramp sits at a safe, manageable angle that won’t cause your bike to accelerate uncontrollably during loading. A level surface also prevents the truck from rocking or shifting during the loading process, which could cause dangerous accidents, and provides a stable base for the entire operation. Concrete pavement, asphalt, or other hard, flat surfaces work best, while soft or uneven ground can compromise stability and create hazardous situations.
Once your truck is positioned correctly, unfold the loading ramp and place it with the finger ends—the narrower section that contacts the ground—on the pavement and the wider end resting on the tailgate. The transition point where the ramp meets the tailgate requires particular attention, as this is where the ramp could slip or shift during use. A proven technique from experienced transporters involves using additional tie-down straps to secure the ramp to anchor points underneath the tailgate if the ramp feels at all wobbly or loose. This simple extra step prevents the ramp from sliding or collapsing during the critical moment when your bike’s full weight is upon it.
The loading ramp angle significantly impacts both loading difficulty and safety. Ramps placed at too steep an angle require more upward force and can cause the bike to tip backward if you lose control, while ramps that are too shallow create a longer lever arm that feels unstable underfoot. Most experts recommend maintaining an angle between 20 and 30 degrees from horizontal, which balances manageable rolling resistance with structural stability. If the ramp feels too steep, back the truck slightly further from the loading point to reduce the angle. If it feels too shallow and unstable, move the truck closer to the ramp’s base to increase the angle. For precise measurement, use a smartphone angle finder app to verify your ramp angle before loading.
Diagonal Loading Technique for Maximum Stability
The actual loading process requires understanding proper body mechanics and bike positioning to execute safely and efficiently. Before approaching the ramp, place your dirt bike in neutral gear, which allows the wheels to roll freely without the risk of the bike lurching forward if the throttle accidentally engages. Position the bike several feet back from the ramp’s base, centered relative to the ramp’s width, while you stand beside the bike facing the direction of travel. Grip the handlebars firmly with one hand while positioning your body alongside the bike for control.
Execute the loading motion smoothly and deliberately, rolling the bike up the ramp in a continuous motion rather than in stops and starts. Push from behind while guiding from the side, positioning your body slightly behind and to the side of the bike’s centerline. This positioning allows you to correct any tendency for the bike to drift left or right on the ramp while maintaining forward momentum. Keep the engine off during loading—the rolling motion in neutral requires no power, and keeping the engine off eliminates the risk of accidental throttle engagement.
Single Bike Positioning Strategy
For transporting a single dirt bike, position the bike diagonally in the truck bed with the front wheel in one front corner and the rear wheel in the diagonally opposite rear corner. This diagonal orientation maximizes the distance between the bike’s contact points with the truck bed, creating a wider base of support. It positions the bike at an angle that naturally resists tipping forces from acceleration and braking, and leaves space for additional cargo in the remaining area. The diagonal position also aligns the bike’s frame in a way that makes tie-down attachment more intuitive and effective—your tie-down straps will pull against the natural forces experienced during transport.
Two-Bike Transport Configuration
When transporting two dirt bikes simultaneously, position them with front wheels turned inward so handlebars face each other, creating a symmetrical arrangement that maximizes stability. This facing-inward configuration prevents handlebars from interfering with each other during transit and positions the bikes so their combined mass creates a stable center of gravity. If you’re not using wheel chocks, this inward-facing, parallel positioning becomes even more critical for maintaining stability. Position the bikes as far apart as the truck bed width allows, with sufficient clearance between handlebars and between outer wheels and truck bed walls—typically 4-6 inches of clearance prevents contact during normal road conditions.
Professional Tie-Down Strategy for Absolute Security
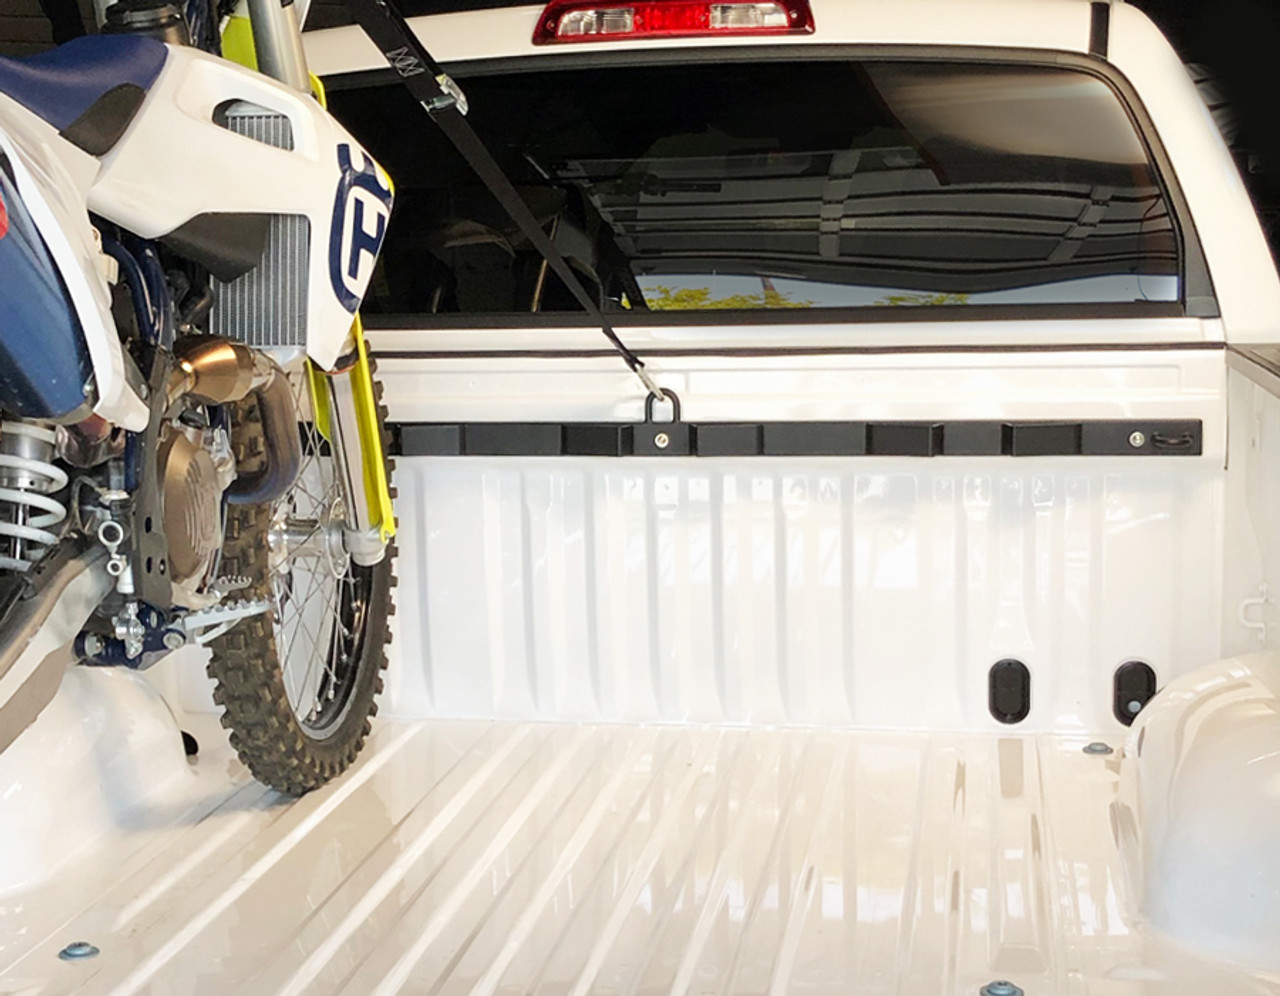
The tie-down phase represents the most critical element of securing a dirt bike for transport, as inadequate securing causes most bike damage and accidents during transportation. Modern pickup trucks feature multiple anchor points integrated into the truck bed floor and walls, typically consisting of metal rings or loops bolted to the bed surface. These anchor points are rated for specific load capacities, usually between 500 and 1,000 pounds per point, and are strategically placed to provide optimal attachment locations for various cargo types. For dirt bike securing, the primary anchor points are typically located along the sides of the bed near the front corners where the cab meets the bed.
Begin the tie-down process by attaching a ratchet strap’s hook end to the front-right metal ring inside the truck bed. This anchor point provides a forward-facing attachment that resists the bike’s tendency to slide backward during braking. The opposite end of the strap—the soft loop end—should attach to the right handlebar or an appropriate frame point on your dirt bike. Once both ends are connected, engage the ratchet mechanism to remove all slack from the strap and pump the handle to increase tension until the strap is snug but not so tight that it deforms the bike’s components. A good tension test: you should be able to press down on the strap with your thumb and feel firm resistance, but not so tight that the strap cuts into the bike’s frame.
Critical Tensioning Technique
After completing the first tie-down on one side, repeat the process for the opposite side to create a cross-bracing effect that secures the bike from movement in multiple directions. The second strap should attach from the opposite bed anchor point to the opposite handlebar or frame point, creating an X-pattern when viewed from above that resists both forward and lateral movement. Tension each ratchet strap independently, checking that both straps share the load evenly. If one strap is significantly tighter than the other, release some slack from the tighter strap and apply additional tension to the looser one until both are equally tensioned. Professional haulers recommend applying tension in stages—tighten each strap somewhat, then go back and apply final tension to both—to achieve balanced load distribution.
Safety Checks Before Hitting the Road
Before driving away, perform these critical safety checks to ensure your dirt bike remains secure throughout the journey. First, attempt to move the bike in all directions—push forward, backward, and side-to-side. There should be minimal movement, with any motion being absorbed by the bike’s suspension rather than indicating loose tie-downs. Second, verify that all straps are positioned away from moving parts like suspension components that could cause wear during transit. Third, check that no straps are positioned where they could contact hot engine parts during transport. Finally, take a photo of your securement setup as a reference for future loads and to document your proper procedures in case of an accident.
For trips longer than 30 miles, stop after the first 10-15 miles to recheck strap tension—temperature changes and initial vibration often cause slight relaxation that requires minor adjustment. During these checks, inspect for any unusual wear points where straps contact the bike and verify that all anchor points remain secure. This simple 60-second stop prevents most transport-related damage and gives you peace of mind for the remainder of your journey.


