
That frustrating moment when your dirt bike won’t start on the first kick—especially when you’re ready to hit the trails—is all too familiar for many riders. The choke is your secret weapon for reliable cold starts, but using it incorrectly can flood your engine or leave you stranded in the parking lot. Whether you’re a beginner struggling with your first cold morning ride or an experienced rider who’s never fully understood this critical component, mastering how to use a choke on a dirt bike transforms frustrating mornings into smooth kick-starts. This guide delivers the exact steps, timing, and troubleshooting you need to start your bike confidently in any temperature.
Locate Your Dirt Bike’s Choke Mechanism
Finding the choke on your dirt bike is the first critical step before you can use it properly. Most dirt bikes position the choke in one of two places, and knowing where to look saves time when you’re standing in the cold with a stubborn engine.
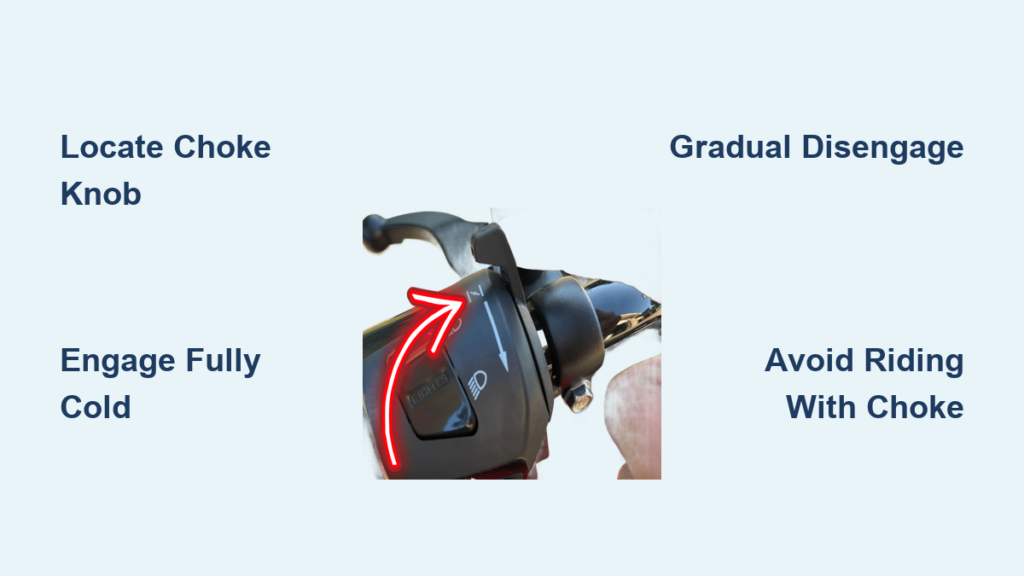
Identify Carburetor-Mounted Choke Knob
The most common choke location is directly on the carburetor as a black knob protruding from the side or top. This quarter-sized knob typically pulls outward to engage the choke and pushes inward to disengage it. When pulled out, it restricts airflow to create that essential rich fuel mixture for cold starts. If you’re on your knees inspecting your engine, look for this distinctive black component near the air intake—many riders mistake it for a random bolt until they learn its purpose.
Check Handlebar-Mounted Choke Controls
Some modern dirt bikes feature handlebar-mounted chokes for convenience, usually as a small lever or button within thumb’s reach. These eliminate the need to bend down before starting, though they’re less common on entry-level models. If your bike has this setup, you’ll find the control typically on the left handlebar near your clutch lever. Test it before your next ride to confirm its position—knowing exactly where to reach in the dark or cold makes all the difference when you’re trying to start.
Execute Perfect Cold Start Procedure with Choke

Following the exact sequence for using the choke on a cold dirt bike prevents flooding and ensures reliable ignition. Each step builds on the previous one to create the ideal conditions for combustion.
Prepare Bike Before Engaging Choke
Before touching the choke, shift into neutral to prevent accidental movement, close the throttle completely, and ensure your fuel petcock is in the “on” position. Survey your surroundings for safety—nothing ruins a ride faster than an unexpected lurch when the engine finally fires. This preparation phase takes less than 15 seconds but prevents common starting failures.
Engage Choke Fully for Maximum Fuel Enrichment
Pull the choke knob fully outward (or activate the handlebar lever to its maximum position) to restrict airflow into the carburetor. This creates the richest possible fuel mixture needed for cold starting. If your engine is extremely cold (below 50°F/10°C), you’ll need full choke engagement; for mildly cool conditions, you might get away with partial engagement. The key is recognizing that a completely cold engine requires maximum restriction.
Prime Engine and Execute First Kick
Twist the throttle once or twice to prime the carburetor with additional fuel, then return to closed position before kicking. Deliver one firm, complete kick stroke—many riders fail by using short, weak kicks that don’t compress the cylinder properly. If the engine sputters but doesn’t catch, resist adjusting the choke immediately; try one more kick with the same setting before making changes.
Warm Up Engine Before Disengaging Choke
Rushing to turn off the choke after the engine fires is one of the most common mistakes riders make. Proper warm-up prevents stalling and protects your engine.
Allow Adequate Warm-Up Time Based on Temperature
In cold conditions (below 60°F/15°C), let your dirt bike idle with the choke fully engaged for 1-2 minutes. In warmer conditions (above 70°F/21°C), 30 seconds may suffice. During this time, listen for the idle to stabilize—your engine should transition from a high, erratic idle to a steady, consistent rhythm. If the idle remains rough after 30 seconds, your choke setting may need adjustment for current conditions.
Gradually Reduce Choke as Engine Warms
Slowly push the choke knob inward while monitoring engine response. If the RPM drops significantly or the engine stumbles, you’re reducing too quickly—pull the choke back out slightly and wait another 15-30 seconds. The ideal transition feels smooth, with the engine maintaining consistent power as you disengage the choke. Fully disengage the choke before riding aggressively, as even partial engagement robs power and increases fuel consumption.
Fix Common Choke Starting Failures
When your dirt bike won’t start despite proper choke use, these targeted solutions address the most frequent problems.
Clear a Flooded Engine in Three Steps
If you smell strong fuel and hear a “wet” kicking sound, your engine is flooded. First, close the choke completely. Second, hold the throttle fully open while kicking 5-6 times to flush excess fuel. Third, return throttle to closed position, engage half-choke, and attempt restart. This simple sequence clears 90% of flooding issues without needing to remove the spark plug.
Diagnose Non-Functional Choke Mechanisms
If engaging the choke produces no change in starting behavior, check for these failure points:
– Cable issues: Inspect for frayed, kinked, or disconnected cables
– Mechanical binding: Verify the choke plate inside the carburetor actually moves
– Fuel supply problems: Confirm fuel is reaching the carburetor (often overlooked)
A functioning choke should dramatically improve cold starting—if it doesn’t, the mechanism likely isn’t operating as intended.
Prevent Costly Choke Mistakes That Damage Engines
Understanding what not to do with your choke protects your engine from preventable damage that accumulates over time.
Never Leave Choke Engaged During Riding
Running with the choke partially engaged while riding creates an excessively rich fuel mixture that causes multiple problems:
– Reduced power output (up to 20% less horsepower)
– Excessive carbon buildup in combustion chamber and exhaust
– Fouled spark plugs requiring premature replacement
– Washed cylinder walls from excess fuel stripping oil film
Disengage the choke completely before leaving the parking area—no exceptions.
Avoid Over-Priming Before Cold Starts
Twisting the throttle excessively before kicking adds too much fuel, overwhelming the already-rich choke mixture. Limit priming to one or two gentle twists—any more significantly increases flooding risk. If your bike has electric start, this mistake becomes even more costly as repeated attempts drain your battery while flooding the engine.
Optimize Choke Use for Extreme Cold Conditions
Starting in freezing temperatures requires special techniques to overcome the additional challenges cold presents.
Pre-Start Preparation for Sub-40°F Temperatures
Before attempting to start in extreme cold:
– Warm the carburetor by holding your hand over it for 30 seconds
– Tap the carburetor body lightly with a screwdriver handle to dislodge fuel deposits
– Check fuel quality—old or ethanol-blended fuel vaporizes poorly in cold
These simple pre-start steps dramatically improve cold-weather starting reliability without special equipment.
Extended Warm-Up Protocol for Below-Freezing Starts
When temperatures drop below freezing, double your normal warm-up time. Allow 2-3 minutes with full choke before attempting disengagement. During this extended warm-up, gently blip the throttle every 30 seconds to circulate oil through all engine passages. Your dirt bike needs this extra time for critical components to reach operating temperature before riding.
Maintain Your Choke System for Reliable Performance
Regular choke maintenance prevents the most common cold-start failures before they happen.
Monthly Choke Cable Inspection Routine
Every month, perform this quick choke system check:
1. Operate the choke lever/knob through its full range
2. Verify smooth movement without sticking or binding
3. Inspect cable for fraying, kinks, or corrosion
4. Apply light lubricant to cable housing if needed
This 60-second inspection catches developing problems before they leave you stranded.
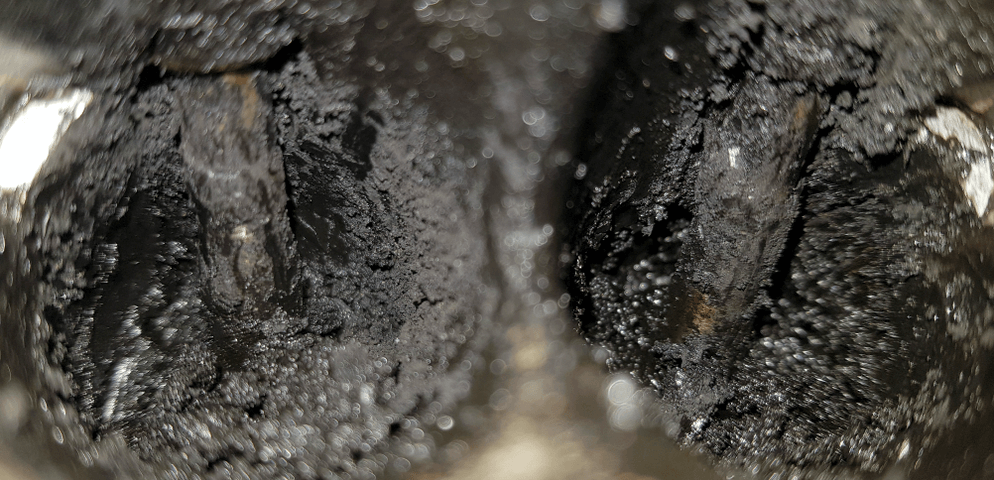
Spark Plug Analysis for Mixture Diagnostics
Your spark plug tells the story of your fuel mixture:
– Black, sooty deposits: Consistently too rich (choke not opening fully)
– White, blistered electrodes: Too lean (choke not closing completely)
– Normal tan color: Perfect mixture
Check your plug during regular maintenance to catch choke-related issues early.
Perfect Choke Timing Reference Chart
| Engine Temperature | Choke Position | Duration | Expected Engine Response |
|---|---|---|---|
| Completely cold (<50°F/10°C) | Fully engaged | 60-120 seconds | High, slightly rough idle that gradually stabilizes |
| Partially warmed (50-70°F/10-21°C) | Half engaged | 30-60 seconds | Smooth transition as RPM stabilizes |
| Near operating temp (>70°F/21°C) | Fully disengaged | N/A | Steady idle ready for riding |
Final Note: Mastering how to use a choke on a dirt bike means understanding it’s not just an on/off switch but a precision tool for managing your fuel mixture during the critical warm-up phase. By following these exact procedures for locating, engaging, and disengaging your choke, you’ll transform frustrating cold starts into reliable kick-and-go moments. Remember the golden rule: full choke for cold starts, gradual reduction as the engine warms, and complete disengagement before riding. Implement these techniques on your next ride, and you’ll spend less time troubleshooting and more time enjoying the trails.


