
Few things are more frustrating than heading out for a ride only to flip the ignition on your Yamaha dirt bike and hear nothing—or worse, that telltale click-click that tells you something’s wrong. Whether you own a YZ125, WR250F, or any other Yamaha dirt bike model, starting issues can stem from several root causes. Understanding what prevents your bike from firing up is the first step toward getting back on the trails quickly.
This guide walks you through the most common reasons Yamaha dirt bikes fail to start, from simple checks you can do in your driveway to more involved diagnostics. By following these troubleshooting steps systematically, you can identify the problem without unnecessary parts purchases or costly mechanic visits. Most starting issues trace back to just a handful of systems: the battery and electrical system, fuel delivery, ignition components, and engine mechanical condition. Skip random part replacements and focus on these proven diagnostic methods instead.
Confirm Basic Electrical Connections Before Panic Sets In
Before assuming major component failure, verify your Yamaha dirt bike won’t start due to simple connection issues that take minutes to fix. Many riders overlook loose grounds or disconnected wires that completely interrupt the starting circuit.
Locate and Inspect Critical Ground Points
Your Yamaha’s electrical system lives or dies by proper grounding. Find the main ground strap connecting the engine to the frame—typically a braided copper wire near the battery—and check for corrosion or loose mounting bolts. Clean both connection points with a wire brush and apply dielectric grease to prevent future corrosion. A poor ground connection can mimic a dead battery even when voltage tests normal.
Don’t forget secondary ground points like the ECU harness connector and frame-mounted grounds near the steering head. Gently wiggle each connection while attempting to start—the bike firing up during this test confirms an intermittent connection issue. For YZ250F models, pay special attention to the ground near the rear shock mount, which often vibrates loose during aggressive riding.
Diagnose Yamaha-Specific Fuel System Failures in Under 15 Minutes

Yamaha’s fuel systems have unique failure points that differ from other brands. Knowing these model-specific vulnerabilities saves hours of unnecessary troubleshooting when your Yamaha dirt bike won’t start.
Address Common YZ-F Series Fuel Injection Quirks
Newer fuel-injected Yamaha models like the YZ450F have electronic quirks that stump many riders. If your fuel-injected Yamaha cranks but won’t start, try this Yamaha-specific trick: turn the ignition on and off three times quickly before attempting to start. This resets the fuel pump prime cycle and often resolves “phantom” no-start conditions caused by the ECU’s fuel management system.
Check the fuel pressure regulator on four-stroke models—it can fail internally without visible leaks, causing improper fuel pressure. Remove the vacuum line from the regulator while the bike is running (if possible); if fuel drips from the line, the diaphragm has failed and needs replacement. For carbureted models, Yamaha’s accelerator pump systems often develop leaks at the rubber diaphragm, requiring replacement every 20-30 hours of riding.
Pinpoint Ignition System Failures with Model-Specific Testing
Yamaha’s ignition components follow different failure patterns than other brands. Understanding these patterns helps you diagnose whether your Yamaha dirt bike won’t start due to ignition issues versus other causes.
Test CDI Unit Functionality Without Special Tools
Yamaha’s Capacitor Discharge Ignition (CDI) systems fail in distinctive ways that you can diagnose without expensive equipment. If your bike starts when pushed or bump-started but won’t fire with the electric starter, suspect CDI issues specific to Yamaha models. The CDI receives different power sources for kick-start versus electric start—failure in the electric start circuit often points directly to the CDI unit.
Try this field test: disconnect the kill switch wire from the CDI unit (usually a black/yellow wire). If the bike starts immediately, your kill switch circuit has developed a short—a common failure point on WR series bikes due to water intrusion. For older two-stroke models like the YZ125, check the reed valve assembly for cracks; broken reeds cause compression loss that mimics ignition failure.
Execute Yamaha-Specific Compression Checks That Reveal Hidden Problems
Low compression causes Yamaha dirt bikes to refuse starting, but standard compression tests don’t always reveal Yamaha-specific failure modes. These model-targeted tests pinpoint issues generic diagnostics miss.
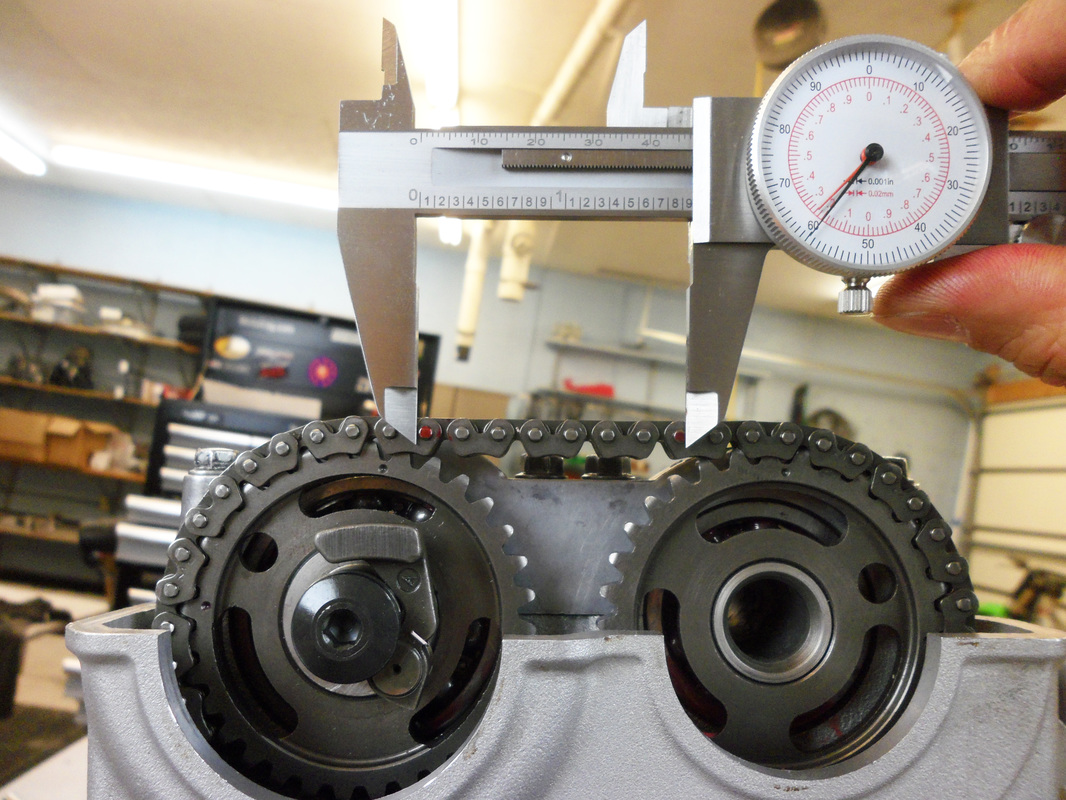
Detect Timing Chain Stretch on High-Mileage YZ Models
Yamaha’s timing chains, especially on older YZ400F and YZ426F models, stretch significantly over time, throwing off valve timing enough to prevent starting while still showing acceptable compression numbers. Remove the timing inspection plug on the left side of the engine and rotate the crankshaft to top dead center. If the camshaft timing marks don’t align perfectly with the case markings, your chain has stretched beyond service limits.
For two-stroke Yamaha models, check the power valve system before condemning the engine. A seized power valve on YZ125 or YZ250 models creates abnormal compression readings and prevents starting. Remove the power valve cover and verify the valve moves freely through its entire range—stuck valves often respond to penetrating oil and gentle tapping with a plastic hammer.
Prevent Future Starting Failures with Yamaha-Centric Maintenance
Most Yamaha dirt bike starting problems are preventable with model-specific maintenance practices that address Yamaha’s engineering quirks before they cause no-start conditions.
Implement Yamaha Fuel System Preservation Protocol
Yamaha’s aluminum carburetors and fuel rails react aggressively with ethanol-blended fuels, causing corrosion that blocks critical passages. When storing your Yamaha dirt bike for more than two weeks, run the engine with STA-BIL 360 Marine fuel stabilizer through both the carburetor and fuel injection systems. Unlike generic stabilizers, this formula specifically counteracts ethanol’s corrosive effects on Yamaha’s aluminum components.
For fuel-injected models, cycle the ignition on and off five times without starting to fully pressurize the system before storage. This prevents fuel from draining back to the tank and leaving the injectors dry—common cause of hard starting after storage on YZ450F bikes. Change your fuel filter every 20 hours regardless of apparent condition; Yamaha’s high-flow fuel pumps push contaminants through filters faster than other brands.
Emergency Field Fixes When Your Yamaha Dirt Bike Won’t Start Mid-Ride
When you’re stranded on the trail with a Yamaha dirt bike that won’t start, these field-expedient fixes get you back to the truck using only basic tools.
Create a Temporary Fuel Delivery System
If you suspect fuel delivery issues but don’t have spare parts, rig a temporary gravity feed system using your hydration pack tube. Disconnect the fuel line at the carburetor, insert the hydration tube, and have a riding buddy slowly pour fresh fuel from a bottle into your mouthpiece. This bypasses petcock and fuel pump issues to confirm whether fuel delivery is your problem. Works equally well on carbureted or fuel-injected Yamaha models.
For electrical gremlins, carry a length of 16-gauge wire specifically for bypassing suspect connections. If your Yamaha dirt bike won’t start and you suspect the starter relay, use this wire to temporarily connect battery positive directly to the starter solenoid’s trigger terminal (NOT the main power terminal). A successful start confirms relay failure—wrap electrical tape around the bypass wire to complete your ride safely.
Quick Diagnostic Reference
When your Yamaha dirt bike won’t start, work through this quick diagnostic sequence:
| Symptom | Likely Cause | First Action |
|---|---|---|
| No lights, no click | Dead battery | Charge or jump-start |
| Click but no crank | Solenoid or starter | Bypass test solenoid |
| Cranks slow | Weak battery or connections | Clean and tighten connections |
| Cranks normally but won’t start | Fuel or ignition issue | Check for spark first |
| Backfires through carburetor | Timing or fuel issues | Check valve timing |
| Sputters then dies | Clogged fuel system | Clean carburetor or fuel filter |
Most Yamaha dirt bike starting problems resolve with basic troubleshooting and maintenance. Electrical issues—particularly battery and connection problems—account for the majority of no-start cases. Fuel system problems rank second, especially in bikes that sit between rides. By understanding these common failure points and performing regular maintenance, you can minimize downtime and keep your Yamaha running reliably.
If you’ve worked through these diagnostic steps without identifying the problem, the issue may require deeper technical knowledge or specialized tools. At that point, consulting your Yamaha service manual or visiting a qualified mechanic becomes the wisest next step. Keep records of what you’ve tested and the results—this information helps diagnose persistent issues more quickly. Always carry a basic toolkit with essential Yamaha-specific tools like a power valve adjustment tool and valve clearance gauges to address common trailside failures.


