Getting air on a dirt bike feels like magic when it clicks, but the reality is that proper airtime comes from mastering a specific combination of body positioning, timing, and bike manipulation that work together to launch both you and your machine skyward. Many riders struggle with inadequate air because they approach jumps too neutrally, landing at the same angle they took off rather than generating the rotational force necessary for proper airborne time. The fundamental technique requires understanding that you and your bike function as a unified system, with your body movements directly influencing your bike’s trajectory through the transition and into the air. This guide breaks down every element of generating serious air, from your position on the jump face to mid-air adjustments that can save a sketchy takeoff.
Why Your Dirt Bike Won’t Get Proper Air (And How to Fix It)
The physics behind dirt bike jumping makes the techniques easier to execute because you know why each movement matters. The core principle revolves around transferring energy from your bike’s forward momentum and your own physical push into vertical lift. When executed correctly, this transfer creates a trajectory that sends both wheels off the ground simultaneously, with you maintaining control throughout the airborne phase.
Your legs and arms act like springs during this process, storing energy as you crouch in the transition and releasing it through extension as you approach takeoff. This coordinated rise means that rather than your bike simply following the jump’s natural curve, you actively elevate both yourself and the machine through deliberate physical action. Skilled riders appear crouched at the bottom of the transition with bent arms and legs, then extend fully as they take off—a visual demonstration of stored muscular energy converting into vertical momentum.
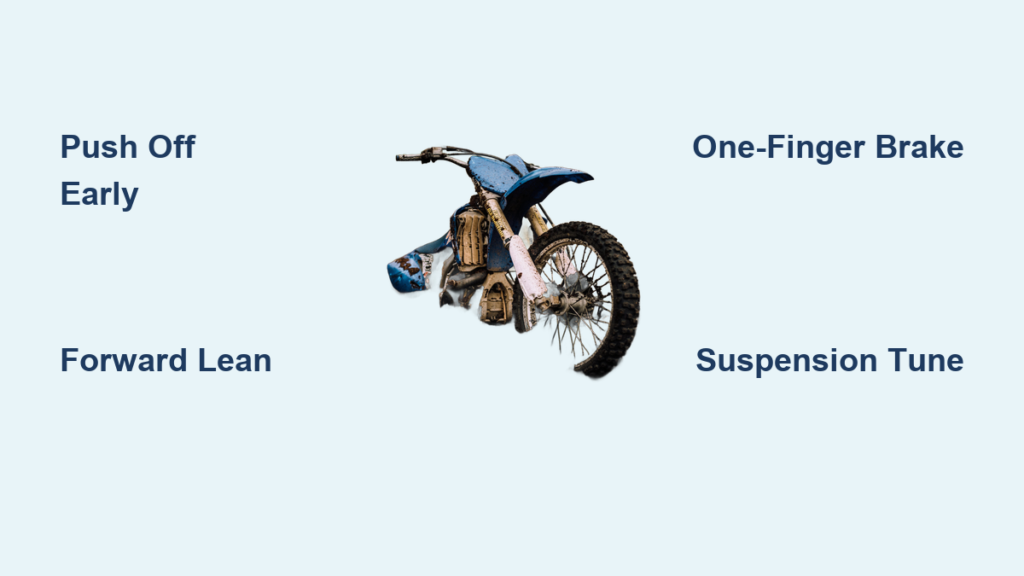
The Forward Lean Technique for Better Rotation
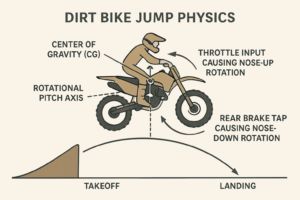
As you approach the lip, you should adopt a slightly forward position with your head positioned directly over the handlebars. This forward lean positions your bike’s front end appropriately for takeoff while allowing your center of mass to contribute to the upward trajectory. Riders who remain too neutral during the approach typically find themselves landing at the same angle they took off, resulting in poor air time and difficult landings.
Your body should be positioned so that your shoulders are slightly ahead of your hips as you begin the transition. This creates the necessary counterbalance against the bike’s tendency to rotate forward during takeoff. If you feel yourself going nose-high immediately after leaving the lip, you’re likely too far back on the bike during takeoff—shift your weight forward on your next attempt.
Execute the Push-Off Technique for Instant Air Improvement
The primary mechanism for generating additional air involves pushing the bike against the transition using both legs and arms. This pushing action should occur in the center of the transition, well before reaching the lip, rather than at the last moment. By pushing early, you direct the bike more in front of your body, forcing it to follow an upward trajectory that carries both rider and machine skyward.
This technique differs significantly from simply pulling up on the handlebars. While arm strength plays a role, the pushing action primarily comes from your legs driving against the bike’s frame and the transition underneath. Your arms serve more as connectors that transfer this leg-driven force to the handlebars while maintaining control, rather than as the primary lifting mechanism.
When to Push Against the Jump Transition (Not at the Lip)
Many riders make the critical mistake of waiting until they’re at the very edge of the lip to push off. Pushing too late is the #1 reason riders fail to get proper air—they’re trying to generate lift after the bike has already left the ground. The optimal timing for your push-off occurs when your front wheel is roughly two-thirds up the transition face.
Practice this by approaching smaller jumps and deliberately focusing on pushing with your legs when your front wheel reaches the midpoint of the transition. You should feel your bike lift beneath you rather than simply rolling over the lip. This early push creates the rotational force needed for proper airborne positioning and gives you the height to make mid-air adjustments if necessary.
Throttle and Clutch Control for Controlled Airtime
Throttle control plays a nuanced role in generating air, primarily through the timing and consistency of your acceleration through the transition. While raw speed contributes to jump clearance, the specific technique for maximizing air involves maintaining or slightly increasing throttle through the takeoff zone while simultaneously executing your push-off technique. The throttle serves as a power source that works in conjunction with your body movements rather than replacing them.
Some riders mistakenly believe that simply going faster will solve inadequate air problems, but this approach often leads to harsh landings and loss of control. The combination of proper speed with correct body positioning and push-off technique produces superior results compared to speed alone. Once airborne, your throttle position at the moment of takeoff essentially locks in your trajectory, making pre-takeoff preparation more critical than mid-air adjustments.
How to Properly Use Clutch for Mid-Air Adjustments
The clutch lever serves multiple purposes during jumping, with clutch control being particularly important when making mid-air adjustments. When executing brake-tapping techniques to adjust your airborne position, you must have the clutch pulled in to prevent stalling the engine. If you do stall your bike during a mid-air adjustment attempt, never land with the clutch engaged—riders who have attempted to land and immediately bump-start a stalled bike have reported straining both wrists from the sudden load.
For most riders, the proper sequence is: approach jump at consistent speed → maintain throttle through transition → push off → pull clutch just before or as you leave the lip → make any necessary brake adjustments → release clutch before landing. This sequence gives you maximum control options while airborne.
Mid-Air Brake Adjustments to Save Your Landing
Tapping the rear brake while airborne provides one of the most effective methods for making fine adjustments to your bike’s angle during flight. This technique works because applying the rear brake shifts weight and forces the bike’s rear downward, helping to bring the front end down when you’ve taken off nose-high. The rear brake proves more effective and easier to modulate than the front brake for this purpose.
Effective brake tapping requires practice until the action becomes automatic, similar to how panic revving feels natural in stressful situations. Many experienced riders practice this technique deliberately, seeking out jumps with short landings where braking in mid-air becomes necessary for safe clearance.
The One-Finger Brake Position That Prevents “Oh Shit” Moments
Keep one finger on the brake lever at all times during jump practice—this pre-positioning reduces the cognitive load required to execute corrections when surprise situations arise. Many riders report a tendency to “freeze” in an “oh shit” position when they find themselves airborne higher or at a wrong angle. Having your finger already positioned on the brake lever bypasses the need to consciously move your hand, allowing instinctive corrections even under stress.
Practice this by approaching jumps slightly faster than comfortable (but still safely), forcing yourself to make mid-air adjustments. Start with small tabletop jumps where landing is forgiving, then progress to more challenging features as your confidence grows.
Optimize Your Suspension for Better Jump Performance
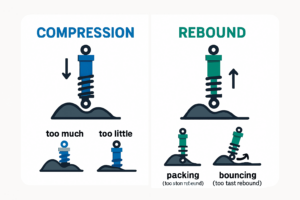
Suspension settings can significantly impact your jumping performance, with rebound damping being particularly relevant for riders struggling with nose-high takeoffs. Increasing shock rebound by two clicks has helped some riders resolve issues with the bike’s tendency to land at the same angle it took off. This adjustment affects how quickly the suspension returns to its extended position after compressing on the jump face.
The relationship between suspension settings and jumping performance varies significantly between riders, bikes, and specific jump characteristics. What works for one rider may not produce the same results for another, making experimentation with small adjustments the most reliable approach to finding your optimal setup.
Essential Pre-Jump Bike Checkpoints
Before attempting any jumps, verify these critical components:
- All major bolts (swingarm, triple clamps, axle) are properly torqued
- Suspension settings match your weight and riding style
- Tire pressure is appropriate for the terrain
- Brake function is responsive with proper lever feel
- Chain tension is correct to prevent binding during compression
A bike that requires mental attention for basic operation leaves fewer cognitive resources available for the complex movements required for proper jumping technique.
Practice Drills That Build Automatic Jumping Skills
Developing competent jumping skills requires extensive practice, with many experienced riders emphasizing that the learning process cannot be rushed. One effective approach involves spending an entire practice session focused specifically on the brake-tapping technique, repeating the action repeatedly until it becomes second nature. This dedicated practice builds muscle memory that allows the technique to execute automatically even when surprise or fear might otherwise freeze your movements.
Video analysis of your own riding provides invaluable feedback that self-assessment cannot match. Recording yourself riding jumps and reviewing the footage reveals positioning errors and timing issues that may not be perceptible during the actual riding experience.
How to Use Video Analysis to Fix Positioning Errors
Set up a camera at your favorite practice jump to capture your takeoff and landing angles. Focus specifically on:
- Your body position relative to the bike at takeoff
- The extension of your limbs during push-off
- Your bike’s angle in mid-air
- Your landing approach
Compare your footage with professional riders—most have similar body mechanics despite different styles. Look for the critical moment when they push off the transition and how their body position changes from the bottom to the top of the jump face.
Avoid These 3 Common Jumping Mistakes That Steal Your Air
Starting with smaller, more manageable jumps and progressively tackling larger features allows your skills and confidence to develop together. Attempting jumps beyond your current capability level often leads to fear responses that undermine proper technique, setting back progress rather than advancing it.
How Late Push-Off Timing Kills Your Air Time
Pushing off too late, near the lip rather than in the center of the transition, reduces the effectiveness of the pushing technique. The pushing action requires time to influence the bike’s trajectory, and executing it at the last moment leaves insufficient opportunity for the technique to work. Developing the timing for early pushing requires practice and often involves deliberately pushing earlier than feels natural until you find the optimal window for your specific jumping style.
Fix this by marking a visual reference point on the jump face—push when your front wheel reaches this point, not when you see the lip. This trains your muscle memory to initiate the push at the correct moment in the transition.
With consistent practice and patience, the techniques described in this guide will become second nature, transforming you from a rider who struggles with airtime into someone who regularly sends impressive jumps with confidence and control. Remember that proper air on a dirt bike isn’t about raw speed—it’s about the precise coordination of body movement, bike control, and timing that creates that magical feeling of flight.