
Nothing ruins a perfect trail day faster than a dirt bike that won’t start properly or loses power mid-ride. When your carburetor gets clogged with varnish, ethanol residue, or debris from contaminated fuel, your bike’s performance suffers dramatically. A dirty carburetor causes hard starting, rough idling, poor acceleration, and decreased fuel efficiency—all symptoms that can turn an exciting ride into a frustrating experience. This dirt bike carburetor cleaning guide gives you the exact steps to restore proper fuel delivery and get your bike running like new again. Whether you’re dealing with a weekend trail bike or a competition machine, learning to clean your carburetor properly saves money on mechanic visits and keeps you riding when others are walking.
Most riders don’t realize how vulnerable carburetors are to modern fuel issues. Ethanol-blended gasoline leaves behind sticky residues as it evaporates, especially when bikes sit unused between rides. These deposits gradually clog the carburetor’s precisely engineered passages, disrupting the critical air-fuel mixture your engine needs. Unlike fuel-injected systems, carburetors rely on mechanical components that must move freely and maintain exact tolerances. When jets get partially blocked or the float mechanism sticks, your bike’s performance immediately suffers. Taking just an hour to clean your carburetor properly can prevent these issues and extend the life of your entire fuel system.
Recognizing Critical Carburetor Performance Issues
Your dirt bike sends clear signals when the carburetor needs attention. Hard starting that requires excessive choke use or multiple kick attempts almost always indicates restricted fuel flow through clogged jets. If your bike starts but immediately dies when you release the choke, the idle circuit is likely partially blocked. Pay attention to idle quality—rough, inconsistent idling or an engine that won’t maintain idle speed points directly to carburetor contamination affecting the low-speed fuel circuit.
Acceleration problems provide unmistakable evidence of carburetor issues. When your bike hesitates, sputters, or loses power during throttle application—especially when transitioning from low to mid-range RPM—the main jet circuit is probably compromised. Riders often describe this as “bogging” or lacking the usual snap when twisting the throttle. Black, sooty exhaust smoke indicates an overly rich fuel mixture from restricted air passages, while backfiring through the intake suggests lean conditions caused by blocked fuel passages. A sudden drop in fuel efficiency also signals carburetor trouble, as improper mixture settings force the engine to consume more fuel to maintain power.
Visual inspection reveals additional warning signs. Fuel-saturated air filters indicate a stuck float causing overflow, while residue around the carburetor body suggests leaks from deteriorated gaskets. Strong fuel odors during operation point to improper mixture settings or flooding issues. If you notice any combination of these symptoms, don’t delay—continued operation with a compromised carburetor leads to carbon buildup on piston crowns, spark plug fouling, and potentially more expensive engine repairs down the trail.
Essential Cleaning Supplies and Tools Checklist
Gathering the right equipment before starting prevents frustration and ensures thorough cleaning. You’ll need a complete screwdriver set with both Phillips and flathead options in various sizes, as carburetors use multiple screw types throughout their construction. Small sockets (8-10mm range) and wrenches help remove jet housings and fuel line connections without damaging components. Needle-nose pliers prove invaluable for manipulating small parts like circlips and retaining wires without causing damage.
For cleaning, select products specifically formulated for carburetor use. Carburetor cleaner in an aerosol can penetrates small passages effectively, while brake cleaner serves as an excellent preliminary cleaner for removing heavy grime. Never use gasoline as a cleaning solvent—it leaves behind residues that worsen the problem. Compressed air with precision nozzles allows thorough drying of internal passages after cleaning, while soft-bristled brushes in multiple sizes help dislodge stubborn deposits without scratching delicate components. An ultrasonic cleaner provides professional-level results for heavily contaminated carburetors but isn’t essential for routine maintenance.
Before disassembly, obtain a carburetor rebuild kit specific to your bike’s make and model. These kits contain replacement gaskets, O-rings, and sometimes jets that degrade over time and during cleaning. Having fresh seals ready prevents reassembly delays and ensures leak-free operation. Organize all tools and supplies on a clean work surface with good lighting, using a magnetic tray to catch small metal parts. Photographing connections and component positions before disassembly provides an invaluable reference during reassembly—especially for throttle cable routing and jet placement.
Step-by-Step Carburetor Disassembly Process
Safety preparation comes first—allow your engine to cool completely before starting, as working on hot components risks burns and thermal distortion. Disconnect the battery ground to prevent accidental sparks near fuel vapors. Begin by closing the fuel petcock, then disconnect the fuel line from the carburetor inlet into a container to catch residual fuel. Remove the air filter housing to access the carburetor throat, documenting current setup with photos before disconnecting anything.
Remove the carburetor from the engine by loosening the intake boot clamp and disconnecting the throttle cable from the slide mechanism. Work methodically, keeping track of each component’s location. With the carburetor on your workbench, position it with the float bowl down and remove the bowl drain screw, allowing remaining fuel to drain into your container. Remove the float bowl retaining screws in a cross-pattern to prevent warping, then carefully lift off the bowl.
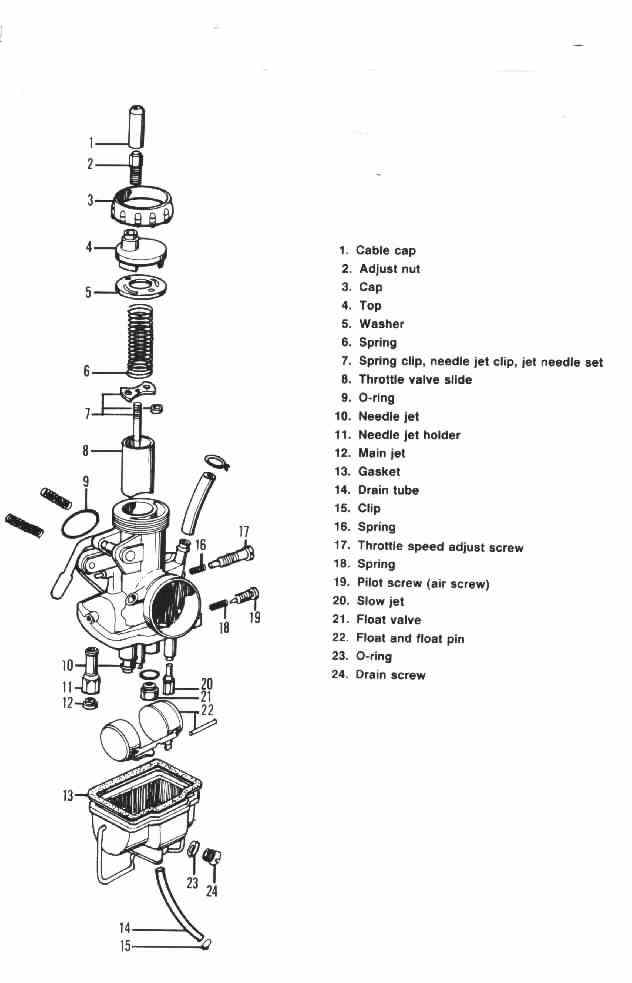
Inside the bowl, inspect the float assembly and remove the float pivot pin, noting its orientation. Lift out the float and examine it for fuel saturation—shake it near your ear; a sloshing sound indicates a compromised float that needs replacement. Remove the needle valve assembly and inspect it for wear. Count rotations as you remove the main jet and idle jet with the appropriate screwdriver, recording this number for accurate reinstallation. Keep all components organized in labeled containers, as mixing up jets or reinstalling them incorrectly causes serious performance problems.
Professional-Grade Carburetor Cleaning Techniques
Thorough cleaning requires systematic attention to every passage and component. Begin by spraying carburetor cleaner through all accessible passages, jets, and orifices. Use compressed air to force the cleaner through each circuit from multiple angles, ensuring complete coverage. Pay special attention to the main jet channel, idle circuit, and emulsion tubes where varnish accumulates most heavily. For stubborn deposits, soak components in a dedicated carburetor cleaning solution for 15-30 minutes—never use metal wires that can enlarge precisely calibrated jet openings.
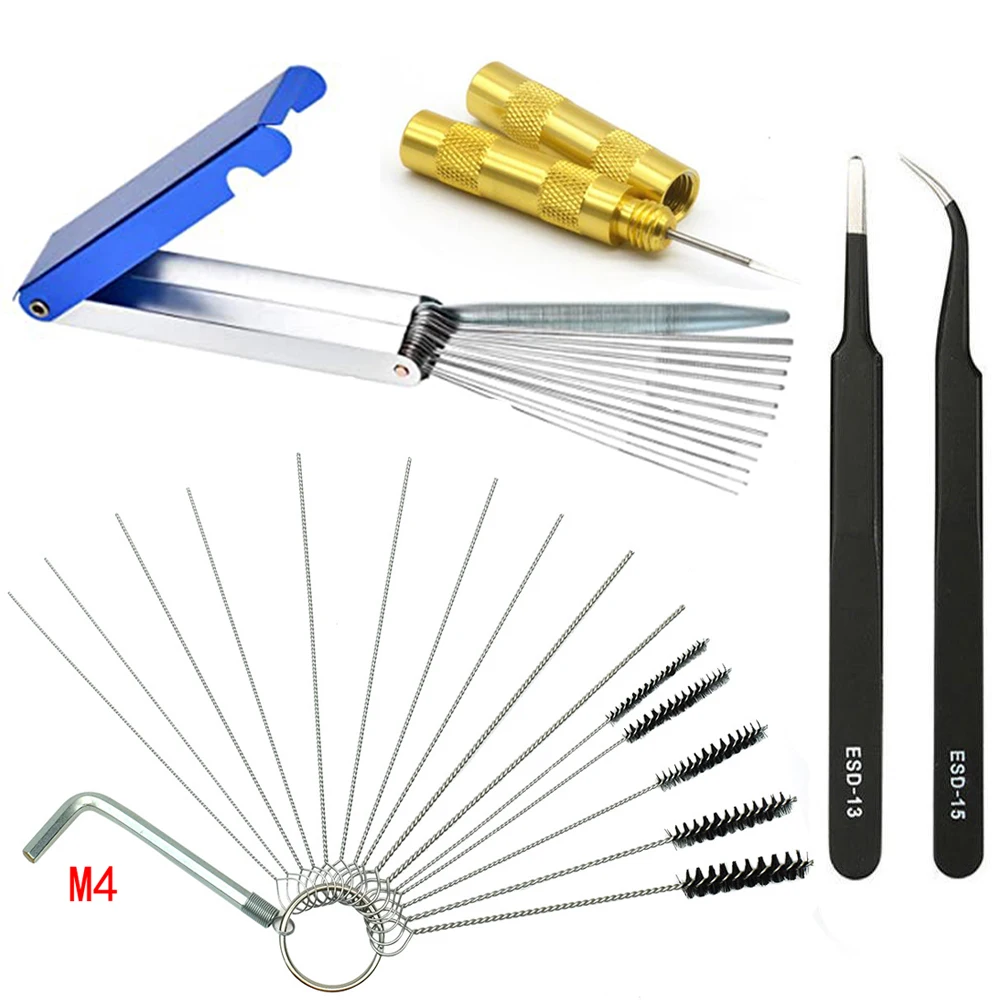
Clean jets individually using appropriate brushes and cleaning wires designed for carburetors. Inspect each jet against a light source to verify complete clearance; any remaining obstruction affects fuel flow and mixture. The float bowl requires thorough degreasing—scrape heavy deposits with plastic tools to avoid scratching mating surfaces, then clean with solvent and fresh rags. The throttle slide and needle need careful handling; clean the slide with solvent without scratching its precisely machined surface, and inspect the needle for wear ridges that affect fuel metering.
Clean all passages in the carburetor body systematically, working through each circuit one by one. For heavily contaminated carburetors, an ultrasonic cleaner filled with appropriate solution provides superior cleaning of internal passages. After ultrasonic cleaning, flush thoroughly with fresh solvent and dry completely with compressed air to ensure no cleaning residue remains. Never blow air directly into the needle valve seat—that can damage the sealing surface and cause flooding.
Critical Component Inspection and Replacement Guidelines
Post-cleaning inspection determines whether components need replacement. Examine the needle valve assembly carefully—the needle should show no grooves, burrs, or flat spots where it contacts the seat. The valve seat requires inspection for corrosion or pitting that prevents positive closure. Replace both components together as a matched set if wear is present, as mixing old and new parts causes improper seating.
Check the float condition thoroughly—shake it to detect internal fuel, and inspect hinge points for wear. Measure float height according to manufacturer specifications; incorrect height causes improper fuel level and running problems. Examine all jets for damage—threads should be intact with no enlargement of fuel orifices. The carburetor body needs inspection for cracks, especially around gasket surfaces. Inspect all gaskets and seals for deterioration; these should be replaced if questionable.
The throttle slide must move freely without binding throughout its travel, with no visible scoring on the slide or body. Any components showing damage or excessive wear should be replaced with OEM or quality equivalent parts. Never reinstall worn components hoping they’ll “work for now”—this leads to recurring problems and potential engine damage. A complete rebuild kit typically includes all necessary wear items at a reasonable cost.
Precise Carburetor Reassembly and Adjustment
Reassembly requires meticulous attention to original positioning. Begin by installing internal components in reverse order of removal, threading jets carefully by hand before final tightening. Set jet depth to match your recorded removal position exactly—count turns precisely for accurate reinstallation. Install the float assembly, ensuring the pivot pin seats correctly, and verify float height by inverting the carburetor and measuring from the bowl mating surface.
Position the float bowl and install retaining screws in a cross-pattern, gradually tightening to compress the gasket evenly. Reinstall the throttle slide and needle, positioning the retaining clip at its original groove. Reconnect the throttle cable and adjust free play according to specifications. When reinstalling the carburetor on the bike, ensure the intake boot seals properly without binding, and check all connections for leaks before starting.
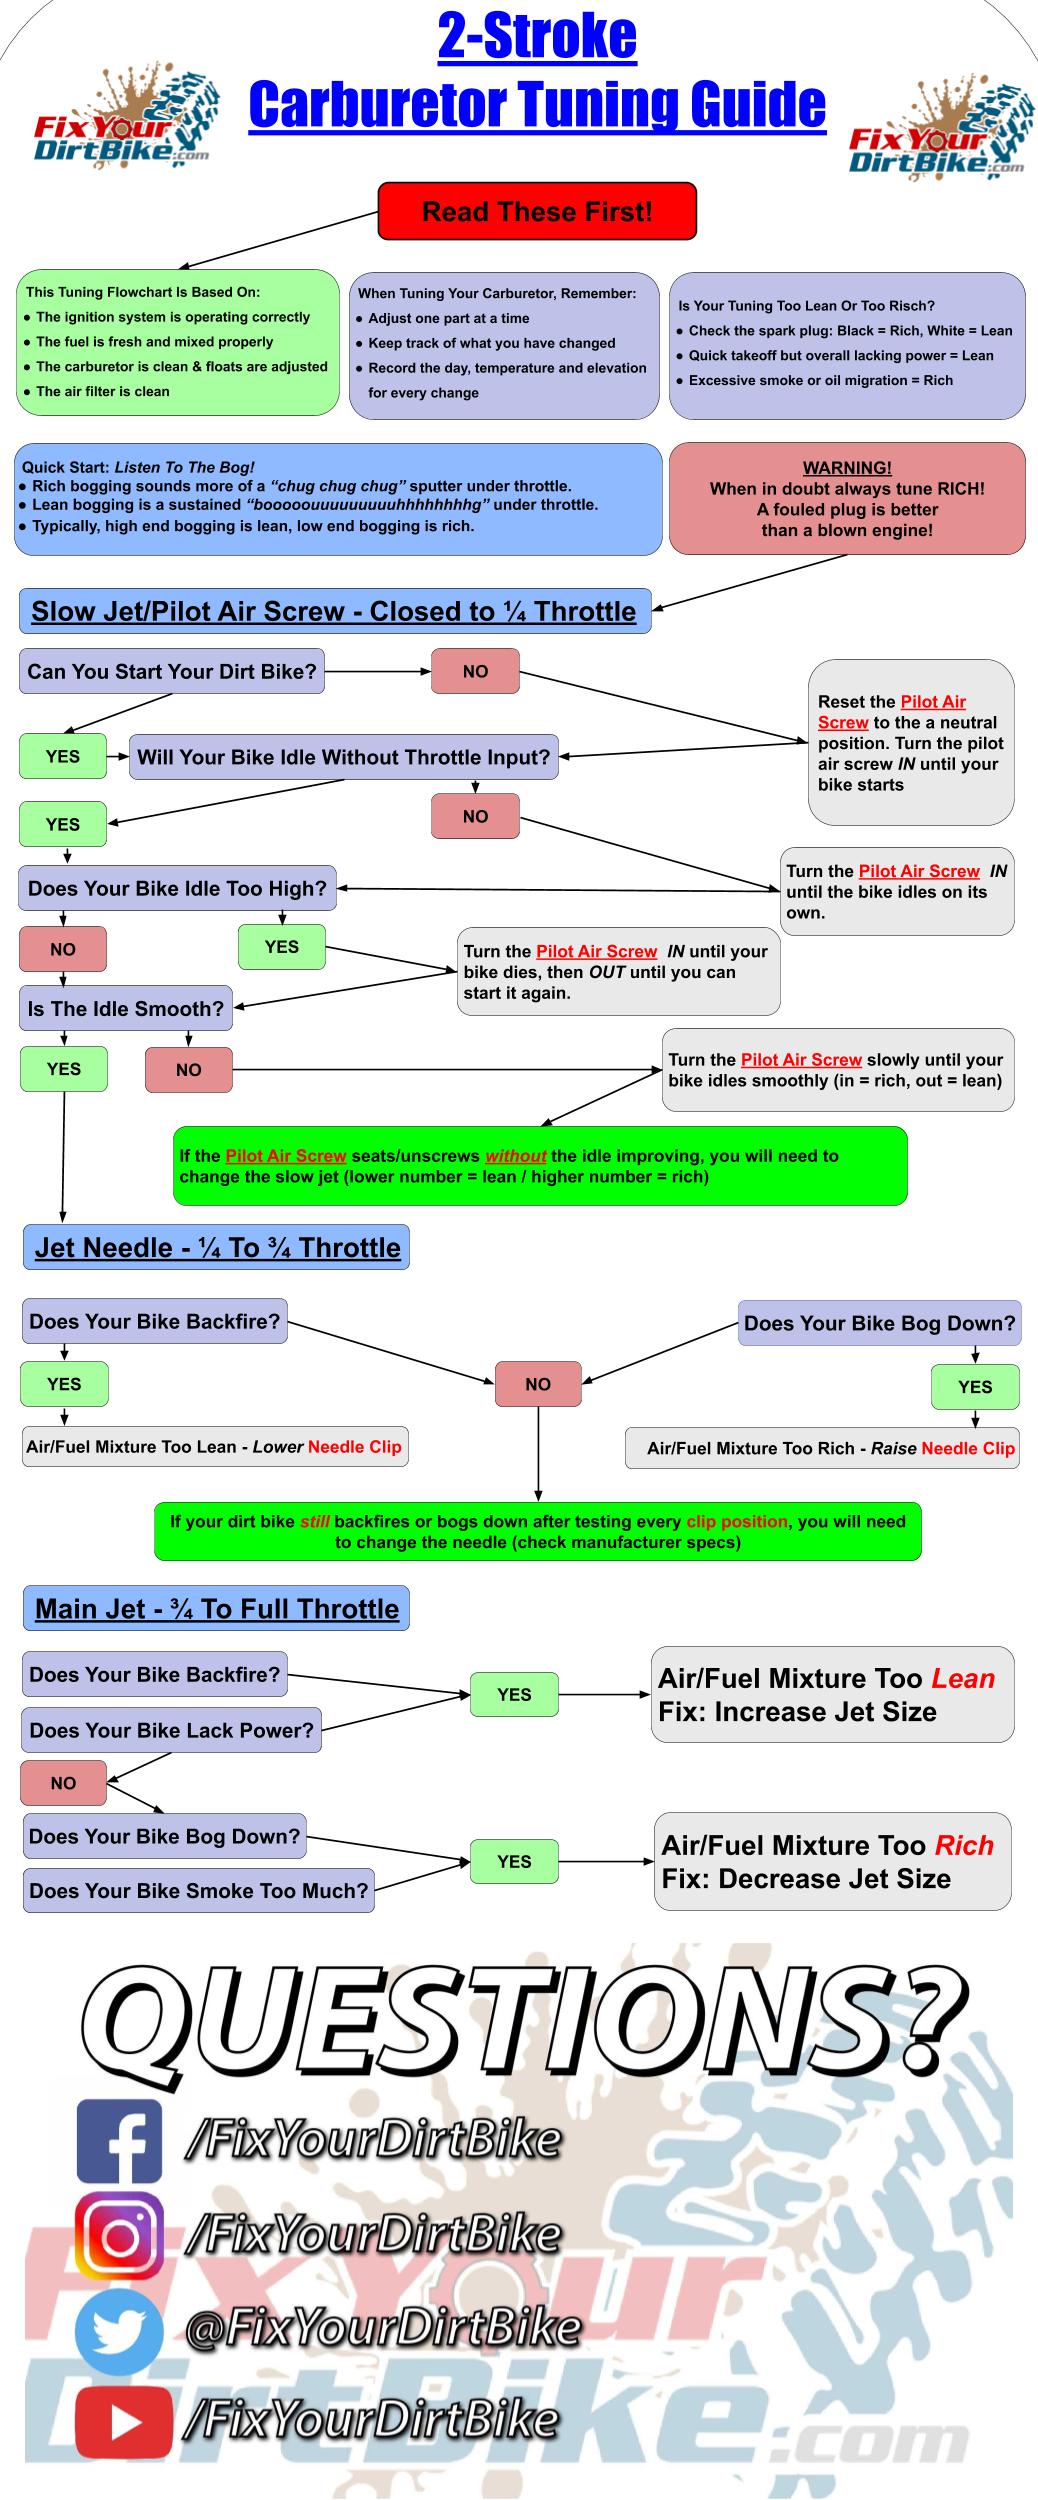
Initial startup requires careful observation—prime the carburetor, start the engine, and allow it to warm thoroughly. Adjust the idle speed screw and mixture screw methodically: turn the mixture screw in until the engine slows, then out until it speeds, settling at the highest idle speed. Test throttle response across the RPM range, listening for hesitation or flat spots. A properly cleaned and adjusted carburetor delivers crisp throttle response, smooth acceleration, and reliable starting every time.
Preventative Maintenance for Long-Term Carburetor Health
Regular maintenance prevents recurring carburetor problems. Check your air filter at each ride session—replace it when dirty to prevent debris from entering the carburetor. Use fresh fuel specifically formulated for small engines, avoiding ethanol-blended fuels when possible or adding appropriate stabilizers for storage. Drain the carburetor before extended storage periods to prevent varnish formation.
Perform periodic carburetor cleaning—annually for regularly ridden bikes or semi-annually for seasonal use—to prevent gradual accumulation of deposits. Monitor performance between services, noting any changes in starting ease or throttle response that might indicate developing contamination. Keep a maintenance log documenting service dates and adjustments made—this history helps identify patterns and informs future maintenance scheduling. With consistent attention to fuel quality and periodic cleaning, your dirt bike’s carburetor delivers reliable performance throughout the riding season.


