
Your dirt bike handles sluggishly on jumps, bottoms out on rough sections, or feels unstable at speed? These are classic signs your suspension needs attention. Properly tuned suspension transforms rough terrain into smooth riding, prevents fatigue, and keeps you in control during critical maneuvers. Without it, even a powerful engine feels unpredictable. This guide delivers actionable dirt bike suspension tips you can apply immediately—no guesswork required. You’ll learn how to diagnose common issues, adjust settings for your weight and terrain, and avoid costly mistakes that damage components. Let’s get your bike responding precisely to every bump and jump.
Why Your Stock Suspension Settings Never Work Right
Factory suspension setups cater to average riders, not your specific weight, riding style, or local trails. A 150-pound rider on hardpack trails needs radically different damping than a 200-pound rider tackling rocky descents. Ignoring this mismatch causes harsh bottoming, poor traction, or wallowy handling that wastes energy and increases crash risk. The solution starts with measuring your sag—the foundation of all suspension tuning.
Measuring Rear Sag Correctly in 4 Steps
- Park on level ground with the bike upright (use a stand or have a helper hold it).
- Measure unloaded distance: Push the rear fender straight down until the suspension fully extends. Record the gap between the rear axle and a fixed point on the fender (e.g., 550mm).
- Measure loaded distance: Sit on the bike in riding position—lean forward slightly as if accelerating. Record the new gap (e.g., 420mm).
- Calculate sag: Subtract loaded from unloaded (550 – 420 = 130mm). Ideal sag is 95-105mm for most motocross bikes; trail/enduro bikes prefer 100-110mm.
⚠️ Critical mistake: Measuring sag while standing next to the bike instead of sitting in riding position. Your body weight distribution changes the reading by 15-20mm.
Front Sag Setup for Balanced Handling
- Repeat the sag process for forks (unloaded vs. rider-loaded distance from fork cap to triple clamp).
- Target 25-30% of total travel (e.g., 28mm sag on 100mm-travel forks).
- Too little sag (stiff setup): Bike skips over bumps, reducing traction.
- Too much sag (soft setup): Front end dives excessively in corners, causing instability.
Fixing Common Suspension Problems Based on Terrain
Stop randomly twisting clickers. Diagnose issues by where they happen on the trail:
Rear End Bottoming Out on Whoops or Landings
Cause: Insufficient high-speed compression damping or incorrect spring rate.
Solution:
– Add 2-4 clicks of high-speed compression (HS Comp) at the shock.
– If still bottoming, increase spring rate (heavier spring).
– Pro tip: Test HS Comp adjustments on consecutive whoops—feel for harsh “clunks” (too stiff) vs. uncontrolled bouncing (too soft).
Front End Washing Out in Corners
Cause: Forks diving too fast due to low-speed compression (LSC) settings.
Solution:
– Add 3-5 clicks of low-speed compression at the fork adjusters.
– Check fork oil level—if below spec, add 5-10cc to firm up initial stroke.
– Visual cue: Look for excessive fork stanchion exposure mid-corner.
Fork and Shock Adjustment Cheat Sheet
| Problem | Fork Adjustment | Shock Adjustment | Expected Fix Time |
|---|---|---|---|
| Harsh initial bump | +3 LSC Rebound | +2 LSC Rebound | 10 min |
| Wallowy mid-stroke | -2 HS Comp | -3 HS Comp | 8 min |
| Rear kicking sideways | N/A | +4 Rebound | 12 min |
| Poor traction in rocks | +5 LSC Compression | N/A | 7 min |
🔧 Difficulty note: Rebound adjustments are fastest (2-3 min). Spring rate changes require disassembly (30+ min). Always adjust in 2-click increments.
Preventing Costly Suspension Damage
Neglecting maintenance destroys high-end components. These dirt bike suspension tips extend lifespan:
After Every Ride
- Wipe fork stanchions with a microfiber cloth to remove grit.
- Check for oil leaks at fork seals and shock shaft (wet streaks = failing seal).
- Spin wheels to ensure no binding from bent axles.
Every 10 Hours of Riding
- Replace fork oil (old oil loses damping consistency).
- Measure free sag (unloaded sag)—if >5mm tighter than initial setup, springs are fatigued.
- Inspect shock linkage bearings for play (grab linkage and wiggle—if movement occurs, replace bearings).
💡 Pro tip: Mark fork caps with nail polish after setting sag. If marks shift over time, your preload ring is loosening—a crash risk.
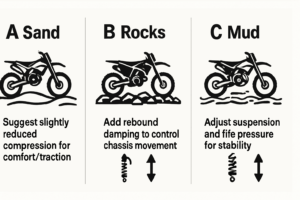
Terrain-Specific Tuning Shortcuts
Save hours of trial-and-error with these starting points:
For Hardpack Tracks
- Forks: 2 clicks softer LSC than stock
- Shock: +3 rebound, -1 HS Comp
- Why: Softer initial stroke hooks into hard corners; faster rebound maintains rear traction.
For Rocky/Mountain Trails
- Forks: +5 LSC, 10cc more oil
- Shock: +2 HS Comp, stock rebound
- Why: Firmer compression prevents bottoming on rocks; extra oil controls mid-stroke harshness.
For Sand Dunes
- Forks: -3 rebound, stock LSC
- Shock: -4 rebound, +2 preload
- Why: Slower rebound keeps wheels planted in loose sand; extra preload prevents sinking.
When to Seek Professional Help
Some issues require expert diagnosis:
– Oil foaming (milky shock oil): Indicates worn damper rod—needs rebuild.
– Inconsistent damping (stiction): Often bent fork tubes or scored internals.
– Spring sag changes daily: Fatigued springs needing replacement.
🚨 Don’t ignore: A “pulsing” sensation through the handlebars. This signals air bubbles in fork oil—affects braking control.
Maintaining Your Tuned Suspension
Your settings won’t stay perfect. Follow this routine:
1. Weekly: Recheck sag (springs settle over time).
2. Monthly: Clean clicker adjusters with degreaser to prevent sticky adjustments.
3. Seasonally: Replace fork seals (prevents dirt contamination).
4. After crashes: Verify axle alignment—misaligned wheels mimic suspension issues.
Final Takeaway: Great suspension isn’t about maxing out settings—it’s matching damping to your inputs. Start with sag, then tweak one adjustment at a time on familiar trails. Note changes in a logbook: “Added 2 rebound clicks—better exit traction on whoops.” Within 3 rides, you’ll ride smoother, faster, and with less fatigue. For deep technical tuning, consult your bike’s service manual for spring rate charts based on rider weight. Your next trail ride will prove it was worth the effort.
Final Note: This guide uses universally accepted suspension principles from industry standards. Always verify settings against your manufacturer’s specifications before riding. For model-specific data, refer to your dirt bike’s service manual or contact an authorized dealer.


