
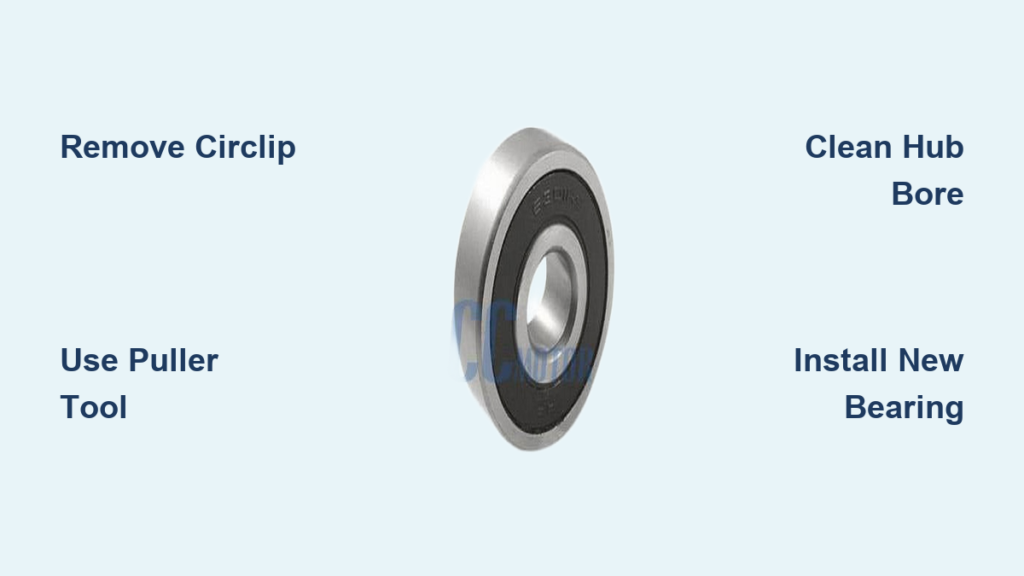
That unsettling click or grinding noise coming from your wheel isn’t just annoying—it’s your dirt bike screaming for attention. Wheel bearings endure brutal punishment during off-road riding, supporting your full weight while absorbing impacts that would shatter less robust components. When contaminated by mud, water, or debris, these critical components degrade until they fail completely, leaving you stranded or worse—compromising your safety mid-ride. Mastering dirt bike wheel bearing removal transforms this potentially expensive dealer visit into a manageable afternoon project, restoring your wheel assembly to like-new condition with basic tools and mechanical confidence.
Ignoring early bearing failure signs risks catastrophic consequences. What starts as a subtle click during rotation evolves into constant grinding that damages your expensive wheel hub. By learning proper dirt bike wheel bearing removal techniques, you’ll spot problems early, prevent collateral damage, and ensure your bike remains trail-ready. This guide covers every critical step—from identifying failure symptoms to installing new bearings correctly—so you never miss another ride due to preventable bearing issues.
Identify Wheel Bearing Failure Before It’s Too Late
Recognizing failing wheel bearings early prevents hub damage and keeps you safe on the trail. Start by securing your bike on a stand and grasping the tire at 3 and 9 o’clock positions. Any side-to-side play beyond minimal tolerance indicates worn bearings requiring immediate attention—the wheel should feel stiff when jerked laterally. Even slight looseness accelerates wear exponentially, turning a simple bearing replacement into costly hub repairs.
Listen for telltale noises during riding and inspection. Early-stage failure manifests as a faint click occurring once per wheel rotation, often accompanied by subtle roughness when spinning the wheel by hand. As deterioration progresses, this click becomes more pronounced and frequent until it develops into constant grinding noise during riding. Some bearings fail catastrophically with no warning, making regular inspection during tire changes essential preventive maintenance.
Conduct These Critical Rotation Tests
Perform these simple tests before every major ride to catch bearing problems early:
-
Free-spin test: Elevate the wheel and give it a firm spin. A healthy bearing spins freely with a smooth whirring sound and takes 5-7 seconds to stop. Worn bearings create resistance, causing the wheel to stop abruptly or rotate jerkily.
-
Rock test: With the bike stationary, rock it side-to-side while listening for clicking from the wheel area. Any audible clicking indicates bearing play requiring immediate inspection.
-
Visual inspection: Remove the outer seal and rotate the bearing by hand. Look for rough spots, pitting, or corrosion on the bearing surfaces—any abnormalities mean replacement is necessary.
Essential Tools for Successful Bearing Extraction

Using proper tools makes dirt bike wheel bearing removal efficient and prevents costly damage to your hub. The bearing puller kit represents your most critical investment—specifically a blind bearing removal set with slide hammer mechanism. These tools grip the bearing from the inside, allowing controlled extraction without transmitting damaging force to the hub housing. The JMP Puller Kit has earned widespread acceptance among dirt bike mechanics, with the 25mm die size fitting most dirt bike wheel bearings.
Must-Have Tools Checklist
- Bearing puller kit with slide hammer and appropriate dies (typically 25mm)
- Complete socket set including 24mm socket for axle nut removal
- Circlip pliers (retaining ring pliers) for internal clips
- Flathead screwdrivers for seal removal
- Rubber mallet for gentle seal installation
- Brass drifts or punches for alternative extraction methods
- Lithium-based grease for packing seals
- Degreaser and clean rags for hub cleaning
- Anti-seize compound for axle threads
Without proper tools, mechanics often damage hub bores during extraction. The slide hammer puller method preserves the hub bore surface finish, while improvised hammer-and-punch techniques frequently scar the hub interior, creating conditions for premature bearing failure. Invest in the right tools once—your expensive wheel hubs will thank you.
Prepare Your Bike for Bearing Replacement
Proper preparation prevents mistakes that cause rework and component damage. Start by securing your motorcycle on a stable stand with the target wheel elevated and able to rotate freely. This positioning allows initial inspection of bearing condition while providing unobstructed access to all components.
Begin preparation by removing wheel spacers from both hub sides. These typically slide off with finger pressure, though some require gentle prying with a flathead screwdriver. Set them aside in a labeled container—losing these small parts creates major headaches during reassembly. Next, carefully remove the outer seals using a flathead screwdriver, working gradually around the circumference to avoid damaging the seal groove.
Critical Identification Step You Can’t Skip
Identify which hub side contains the circlip (retaining clip) before proceeding. Most dirt bike wheel hubs feature one bearing retained by an internal circlip while the other simply presses into the bore. This distinction determines your removal sequence—always address the circlip side first during removal and last during installation. Mark this side clearly with tape or take a photo for reference, as installing bearings in the wrong sequence causes binding and premature failure.
Thoroughly clean the hub interior using degreaser spray and clean rags before extraction. Removing accumulated debris allows complete inspection of the hub bore surfaces for damage. Any signs of grooving or corrosion should be noted, as these conditions may require professional repair before new bearings can be installed.
Expert Bearing Removal Methods That Work
Bearing Puller Technique for Damage-Free Extraction
The bearing puller method provides the safest, most controlled approach to dirt bike wheel bearing removal. After removing the circlip from one side, select the appropriate puller attachment and engage it with the bearing’s inner race. Insert the puller arms through the bearing bore until they contact the inner race from inside, then attach the slide hammer mechanism.
Operate the slide hammer with steady, controlled pulls while maintaining alignment. The bearing gradually works its way out of the hub bore without transmitting harmful side loads to the hub walls. This entire process typically takes just a few minutes and preserves the hub bore surface finish—critical for proper seating of new bearings. Never use excessive force; if the bearing resists extraction, apply penetrating oil and allow an overnight soak before trying again.
Emergency Methods When Tools Are Limited
When specialized tools aren’t available, these alternative methods can save your ride:
-
Drift punch technique: Position a punch against the bearing’s inner race through the hub center. Strike the punch while rotating it around the bearing perimeter, working the bearing out gradually. This method risks damaging the hub bore if alignment isn’t maintained.
-
Boiling water trick: Pour boiling water over and around stubborn bearings to create thermal expansion that breaks corrosion bonds. Effective for older bikes with rusted-in-place bearings.
-
Penetrating oil soak: Apply PB Blaster or similar penetrant and allow 24 hours for maximum effectiveness before attempting extraction again.
Install New Bearings Like a Pro

Installing new wheel bearings correctly is equally important as proper removal. Before installation, thoroughly clean the hub bore with degreaser and inspect for damage. Verify new bearings are the correct part number—many mechanics chill new bearings in a freezer for several hours, as thermal contraction makes insertion easier.
Install the circlip first on its designated side, then position the new bearing and tap it into place using a socket of equal diameter. Work methodically around the bearing perimeter, checking frequently to ensure it remains parallel to the hub bore. The bearing must seat fully against the circlip without gaps—partial seating causes immediate failure.
Don’t Forget the Inner Tube Spacer!
This critical component is frequently overlooked during reassembly. Position the clean, lightly greased spacer between bearings before installing the second bearing. Some mechanics recommend leaving a hair’s-width gap between the spacer and second bearing to allow free floating and prevent axle binding. When both bearings are seated, pack the seals with lithium-based grease before installation—this creates a protective barrier against future contamination.
Extend Bearing Life With Smart Maintenance
Proper cleaning techniques significantly extend bearing life. When washing your motorcycle, maintain at least two feet between pressure washer wand and bearing locations—direct high-pressure streams force water past seal barriers. For routine cleaning, use a bucket of water with scrub brushes instead of power washing near hubs.
Regular bearing inspection during tire changes catches problems early. Remove the seals and rotate the bearing by hand—any roughness, binding, or abnormal play indicates developing failure. Lubricate axle surfaces with lithium-based grease during reassembly, and apply anti-seize to axle threads to prevent galling.
The interface between axle and bearing inner race creates a natural pathway for water intrusion during wet riding. Some riders fabricate custom axle spacers with O-ring seals to block this moisture pathway—a worthwhile modification for frequent wet-conditions riders. By mastering dirt bike wheel bearing removal and installation, you’ll transform a potentially intimidating maintenance task into routine procedure that keeps you riding longer with fewer breakdowns.


