
That moment when your dirt bike’s clutch starts slipping during a crucial climb or drags when you’re trying to stop can ruin an entire ride. Whether you’re dealing with a clutch that won’t disengage properly, slips under acceleration, or has completely burned out from aggressive riding, knowing how to fix it yourself gets you back on the trail faster and saves serious money. This guide delivers the exact steps professional mechanics use to diagnose and repair dirt bike clutches—covering everything from simple cable adjustments to emergency trail fixes and complete internal rebuilds. You’ll learn what to check first, how to identify specific failure modes, and proven techniques that actually work on real-world dirt bikes.
Diagnose Your Specific Clutch Failure Before Repairing
Your first step must be identifying exactly what’s wrong—clutch issues fall into three distinct categories with different solutions. Clutch drag happens when plates fail to fully separate despite pulling the lever, causing your bike to stall when stopped and making neutral nearly impossible to find. This typically points to worn plates, incorrect cable adjustment, or internal damage preventing full disengagement.
A slipping clutch presents completely different symptoms—you’ll feel engine revs increase but power to the rear wheel disappears, often accompanied by a burning smell. Once slippage begins, heat builds rapidly, accelerating the problem until you have no drive at all. This usually means your friction plates are worn out or contaminated.
Grabby engagement problems manifest as uneven power delivery during takeoff, where the clutch engages too abruptly at unusual points in lever travel. This often indicates uneven plate wear or issues with the pressure plate springs that require precise diagnosis before disassembly.
Adjust Clutch Cable Free Play to Solve Common Issues
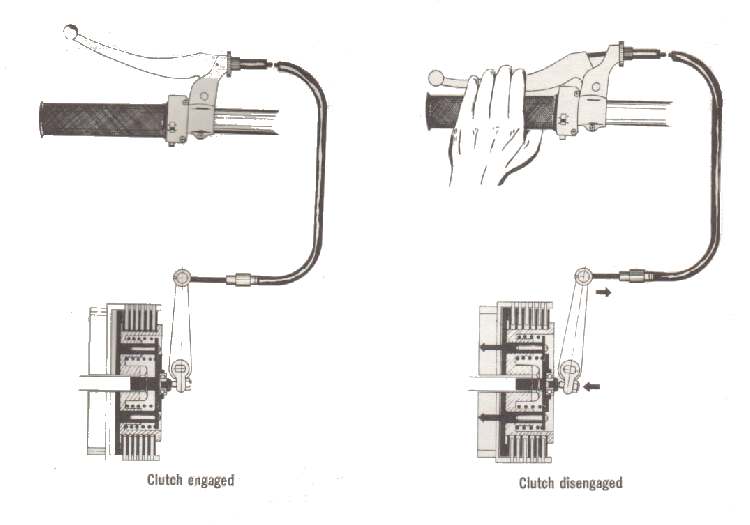
Before opening the clutch cover, check the simplest culprit: your clutch cable. With the bike on a stand, pull the clutch lever and feel for 2-3mm of free play before resistance begins. If the lever seats tightly against the grip with no play, your cable is too tight—this causes premature disengagement and prevents smooth clutch feathering during technical riding.
A properly adjusted cable should fully disengage the clutch at approximately halfway through lever travel on a warmed-up bike. If disengagement happens at only a quarter pull, the cable is too tight; if you must pull nearly to the bar, it’s too loose. Use the barrel adjuster near the lever—unscrew to increase free play, screw in to reduce it. If you’ve maxed out adjusters with no improvement, replace the cable immediately. Continuing to ride with improper adjustment accelerates clutch wear exponentially.
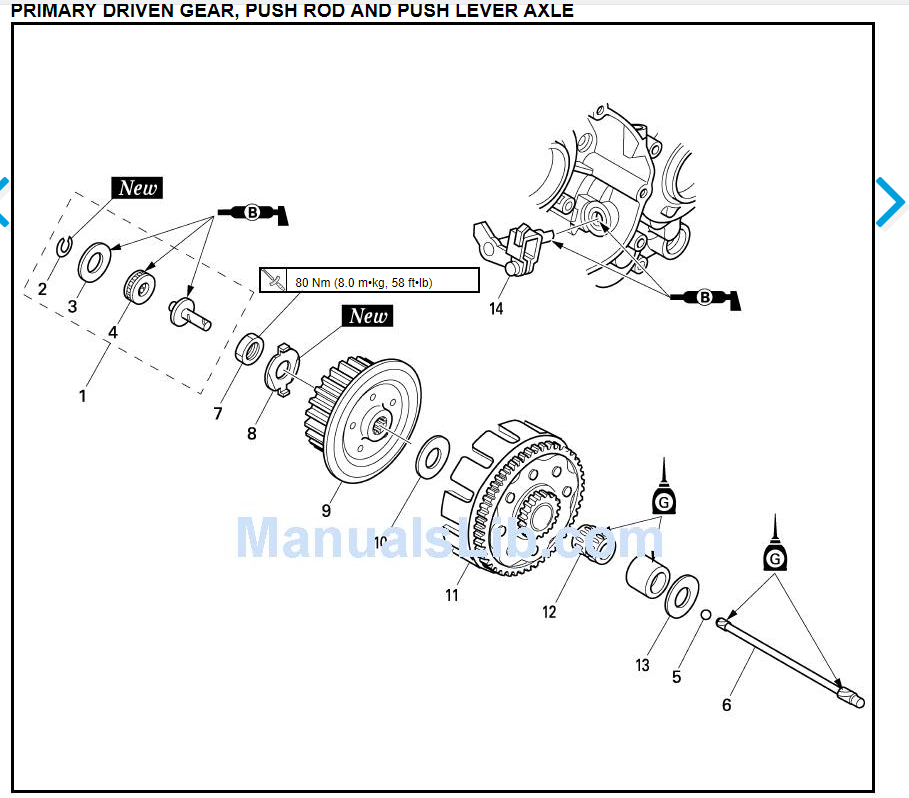
Remove Clutch Cover Without Damaging Seals or Gaskets
Accessing internal components requires careful clutch cover removal. Many modern dirt bikes feature an outer clutch cover sealed with an O-ring that allows plate replacement without draining coolant. If your bike lacks this design, drain coolant first since the water pump often mounts within the main cover.
When removing bolts, work in a criss-cross pattern to prevent warping. Before reinstalling, place the cover in position and gently press down to verify complete seating around the entire perimeter—many failures occur from improper seating that causes oil leaks. Tighten bolts to specification using a torque wrench; most require only 10-12 Newton metres—far less force than most riders apply.
For better access on hot components, remove the fuel tank. On KTMs, disconnect the dry break fuel line followed by three mounting bolts, then lay the bike on its side for comfortable clutch access.
Replace Worn Clutch Plates with Correct Installation
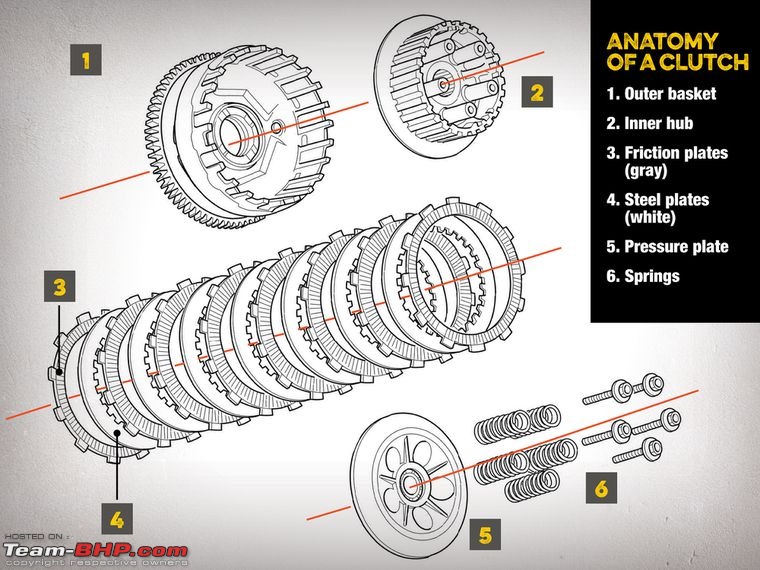
After removing the pressure plate bolts in a criss-cross pattern, inspect all plates for damage. Check for warping by placing each plate on a flat glass surface—if it rocks or gaps appear, replace it immediately. Measure friction material thickness; significant wear or glazing means replacement is necessary.
Critical installation tip: Soak new friction plates in fresh engine oil for several hours before assembly—this prevents initial slippage and ensures proper break-in. Install plates in the exact sequence specified in your service manual; most have directional orientation that affects performance. Never mix up steel and friction plates—this causes immediate failure.
Fix Persistent Clutch Drag with Lever and Bolt Modifications
If drag continues after plate replacement, two proven modifications can solve the problem. Grind the clutch lever’s contact point where it meets the grip—removing 1-2mm allows greater lever travel and more complete disengagement. While this slightly weakens the lever, crash-tested examples show it maintains structural integrity.
Add 1mm washers under pressure plate bolts to increase spring free play. This modification reduces clutch pull effort by approximately 15% while preventing spring bottoming. Testing on Yamaha YZ250, Kawasaki KX250, and Honda XR650R models confirmed no slippage under racing conditions. Always combine both modifications—the ground lever allows greater travel while washers prevent spring bind at full compression.
Emergency Trail-Side Repairs When You’re Stranded
When a clutch burns out miles from civilization, break one steel plate into pieces and space them evenly around the clutch pack to eliminate excess clearance. Stack two pieces together at intervals—this locks the clutch in constant drive without causing slippage. Alternative method: Place small washers under the springs to increase tension and compensate for worn friction material.
After either emergency repair, remove the clutch lever entirely to prevent accidental engagement that could cause further damage. Start the bike in gear or roll-start it—you’ll operate without clutch disengagement, but you’ll make it back to camp. Remember to replace springs when performing permanent repairs, as heat from slippage reduces their compression pressure.
Reassemble with Precision Torque to Prevent Future Damage
During reassembly, tighten pressure plate bolts in multiple passes using a criss-cross pattern. Most require only 10-12 Newton metres—exceeding this strips threads or over-compresses springs. Before starting the engine, verify adequate clearance between the pressure plate and cover; insufficient space causes grinding when the engine runs.
Critical safety check: Rotate the clutch assembly by hand to confirm no contact between moving parts and the cover. If clearance appears marginal, disassemble and reposition components—ignoring this causes catastrophic cover damage within seconds of engine operation.
Extend Clutch Life with Proven Maintenance Practices
Check cable free play weekly and replace cables before adjustment limits are reached—maxed-out adjusters accelerate wear. Inspect plates annually by removing the outer cover and checking for warping on glass. Replace springs after severe slippage since heat reduces their compression pressure, causing premature wear of new plates.
Always use manufacturer-recommended oil—automotive oils with friction modifiers cause slippage even in new clutches. Never use greases on the thrust bearing; fresh engine oil provides proper lubrication without compromising friction characteristics. After any clutch service, bed in new plates by avoiding full-throttle acceleration for the first 20 miles.
Pro tip: Carry a spare steel plate broken into pieces for emergency repairs. Even experienced riders get stranded by sudden clutch failure, and this simple backup can save an entire riding day. Track your clutch’s performance—early detection of minor slippage prevents complete burnout and costly internal damage.


