
That frustrating moment when your dirt bike’s clutch refuses to disengage properly can ruin an entire ride. A sticky clutch causes difficulty shifting gears, resistance when pushing the bike in gear with the lever pulled, lurching movements during gear changes, or even unexpected stalling. If you’re searching for how to fix a sticky clutch on a dirt bike, you’re not alone—this common issue affects riders of all skill levels. The good news is that most sticky clutch problems can be diagnosed and resolved with systematic troubleshooting, starting with simple checks before moving to internal inspections. By following these proven steps, you’ll identify the root cause and implement the right solution to get back on the trail quickly.
Verify Proper Clutch Lever Free Play Before Disassembly
Incorrect clutch cable tension is the culprit behind many sticky clutch problems. If your cable is too tight, the clutch plates won’t fully separate even when you pull the lever all the way in, causing that annoying drag that prevents smooth rolling. Most dirt bikes require precisely 3-5mm of free play at the lever tip—measured from the fully released position to where you first feel resistance.
Adjust your clutch lever properly with these steps:
– Locate the adjustment barrel at your clutch lever perch
– Turn clockwise to increase free play (loosen cable)
– Turn counterclockwise to decrease free play (tighten cable)
– If the barrel is maxed out, adjust the cable at the engine anchor point
If you’ve adjusted to the correct free play range but still experience sticking, your cable may be the problem rather than the clutch itself. Move on to inspecting the cable condition before removing any engine covers.
Inspect Clutch Cable for Binding or Damage
A frayed or corroded clutch cable can prevent proper disengagement even with perfect lever adjustment. Disconnect the cable from the clutch arm at the engine and manually work the lever through its full range while watching for resistance points. Pay special attention to where the cable enters the housing near the engine—this area commonly develops kinks from heat exposure.
Look for these cable failure signs:
– Visible fraying at either end connection point
– Rust or corrosion inside the cable housing
– Rough spots when working the lever through its range
– Inability to move the clutch arm freely when disconnected
If your cable binds in certain positions or shows visible damage, replacement is necessary. On hydraulic clutch systems, skip to checking fluid levels and bleeding the system instead of inspecting a cable.
Analyze Oil Type and Condition for Clutch Compatibility
Using incorrect engine oil causes more sticky clutch problems than any mechanical failure. Standard automotive oils contain friction modifiers designed for car engines but disastrous for motorcycle wet clutches. Diesel-grade oils like Rotella T6 are particularly problematic—many riders report immediate clutch drag after switching to these formulations.
Drain and inspect your oil with these critical checks:
– Smell for burnt odor indicating overheating
– Look for metallic particles signaling clutch wear
– Check color—dark, sludgy oil needs replacement
– Verify you’re using motorcycle-specific oil without automotive additives
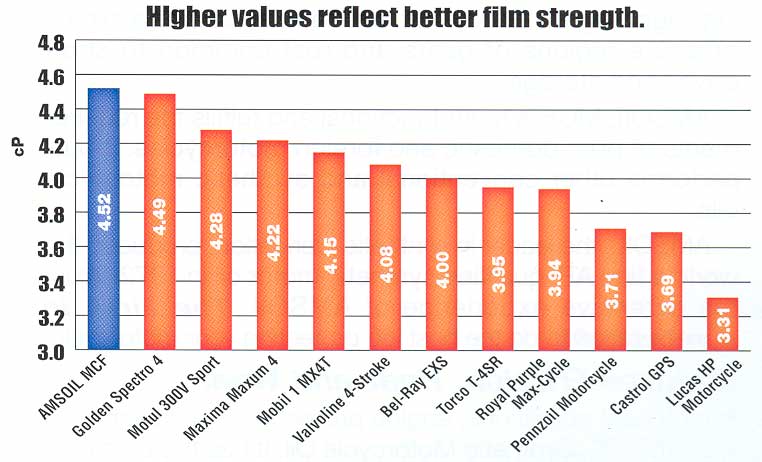
Always flush the entire oil system when installing new clutch components. Reusing contaminated oil with fresh plates guarantees continued sticking problems. Stick with the manufacturer’s recommended oil type—most dirt bike specialists recommend premium motorcycle oils specifically formulated for wet clutch applications.
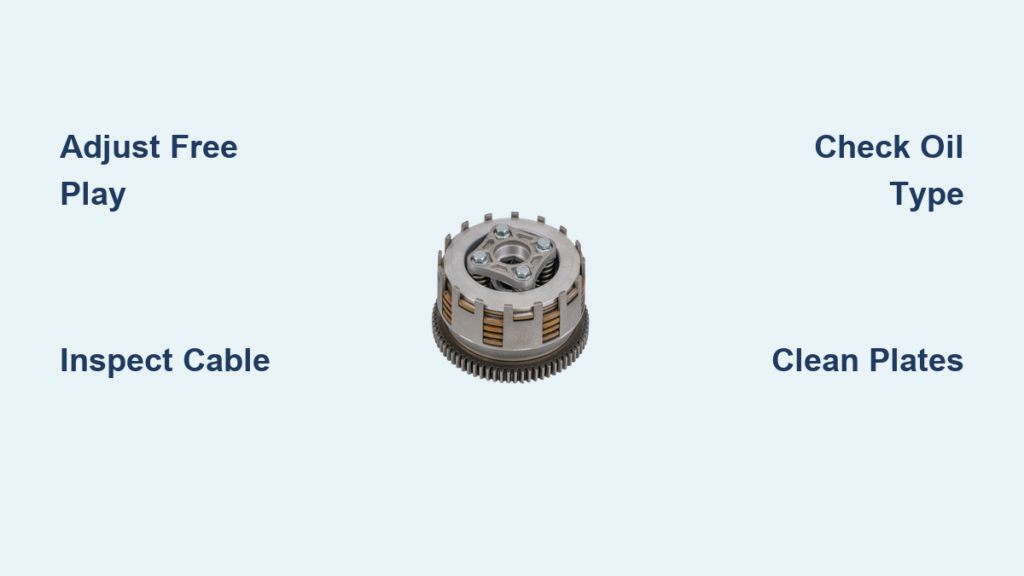
Remove Clutch Cover for Internal Component Inspection
When basic adjustments don’t resolve the issue, you’ll need to access the clutch assembly. Remove the clutch cover carefully, noting gasket condition for proper resealing. Once exposed, methodically inspect each component while keeping everything in order for reassembly.
Checking Steel Plates for Warping on Flat Surface

Steel plates must lie perfectly flat to allow proper separation. Place each plate on a known flat surface like glass or precision granite block. Any rocking motion or visible light gap underneath indicates warping that prevents full disengagement. Never attempt to straighten warped steel plates—their heat-treated structure is compromised once bent, making replacement the only safe option.
Examining Friction Plates for Glazing and Wear
Friction plates develop a hard, shiny surface (glazing) from heat cycles that causes sticking. Separate each plate and inspect for:
– Smooth, glassy surfaces instead of textured friction material
– Uneven wear patterns across the plate surface
– Separation of friction material from the steel backing
– Thickness below manufacturer specifications
Many experienced riders note that even plates measuring within spec can feel “sticky” when old, while properly soaked new plates separate easily. If plates show significant glazing or wear, replacement is necessary.
Inspecting Clutch Basket for Wear Grooves
Run your finger around the inside circumference of the clutch basket feeling for ridges where friction material has worn into the aluminum. These grooves catch the tabs on friction plates, preventing smooth release. Severe wear requires basket replacement—attempting to file down grooves weakens this critical component.
Clean Sticky Clutch Plates Without Causing Damage
When plates show minor sticking but aren’t worn out, cleaning often restores proper function. Spray each plate thoroughly with brake cleaner, focusing on the contact surfaces. Allow complete evaporation—brake cleaner won’t damage friction material but leaves no residue.
Critical oil soaking step after cleaning:
– Submerge friction plates in fresh motorcycle oil
– Allow 5-10 minutes for full saturation
– Never install dry clutch plates
– Verify correct stacking order during reassembly
Premium synthetic oils like Amsoil often provide better plate separation than conventional oils. Properly cleaned and reinstalled plates can perform like new if underlying components remain within specification.
Replace Worn Components with Correct Specifications
Friction plates beyond their service life, warped steel plates, or worn clutch baskets require replacement. Never mix new and old components—installing fresh friction plates with worn steel plates or a grooved basket guarantees continued problems. Replace springs simultaneously as they lose tension over time, causing uneven pressure across the clutch pack.
When replacing components, verify your pressure plate isn’t warped by checking its flatness against a known surface. Heat discoloration or scoring indicates damage requiring replacement. A single compromised component affects the entire clutch assembly’s performance.
Follow Correct Break-In Procedure for New Clutches
New clutch plates need proper break-in to reach optimal performance. During the first 50-100 miles:
– Avoid aggressive launches and full-throttle acceleration
– Use smooth, progressive clutch engagement
– Allow clutch to fully release before adding power
– Alternate between acceleration and deceleration
Rushing the break-in process creates glazing and premature wear. Properly broken-in clutches provide smoother engagement and prevent future sticking issues. Patience during this critical period pays dividends in clutch longevity.
Prevent Future Clutch Problems with Proper Maintenance
Avoid repeat sticky clutch issues with these preventative measures:
– Change oil at manufacturer-specified intervals
– Use only motorcycle-specific oil without automotive additives
– Check clutch adjustment before every ride
– Inspect cable for fraying during routine maintenance
Critical riding habits to avoid:
– Riding with clutch partially engaged for extended periods
– Using clutch to control speed on steep downhills
– Frequent aggressive launches that overheat clutch
Regular maintenance prevents 90% of sticky clutch problems. Keep your clutch system clean, properly adjusted, and filled with correct fluids for trouble-free operation.
A properly functioning clutch makes all the difference between an enjoyable ride and constant frustration. By methodically working through these diagnostic steps—from simple lever adjustments to internal component inspection—you’ll identify and resolve your sticky clutch problem efficiently. Remember that cold-weather drag is often normal, but persistent sticking when warm requires attention. Never ride with a compromised clutch, as sudden engagement failures can lead to dangerous situations. When in doubt, consult a professional mechanic—your safety is worth the investment. With proper maintenance and correct riding techniques, your dirt bike’s clutch should provide reliable service for thousands of miles. Now that you know how to fix a sticky clutch on a dirt bike, you’re ready to tackle trail challenges with confidence.


