
There’s nothing more frustrating than snapping a spoke mid-ride and realizing you need to rebuild your entire dirt bike wheel. Many riders immediately take their bike to a shop, paying $100-$200 for a service they could easily perform themselves. The truth is that replacing broken spokes on your dirt bike wheel is a straightforward process that requires patience and the right approach—not mystical mechanical skills. This guide walks you through the complete spoke replacement process from start to finish, so you can get back on the trail without breaking the bank.
Before you begin, understand that wheel building consists of two distinct phases: lacing (covered here) and truing (which requires separate tools and techniques). The lacing process establishes the wheel’s structural foundation, while truing fine-tunes everything for perfect rotation. Take your time with each step in this guide, and you’ll save significant money while gaining a valuable mechanical skill that will serve you for years.
Gather Essential Tools Before Cutting Damaged Spokes

Having the right tools ready prevents frustrating interruptions mid-project. You’ll need a cutting wheel or rotary tool to remove old spokes, a properly sized spoke wrench that fits your specific nipples, and a punch with hammer for seating stubborn spoke heads. A quality spoke wrench grips the nipple securely without rounding its edges—cheap tools often slip and damage nipples during critical tightening stages.
Collect your replacement spokes, ensuring you have the correct lengths for your specific wheel configuration. Most dirt bike wheels use either 32 or 36 spokes, and many designs incorporate different lengths between inner and outer positions. Have plenty of anti-seize compound on hand to protect threads against corrosion from mud, water, and trail debris. Keep rags nearby for cleaning excess anti-seize and maintaining grip on slippery parts.
Critical Tool Checklist for Spoke Replacement
- Cutting wheel or rotary tool for spoke removal
- Correct size spoke wrench (usually 3.2mm or 3.5mm)
- Punch and hammer for seating spoke heads
- Anti-seize compound for thread protection
- Replacement spokes of proper length and type
- Clean work surface with adequate lighting
Measure Rim Height Before Disassembly
Before removing any components, measure and record the distance from the rim’s outer edge to the ground. This measurement serves a crucial purpose: when you rebuild the wheel, you’ll need to block the rim up to approximately this height to make assembly significantly easier. Skipping this step leaves you struggling with a rim at an awkward working height throughout the entire project.
Use a straightedge or tape measure to get an accurate reading, noting the dimension somewhere accessible. This simple preparatory step pays dividends in reduced fatigue and improved precision during the more complex lacing stages. The blocked-up position allows you to work on the wheel at a comfortable height while maintaining proper alignment between hub and rim throughout assembly.
Identify Correct Spoke Lengths and Layout Pattern

Many dirt bike wheels feature offset spoke patterns requiring different spoke lengths for inner and outer positions. If your spoke kit includes multiple lengths without clear labeling, you must identify which length goes where before installation begins. The consequences of guessing are significant—incorrect lengths cause uneven tension, impossible truing, and potential spoke failure.
The easiest method involves removing two spokes from your old wheel (if any remain usable), measuring them precisely, and recording their positions. Compare these measurements to your new spoke kit, matching lengths to their corresponding positions. If no original spokes exist for reference, examine the wheel’s geometry to identify which positions require longer or shorter spokes based on their angle and distance from the hub flange.
Once you’ve mapped out the correct spoke layout, separate your new spokes by length into distinct groups. Labeling or organizing these groups prevents costly confusion during assembly. This preparation step takes only minutes but eliminates the frustration of discovering misplaced spokes after half the wheel is assembled.
Remove Damaged Spokes and Inspect Rim Condition
With your measurement recorded and spoke layout determined, cut out the damaged spokes using a cutting wheel or appropriate tool. Work methodically around the wheel, removing all old spokes and disposing of them safely. As each spoke comes out, you create more working room for subsequent removals.
After clearing all spokes, perform a thorough rim inspection. Look for cracks, dents, or signs of permanent damage that could compromise the rebuilt wheel. Two common crack locations are near spoke holes and along the valve stem area—these high-stress zones show damage first. If your rim has cracks or excessive wear, factor rim replacement into your project before proceeding. A damaged rim undermines all your spoke replacement efforts, so address these issues now rather than discovering them after completing the assembly.
Apply Anti-Seize to New Spokes Before Installation
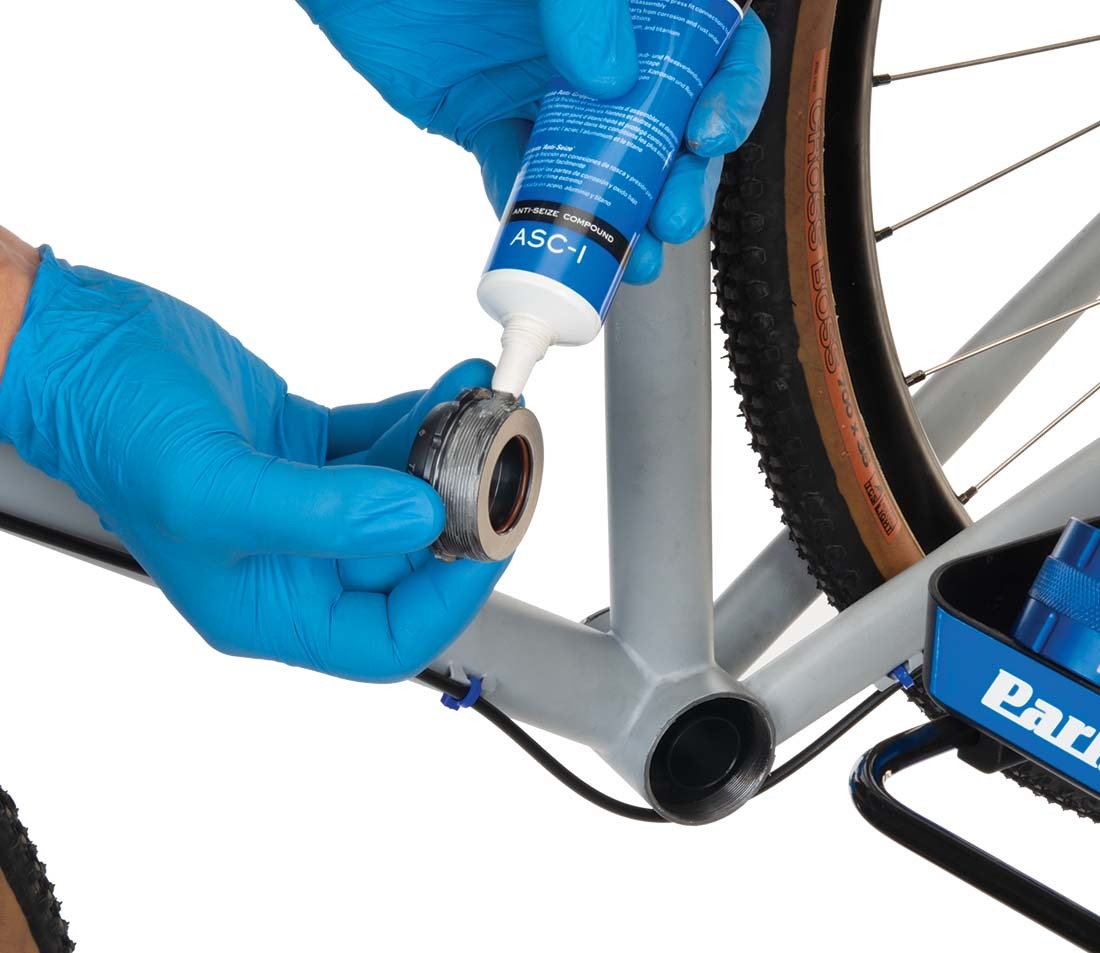
Dirt bike wheels face harsh conditions: mud, water, vibration, and prolonged exposure to the elements. Protect your investment by coating all spokes with anti-seize compound before installation. This protective layer prevents corrosion at the spoke-nipple interface and keeps threads turning freely for years of service.
Apply anti-seize generously along each spoke’s threaded section and anywhere metal contacts metal. The compound also makes future adjustments easier when maintaining or truing the wheel. While some builders skip this step to save time, the few minutes invested in coating spokes prevents significant headaches down the trail. Separate your prepared spokes back into their length groups, keeping everything organized for the assembly sequence.
Position Hub and Block Rim at Correct Height
Center your hub at the work area and block up the rim to the height you measured earlier. This blocked position aligns the hub and rim at their final relationship, making hole alignment much simpler throughout the lacing process. The rim’s height relative to the hub remains constant, so establishing this relationship early streamlines every subsequent step.
Either side of the wheel can serve as your starting point—the sprocket side or brake side. What matters is maintaining the rim’s centered position relative to the hub throughout assembly. If the rim drifts to one side, adjust your blocking before continuing. A properly positioned rim makes hole alignment obvious and intuitive rather than requiring constant guesswork.
Install Outside Spokes First on Starting Side
Begin installation with the outside spokes on your chosen side. Installing inside spokes first creates impossible clearance problems for the outside spokes—the geometry simply doesn’t allow it. Each outside spoke threads into its hub hole, then angles toward its corresponding rim hole. You may need to rotate the rim slightly to align holes, but the correct position becomes immediately obvious when you find it.
Thread nipples onto spokes only a few turns at first—engage enough threads to hold the spoke but leave the nipple loose. Keeping everything loose allows the rim to remain mobile, making subsequent spoke installations easier. As you work around the wheel, each newly installed spoke slightly changes the rim’s position, requiring ongoing adjustments to align remaining holes.
Once all outside spokes on the first side are installed, move to the inside spokes on that same side. The process follows the same pattern: install the spoke, align the rim hole, and thread on the nipple loosely. You may need to pull the rim side-to-side and up-and-down to generate enough clearance for spoke ends to pass through rim holes. Don’t force anything—if a spoke won’t align, adjust the rim’s position and try again from a different angle.
Complete Lacing on Opposite Side of Wheel
Flip the wheel over and repeat the lacing process on the second side. Start with the outside spokes, then install the inside spokes. The technique remains identical: align holes, thread nipples loosely, and maintain flexibility throughout the assembly. Side-to-side and up-and-down rim movement helps guide stubborn spokes into position.
By the time you finish this side, all spokes should be installed with nipples threaded but not tightened. The wheel should look complete but still feel loose and flexible—this is exactly what you want at this stage. A properly assembled wheel at this point shows even spoke positioning with similar thread engagement visible on each spoke.
Verify Correct Spoke Installation Before Tightening
Before tightening anything, perform a crucial verification check. Compare the remaining thread length visible beyond each nipple across similar spoke positions. With all nipples loose, the exposed threads should be roughly consistent. If some spokes show significantly more or less thread engagement than their neighbors, the spokes may be installed in wrong positions.
This comparison matters most between spokes of the same length. Inner and outer spokes naturally have different lengths, so comparing them directly produces misleading results. Focus on comparing inner-to-inner and outer-to-outer positions. If you discover misplaced spokes, swap them now before tightening—correcting mistakes after tensioning begins creates unnecessary work and potential damage.
Another verification point involves checking that spoke heads seat fully in their hub holes. Some spoke heads snag on hole edges and require a gentle tap with a punch and hammer to seat properly. Relying on the nipple to pull the head into position often fails, leaving the spoke head partially elevated. Take time to inspect each spoke head and seat any that aren’t fully down.
Apply Even Tension Using Progressive Tightening Pattern
With installation verified, begin tightening all nipples with your spoke wrench. The key principle is evenness—tighten spokes gradually and systematically rather than pulling any single spoke to final tension immediately. Uneven tension creates hop, wobble, and stress concentrations that lead to premature failure.
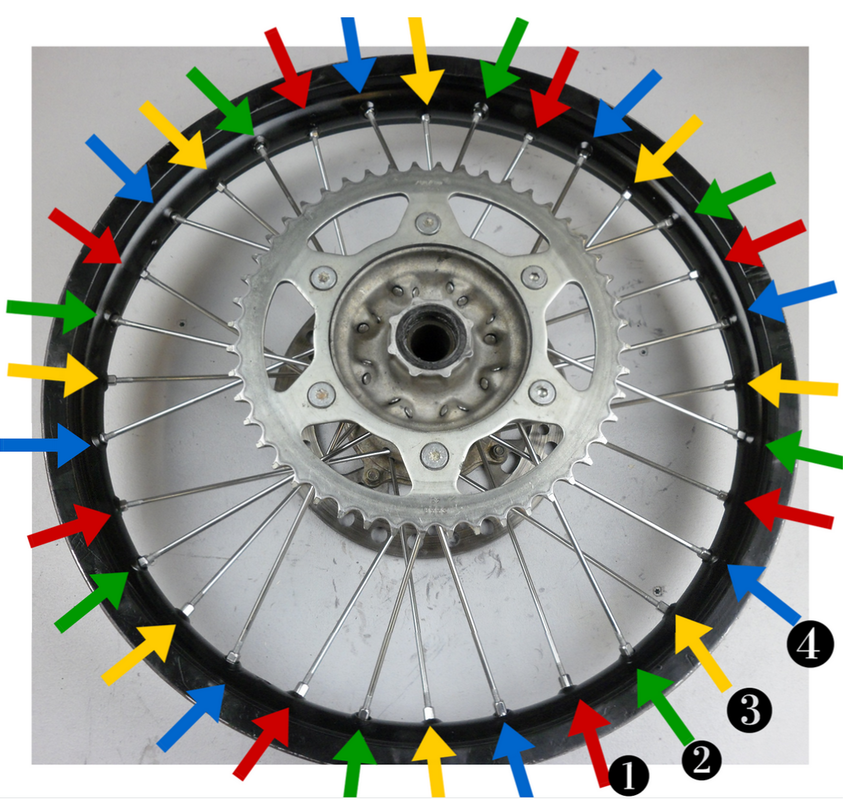
Use a crossing pattern that distributes tension evenly across the wheel. For 32 or 36-spoke wheels, tighten every fourth spoke in sequence, creating an 8 or 9-step pattern that works around the wheel uniformly. The specific pattern matters less than maintaining consistency—whatever sequence you choose, follow it methodically until all spokes receive equal attention.
As you tighten, periodically check that spokes don’t protrude through the nipple ends. Properly installed spokes end flush with or slightly inside the nipple’s end. If any spoke extends beyond the nipple, you’ve overtensioned that specific spoke relative to its neighbors. Back off and redistribute tension more evenly.
Prepare Wheel for Final Truing Process
At this point, your wheel assembly should feel notably tighter than when started. The rim should be tensioned evenly throughout its circumference, with consistent feel when squeezed at various points. All spokes should show similar thread engagement, spoke heads should seat fully, and no spokes should protrude past their nipples.
The wheel is now ready for truing—the process of fine-tuning spoke tension until the wheel runs perfectly straight and round. This adjustment phase requires patience and a truing stand or at minimum a reference point for measuring runout. While truing deserves its own detailed guide, understand that your careful lacing and even initial tensioning directly determines how much work this final phase requires.
The more evenly you tension during this initial stage, the less adjustment truing requires. Rushing the tightening process creates asymmetry that demands extensive correction. With a properly assembled and evenly tensioned wheel, truing becomes a quick final calibration rather than a major adjustment session. Complete your wheel rebuild by truing the wheel to specification, and you’ll have a replacement assembly that rivals professional wheel building at a fraction of the cost.


