
Your dirt bike’s air screw holds the key to perfect idle quality and low-end throttle response—but only if you know which way to turn it. Many riders waste hours adjusting the wrong screw or turning in the wrong direction because they don’t understand the critical difference between air screws and fuel screws. When properly adjusted, your two-stroke engine starts easily, idles smoothly, and responds instantly when you crack the throttle. Get it wrong, and you’ll battle bogging, hesitation, backfiring, or a hanging idle that makes low-speed technical riding frustrating. This guide cuts through the confusion with step-by-step instructions specifically for two-stroke dirt bikes, so you can diagnose mixture problems and tune your air screw like a pro mechanic.
The air screw controls your carburetor’s pilot circuit, which dominates fuel delivery at idle and low throttle openings—exactly where most trail and track riding happens. Unlike four-strokes that use fuel screws, two-strokes rely on air screws to balance the air component of your air-fuel mixture. When adjusted correctly, your engine delivers immediate power the moment you twist the throttle, without hesitation or bogging. This single adjustment can solve many of the most common carburetion problems two-stroke owners face, yet most riders either ignore it completely or adjust it blindly without understanding the consequences.
How to Identify Your Dirt Bike’s Air Screw vs Fuel Screw

Two-stroke dirt bikes universally use an air screw for idle mixture control, while four-strokes employ a fuel screw instead—confusing these two will ruin your tuning efforts. Your air screw sits on the air intake side of the carburetor, positioned upstream from the slide between the air filter and the slide itself. Look for a brass screw near the air intake side with an “A” stamped on it. In contrast, fuel screws reside on the manifold side downstream from the slide between the cylinder and carburetor body, often labeled with an “F.”
Why Air Screw Location Matters for Proper Adjustment
Air screws bypass air around the closed slide at idle through a tapered needle mechanism. When you turn the air screw out (counter-clockwise), more air flows through the idle circuit, leaning the mixture. Turning it in (clockwise) restricts airflow, richening the mixture. This is the opposite of how fuel screws work on four-strokes—where turning out increases fuel flow and richens the mixture. Mistaking one for the other leads to endless frustration as you adjust in the wrong direction, worsening your problem instead of solving it.
Quick Identification Test for Uncertain Riders
If you’re unsure which type of screw your bike has, perform this simple test: with the engine running at idle, turn the screw out 1/4 turn. If the idle speed increases, you’re working with an air screw (two-stroke). If the idle speed decreases, you’re adjusting a fuel screw (four-stroke). This immediate feedback confirms your screw type before you make significant adjustments that could leave your bike unrideable.
Which Way to Turn Your Air Screw for Proper Mixture

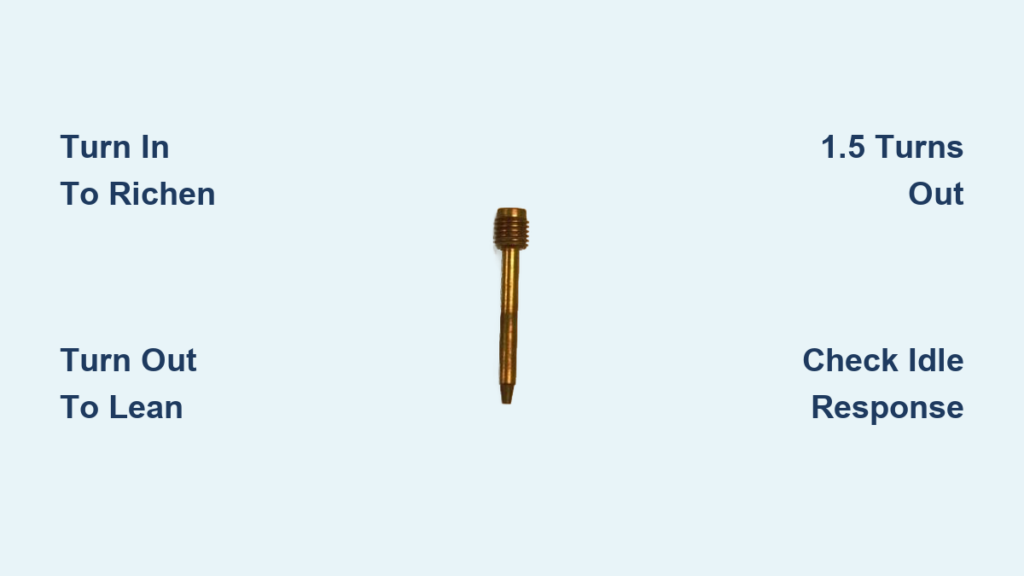
For two-stroke dirt bikes, turning the air screw IN (clockwise) RICHENS the mixture, while turning it OUT (counter-clockwise) LEANS the mixture. This relationship exists because turning the screw in blocks the idle air circuit, reducing airflow and creating a richer air-fuel ratio. Conversely, turning it out allows more air through, effectively leaning the idle mixture. Remember this simple rule: air screws control AIR, so turning them OUT lets MORE AIR in (leaner), and turning them IN blocks AIR (richer).
Critical Warning: Avoid Damaging Your Air Screw
When adjusting, never force the screw when it reaches its seat. Turn it in gently until you feel light resistance—this is the seated position. Forcing it can damage the needle tip or seat, ruining your carburetor’s ability to run properly. The standard adjustment range spans 1.0 to 3.0 turns out from seated, with most bikes performing best between 1.5 and 2.0 turns. Operating beyond 2.5 turns risks the screw backing out completely during operation.
Setting the Perfect Air Screw Baseline for Your 2-Stroke
Establish your starting point by turning the air screw in gently until lightly seated (not tight), then counting turns as you back it out. Most factory settings begin at 1.5 to 2 turns out from seated, though this varies by model. For initial setup, start with 1.5 turns out on a fully warmed-up engine—this middle ground gives you equal adjustment room in both directions.
Step-by-Step Baseline Adjustment Procedure
- Start with engine fully warmed up at normal operating temperature
- Set idle speed using the throttle stop screw (not the air screw)
- Turn air screw slowly clockwise (in) until you feel light resistance
- Count turns as you back it out to 1.5 turns from seated
- Allow engine to settle for 30 seconds before evaluating performance
This baseline gives you a reference point to return to if your adjustments don’t improve performance. The engine should idle steadily without excessive hunting or dying when you blip the throttle.
7 Clear Signs Your Dirt Bike’s Air Screw Needs Adjustment
A rich mixture (air screw too far in) creates these unmistakable symptoms:
– Bog or hesitation immediately upon throttle opening
– Engine feels like it wants to die when cracking the throttle
– Hard starting, especially when hot
– Excessive fuel smell at idle
– Sooty black spark plug after riding
A lean mixture (air screw too far out) produces these telltale signs:
– Weak low-end power and unresponsiveness
– Exhaust popping or backfiring during deceleration
– “Hanging” idle where RPMs stay elevated longer than expected
– Stumbling or hesitation when applying throttle
– White or tan spark plug after riding
Why the 1/8 Throttle Transition Zone Matters Most
The transition zone around 1/8 throttle opening is where air screw settings have their greatest impact. This is because the pilot circuit—controlled by the air screw—dominates fuel delivery at low throttle openings, while the needle circuit takes over as throttle increases. Problems specifically in this transition zone point directly to air screw or pilot jet issues, making it your perfect testing ground.
Step-by-Step Air Screw Tuning for Smooth Throttle Response
Start with your baseline setting on a fully warmed engine. Turn the air screw slowly in 1/8-turn increments while listening for changes in idle quality. The goal is finding the position that produces the highest and most steady idle RPM. After each adjustment, blip the throttle lightly and let the engine settle for 10-15 seconds before making another change.
The Ride-Test Method for Accurate Tuning
The definitive test requires actually riding your bike:
1. Place motorcycle in third gear
2. Lug engine down to near-stall RPM at low throttle
3. Perform smooth roll-on of the throttle while observing response
4. If engine bogs or hesitates, mixture is too rich (turn air screw out)
5. If engine stutters or lacks power, mixture is too lean (turn air screw in)
Make large initial adjustments of 1 turn to determine the correct direction, then fine-tune with 1/4-turn changes. Your final setting should provide immediate throttle response without hesitation, bogging, or popping.
Adjusting Your Air Screw for High Altitude and Hot Weather
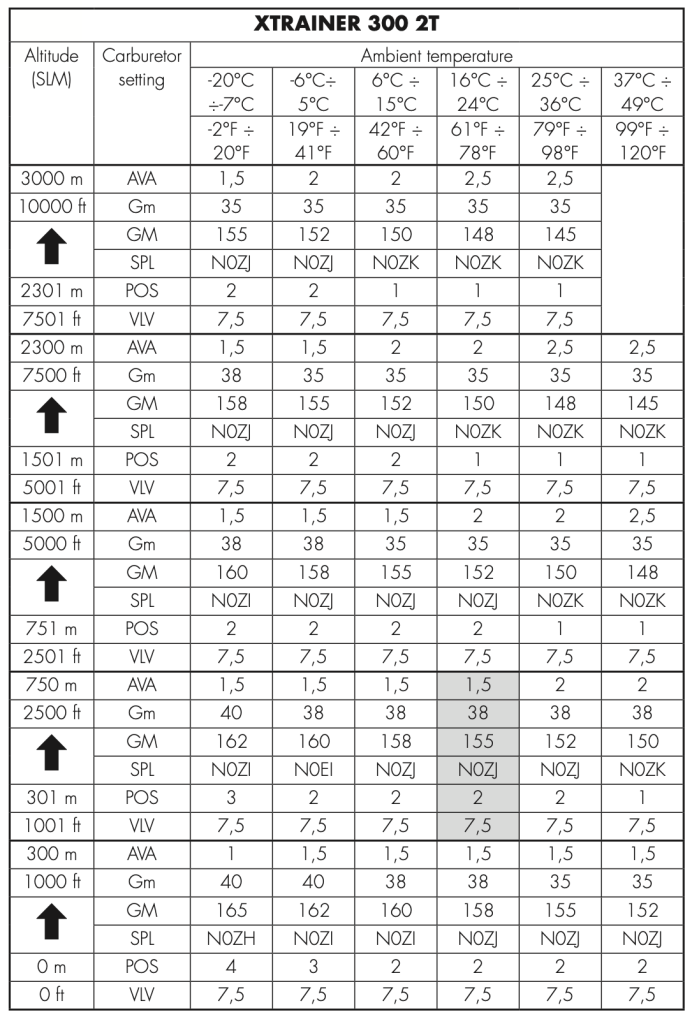
Higher elevation means thinner air, effectively leaning the mixture, requiring you to turn the air screw in (richer) to compensate. At 5,000 feet, you may need to turn your air screw in 1/2 to 1 full turn from your sea-level setting. Similarly, hotter ambient temperatures reduce air density, creating similar lean conditions that demand richer settings.
When to Change Pilot Jets Instead of Forcing Air Screw Adjustment
The standard air screw adjustment range accommodates most altitude and temperature variations. If you need more than 2.5 turns out to achieve proper running, your pilot jet is too small and needs replacement. If you need less than 1 turn out, your pilot jet is too large. Forcing the air screw beyond its effective range reduces its ability to fine-tune the mixture and risks the screw backing out during operation.
Must-Have Tools for Quick Dirt Bike Air Screw Adjustments
Accessing the air screw varies significantly by model. Some bikes position it conveniently on the side of the carburetor, while others tuck it away requiring carburetor removal. For difficult-to-reach air screws, invest in an aftermarket adjustable air screw with a knurled head or extended lever—this modification pays for itself in convenience during track-side adjustments.
Avoiding Costly Screw Damage During Adjustment
Use the correct screwdriver size that fits the screw head perfectly—never force a mismatched tool. Air screw tips are larger and more robust than fuel screw tips, but careless handling can still damage them. Always turn screws gently, especially when approaching the seated position. Damaging your air screw creates problems far more serious than an incorrect idle mixture setting.
5 Carburetor Problems Air Screw Adjustment Won’t Fix
Mixture problems that resist air screw adjustment often stem from these underlying issues:
– Bad reed valves causing symptoms that mimic mixture problems
– Air leaks between carburetor and engine allowing unmetered air
– Contaminated or stale fuel creating erratic performance
– Dented or plugged exhaust pipes affecting scavenging
– Faulty ignition components producing carburetion-like symptoms
Before concluding air screw adjustment is necessary, verify float level is correct, vent lines are clear, and no obstructions exist in carburetor circuits. A systematic approach prevents wasted time adjusting the wrong component while the actual problem goes unaddressed.
Final Note: Proper air screw adjustment is just one component of complete carburetor tuning. Once you’ve mastered this critical first step, move on to pilot jet sizing, needle position, and main jet optimization for full-throttle performance. The air screw works in conjunction with the pilot jet to determine mixture in the low-throttle range—changing one may require corresponding changes to the other to maintain proper mixture across varying conditions. Start with the float level, proceed to the pilot circuit (including your newly adjusted air screw), then address the needle circuit, and finally optimize the main jet. This systematic approach ensures your dirt bike delivers smooth, immediate throttle response across the entire RPM range.


