
Your bikes keep tumbling over in the garage, scratching walls and frames? A wobbly store-bought rack just isn’t cutting it. The solution is simpler than you think: build a rock-solid bike rack using standard 2×4 lumber you can buy for under $50. This guide delivers three proven designs—wall-mounted, freestanding, and gravity stand—each constructed entirely from basic 2x4s with common tools. You’ll eliminate bike clutter permanently while protecting your prized rides, all without specialized skills or expensive hardware. By the end of this weekend project, you’ll have a custom rack perfectly sized for your space and bike collection.
Choose Your 2×4 Bike Rack Design Based on Space Needs

Don’t waste time building a rack that won’t fit your situation. Your ideal design depends on three factors: wall access, bike count, and whether you rent or own. Each solution uses identical materials but solves different storage headaches.
Wall-Mounted 2×4 Rack for Apartment and Garage Spaces
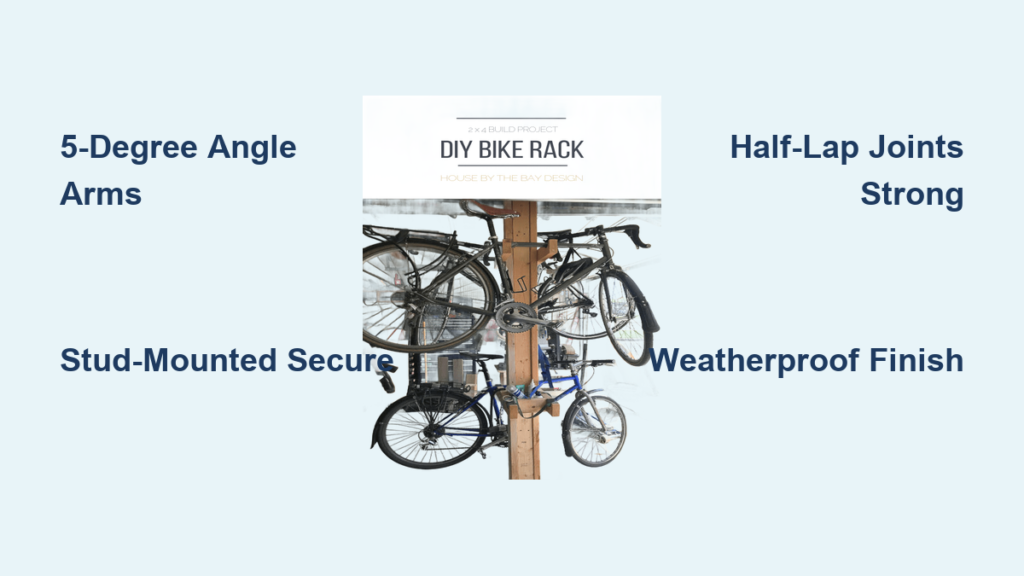
This space-saving champion holds two bikes vertically while protruding just 14 inches from the wall—perfect for narrow garages or rental apartments where floor space is precious. The secret is its 5-degree upward angle on support arms, which keeps bikes securely in place without wall damage. You’ll mount it directly to wall studs at 66 inches height (the sweet spot for most adult bikes), making it invisible when not in use. Best for: Owners with solid stud walls storing 1-3 bikes.
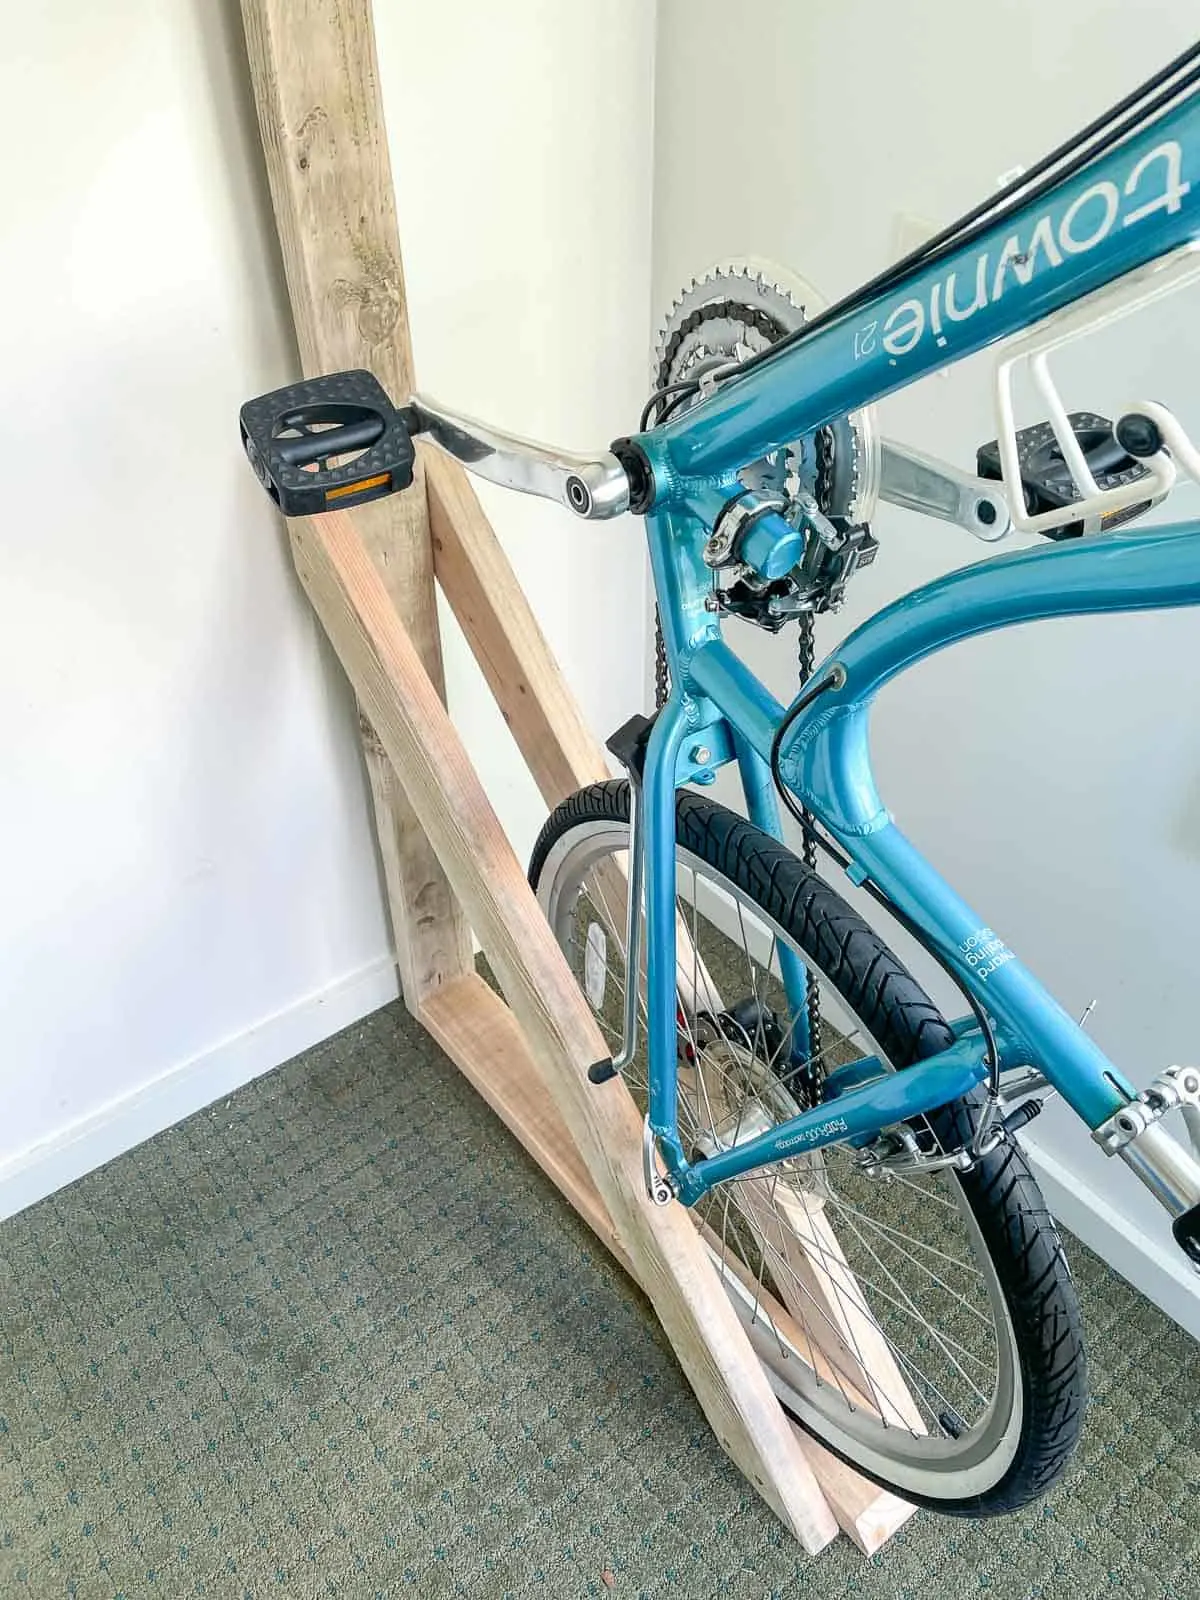
Freestanding A-Frame 2×4 Bike Rack for Flexible Storage
When you can’t drill into walls—or need to move your rack between driveway and basement—this rolling design is your answer. The triangular A-frame base provides rock-solid stability without anchoring, while angled 2.5-inch wheel slots cradle tires securely. Unlike flimsy metal racks, this holds four bikes (even heavy e-bikes) without tipping. Critical detail: The 15-degree slot angle prevents wheel slippage during loading. Best for: Renters, multi-location storage, or handling 4+ bikes.
Gravity Stand 2×4 Rack for Renter-Friendly Bike Parking
No tools? No problem. This lean-against-the-wall design uses physics instead of fasteners to hold 4-6 bikes. The 60-inch front supports create a stable 15-degree lean-back angle that locks bikes in place through weight distribution alone. You’ll never scratch walls again since bikes rest against the rack—not the surface behind it. Warning: Must be placed on level flooring; uneven surfaces cause instability. Best for: Temporary setups, garage sales, or strict no-drill leases.
Gather Exact 2×4 Materials and Tools Before Starting
Skip the hardware store run mid-project with this precise shopping list. Every component comes from standard 2x4s—no specialty lumber required.
Materials for wall-mounted 2-bike rack (total: $18):
– Three 8-foot 2x4s (yields all pieces with zero waste)
– 1 box 2.5″ exterior screws ($8)
– Waterproof wood glue ($4)
– Exterior polyurethane finish ($6)
Critical tools checklist:
– Circular saw (set to 90° for clean cuts)
– Drill with 1/8″ pilot bit and 1/4″ lag bit
– Stud finder (non-negotiable for wall mounts)
– Speed square for precise angle marking
– 120-grit sandpaper (splinters ruin bike frames)
Pro tip: Buy lumber in 10-packs for 20% savings—ideal if building multiple racks or helping neighbors.
Cut Your 2×4 Pieces in One Efficient Session
Measure twice, cut once—especially with 2x4s where a single error wastes your entire board. This sequence prevents mistakes and maximizes yield from three 8-footers.
Mark and Cut Support Arms with Precision
Set your saw to 90° and clamp boards firmly. Cut support arms with a slight 5-degree upward angle using your speed square—this prevents bikes from sliding off. For wall racks: Cut two 48″ top beams first, then four 14″ support arms, finishing with eight small braces (four 3″ and four 8″ pieces). Sand every edge immediately with 120-grit paper; rough cuts damage expensive bike paint during use.
Critical error to avoid: Skipping the 5-degree angle. Flat arms let bikes slide off when loading/unloading—always angle upward toward the wall.
Build Wall-Mounted 2×4 Rack in 30 Minutes
This method secures bikes to wall studs—not drywall—so they won’t rip out under weight. Skip this step and you’ll face wall damage and bike crashes.
Assemble Support Arms Before Wall Mounting
Lay your 48″ top beam flat. Mark support arm positions at 12″ and 36″ from each end (aligning with standard 16″ stud spacing). Apply wood glue to contact points, position arms perpendicular, then pre-drill with 1/8″ bit. Drive three 2.5″ screws per joint—this triple-screw method prevents wobble under bike weight. Test arm strength by hanging 50 lbs before mounting.
Locate Studs and Pre-Drill Mounting Holes
Use a stud finder to locate two adjacent studs—never rely on drywall anchors for bike storage. Hold your rack at 66″ height (measure from floor to top tube when lifting your bike). Pre-drill 1/4″ holes through the 8″ wall blocks, then mark corresponding spots on the wall. This prevents misalignment that strains joints.
Secure Rack and Apply Protective Finish
Drive 3″ lag screws with washers into pre-drilled stud holes until snug (don’t overtighten and split wood). Immediately apply exterior polyurethane to all surfaces—especially end grain where moisture penetrates fastest. Test with one bike first: Lift your heaviest ride into position and check for rack flex before loading all bikes.
Construct Freestanding A-Frame Rack Without Wall Damage
This rolling design handles four bikes on any flat surface. The magic is in the half-lap joints and angled wheel slots—skip these and your rack will wobble.
Build Rock-Solid Base with Half-Lap Joints
Create a rectangle using two 48″ and two 24″ pieces. Cut half-lap joints (remove half the board thickness at corners) for maximum strength—this distributes weight better than simple butt joints. Reinforce with metal brackets if skipping advanced joinery. Critical check: Use a level to ensure base sits perfectly flat; any tilt multiplies instability when loaded.
Cut Perfect 1.5″ Deep Wheel Slots at 15 Degrees
Mark six 18″ slats for wheel supports. Using your speed square, cut 2.5″ wide slots angled at 15 degrees—this cradles tires without rim damage. Maintain exact 1.5″ depth across all slots; shallow cuts let wheels wobble, while deep cuts weaken the wood. Space slots 6″ apart to accommodate various bike widths.
Final Assembly and Floor Protection
Attach slats to vertical posts with glue and screws, then sand entire rack to 220-grit smoothness. Apply two coats of exterior finish, focusing on end grain. Add rubber feet to the base corners—this prevents floor scratches and stops the rack from sliding during bike loading.
Customize Your 2×4 Rack for Different Bike Types

One-size-fits-all racks cause handlebar collisions and frame scratches. Tailor spacing and height to your specific bikes.
Road Bike Adjustments
Mount support arms 24″ apart center-to-center. Position arms higher so top tubes sit level (prevents saddle strain). Use narrow 2.5″ support arms to avoid handlebar interference on drop-bar bikes.
Mountain Bike Modifications
Widen spacing to 26″ for wide handlebars. Reinforce arms with diagonal braces underneath—MTBs weigh 30+ lbs more than road bikes. For fat tires, widen wheel slots to 3″ and deepen to 2″.
Kids’ Bike Safety Tweaks
Space arms 20″ apart and mount 12″ lower for easy access. Round all corners with sandpaper—no sharp edges near little hands. Add non-slip rubber strips to wheel slots for training bikes.
Weatherproof Outdoor 2×4 Racks Against Rot
Standard lumber fails outdoors within months. These upgrades make racks survive rain, sun, and snow.
Must-do material swaps:
– Use pressure-treated 2x4s (not cedar—too soft for heavy bikes)
– Switch to stainless steel screws (galvanized rusts in 12 months)
– Apply spar urethane instead of paint (flexes with wood movement)
Finish application secret: Brush polyurethane into end grain first—this porous area absorbs 3x more finish. Reapply annually in spring; failing to do so causes cracking within 18 months.
Troubleshoot 2×4 Rack Wobble and Instability
Fix these common issues before they damage your bikes:
Rack wobbles when loading bikes: Add diagonal 2×4 braces between vertical posts. For wall racks, confirm you hit two studs—not just one.
Bikes scrape walls: Extend support arms by 2-3 inches using 2×4 extensions. Never use rubber bumpers—they compress and fail.
Screws loosen over time: Always use wood glue with screws. For freestanding racks, replace with 1/2″ carriage bolts.
Wood splits near joints: Pre-drill holes 1/8″ wider than screw diameter, especially within 2″ of board ends.
Maintain Your 2×4 Bike Rack for Longevity
Five minutes monthly prevents costly repairs:
- After rain: Wipe down outdoor racks to prevent water pooling
- Monthly: Tighten all screws—vibration loosens them surprisingly fast
- Annually: Lightly sand and reapply finish before winter
- Before heavy use: Test stability by pushing rack sideways—any movement means add bracing
Real Cost Breakdown: Build for Under $50
Stop overpaying for flimsy racks. This budget beats store prices:
- Lumber: Three 8-foot 2x4s = $10.50
- Hardware: Screws, glue, finish = $17
- Total: $27.50 (vs. $80+ for commercial racks)
Savings hack: Buy 10 2x4s for $28 (20% off) and build racks for neighbors—split the cost and save $5 per rack.
Your bikes deserve better storage—and now you have the blueprint. Pick your design based on space constraints, grab three 2x4s this weekend, and build a rack that outlasts store-bought versions. Within three hours, you’ll eliminate garage chaos while protecting your rides. Remember: The 5-degree arm angle and stud-mounted security transform basic lumber into bike storage that works. Start cutting, and ride into an organized space tomorrow.


