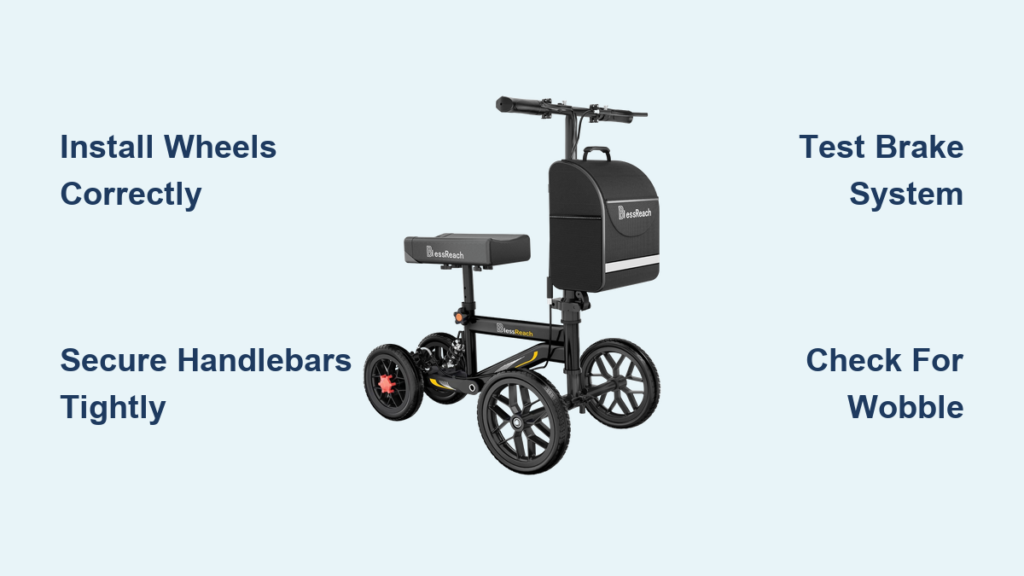
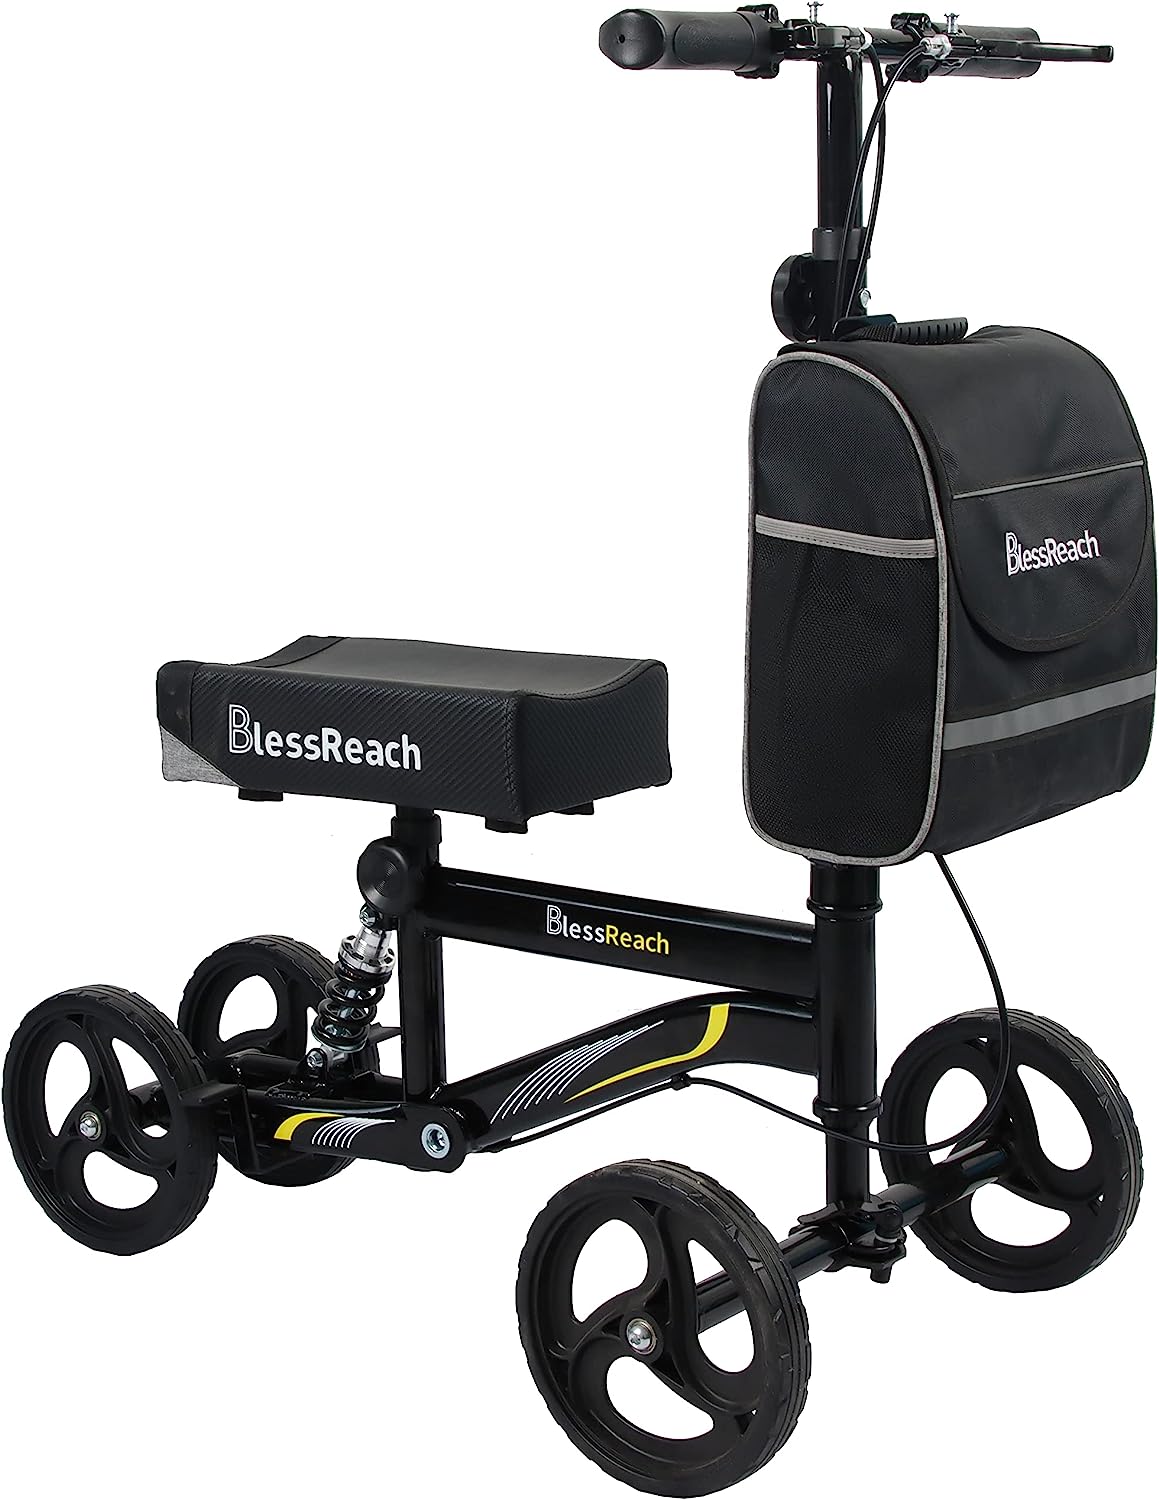
If you’ve just unboxed your BlessReach knee scooter, you’re likely eager to get moving, especially if you’re recovering from foot or ankle surgery. The good news is that assembling the BlessReach knee scooter (Model WB-2208) is designed to be quick, tool-minimal, and intuitive. Most users complete setup in under 20 minutes with no prior experience. This guide walks you through every step clearly and safely, so you can go from box to mobility in record time without missing critical safety checks or making common assembly mistakes.
You’ll learn how to install wheels correctly, secure the handlebars, attach the knee pad, and test the brake system, all using only the included hex wrench. We’ll also highlight key tips to prevent handlebar wobble, avoid plastic cracking, and ensure long-term stability. Whether you’re setting it up for yourself or helping a loved one, this step-by-step walkthrough ensures a smooth, confident assembly.
Wheel Installation Made Simple
The first step in assembling your BlessReach knee walker is attaching the wheels. This process uses pre-aligned brackets and simple hardware, so there’s no guesswork required.
Front Wheels: Align, Insert, Tighten
Follow these steps to install both front wheels securely.
- Position the wheel into the front fork bracket.
- Slide the rubber gasket onto the axle first. This protects the hub and ensures smooth rotation.
- Insert the mounting screw through the wheel hub, add the washer, then thread it into the front rod hole.
- Use the included hex wrench to tighten securely. Do not over-tighten, especially on plastic parts.
- Repeat for the second front wheel.
- Test spin both wheels. They should rotate freely without rubbing or wobbling.
Pro Tip: If a wheel feels stiff, double-check that the gasket isn’t pinched and the screw isn’t too tight.
Rear Wheel: Snap-In and Secure
The rear wheel installation follows a similar pattern but uses a different bracket style.
- Place the rear wheel into the U-shaped bracket at the back of the main frame.
- Attach the hook-style bracket over the wheel axle to hold it in place.
- Insert the mounting screw through the bracket and into the frame.
- Tighten with the hex wrench until firm. Again, avoid excessive force on plastic components.
- Verify free rotation. The rear wheel should spin smoothly like the front ones.
Note: The rear wheel does not steer. Only the front wheels turn for directional control.
Shock Absorber and Frame Locking
This section connects the shock-absorbing mechanism and locks the folding frame into riding position, which is critical for stability and comfort.
Install the Shock Absorber
The shock absorber provides a smoother ride over uneven surfaces.
- Flip up the rear support arm slightly if needed to access the mounting notch.
- Remove any temporary screws blocking the shock absorber slot.
- Align the shock unit with the notch on the main frame. It may feel spring-loaded, which is normal.
- Reinsert the screws and tighten fully with the hex wrench to lock the shock in place.
Alternative Method: Insert the screw from below the mounting point, secure with the wing nut on top, then tighten completely using the hex wrench.
Lock the Steering Column
- Fold the steering column down into its upright position.
- Engage the black buckle by inserting it into the matching hole on the frame.
- Flip the switch to lock the column in place.
Connect the Tie Rod
- Remove the quick-release screw at the base of the steering column.
- Slide the front wheel tie rod into the groove between the two metal plates.
- Reinsert and tighten the quick-release screw.
- Press down the lever to fully engage the lock.
Final Check: Move the front wheels side to side. They should turn smoothly in sync with the handlebars.
Handlebar Mounting and Adjustment

Proper handlebar setup ensures control, comfort, and prevents dangerous wobbling during use.
Attach the T-Tube Handlebars
- Insert the T-tube into the top of the steering column.
- Orient the brake levers so they face inward. Squeezing them should activate the brake.
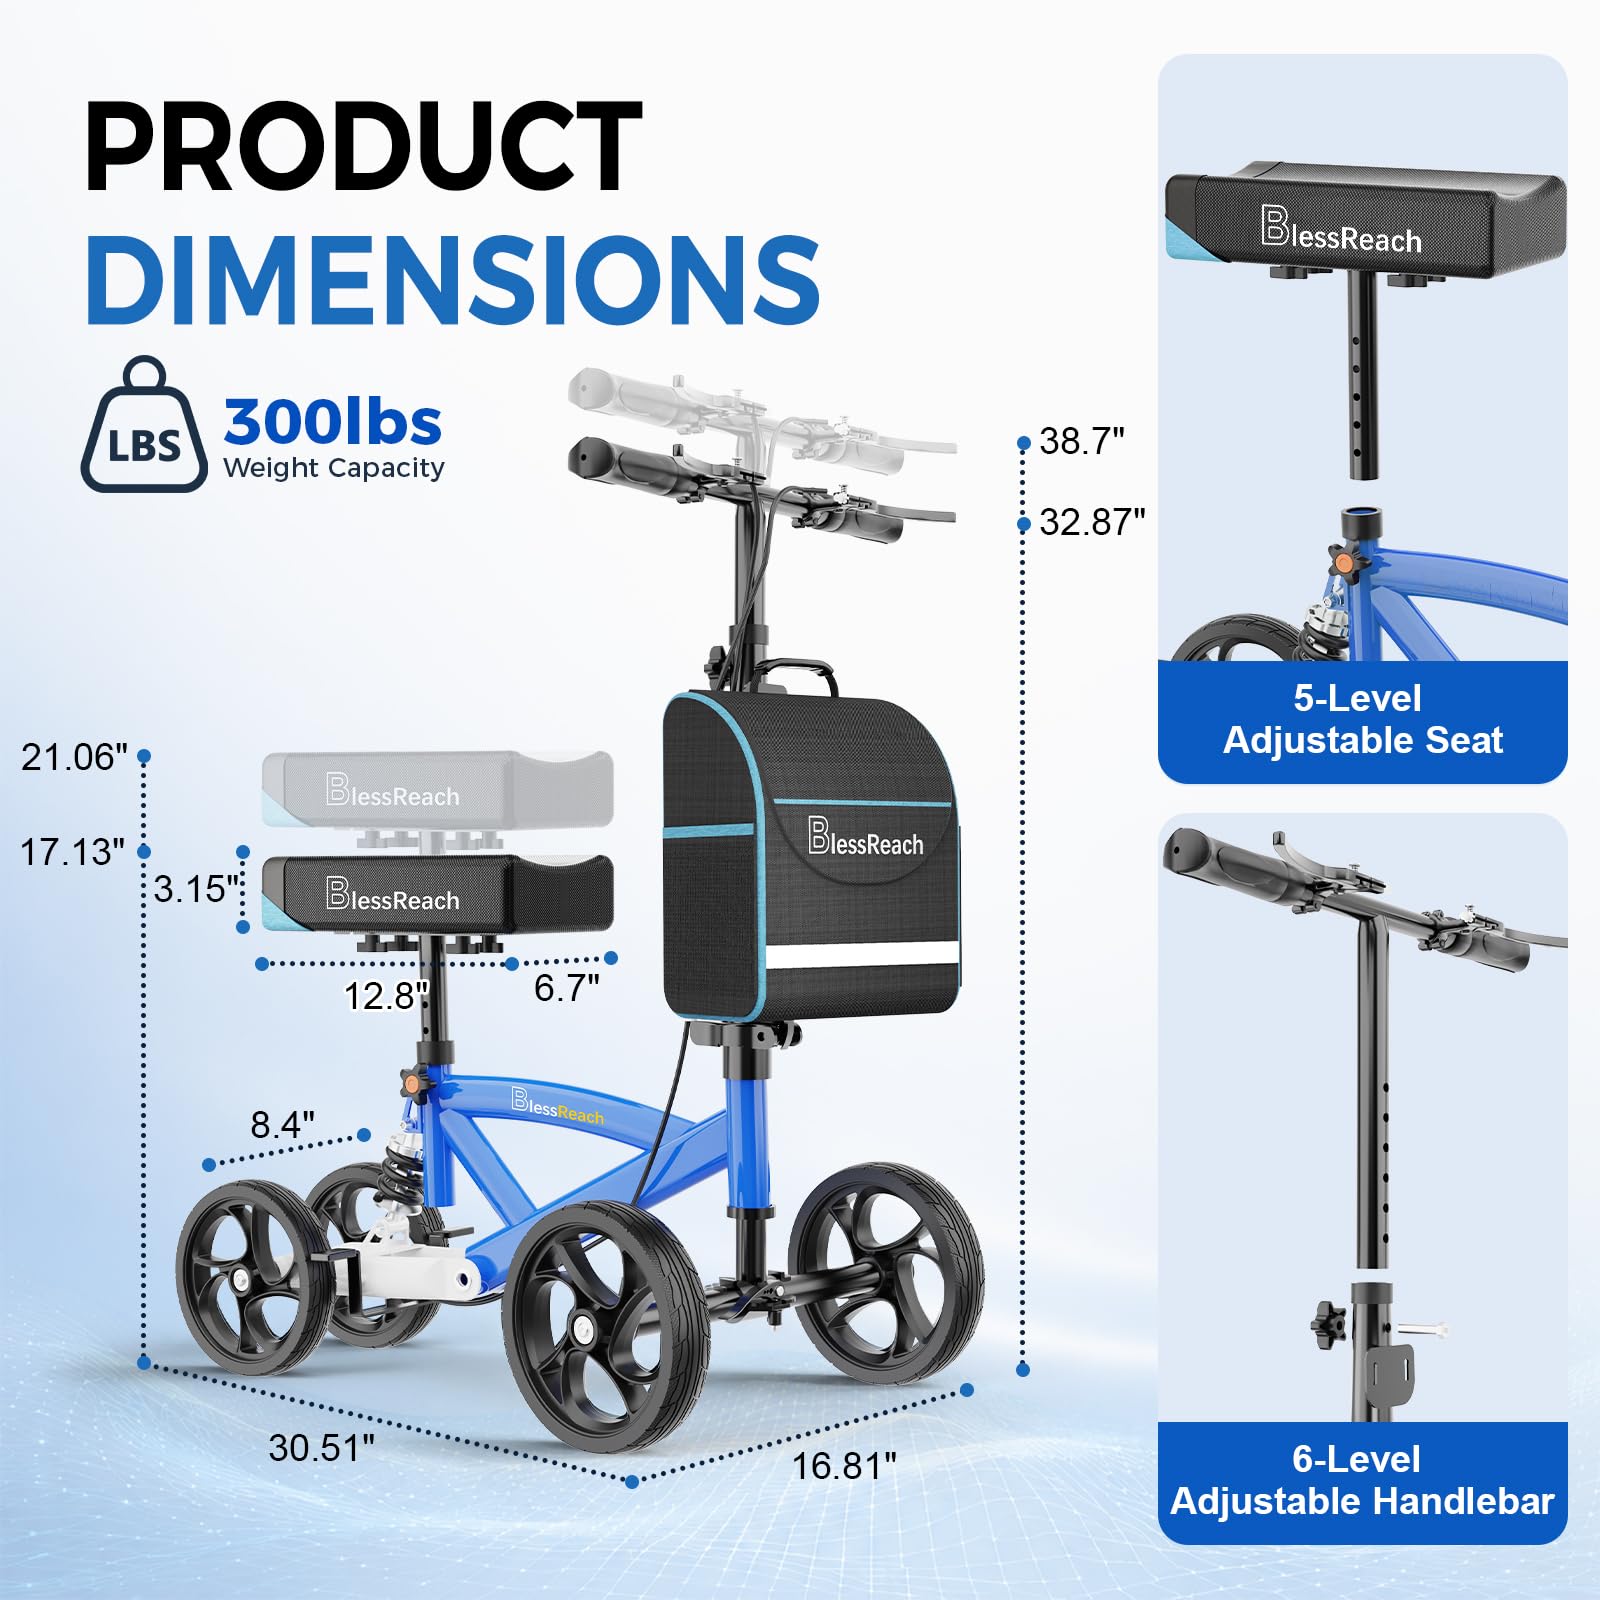
- Adjust height so your arms are slightly bent when gripping the handles, with elbows at about 15 to 20 degrees.
- Insert the adjustment screw into the side hole.
- Tighten the knob until the hex head seats fully into the hex hole.
Critical Step: If the screw isn’t fully seated, the handlebars and knee pad may shake during use.
Fix Handlebar Wobble
If the handlebars feel loose or wobble after assembly, try these fixes.
- Loosen the right-side screw slightly.
- Realign the handlebar to center position.
- Retighten firmly.
- Add a shim if needed. Place a small piece of folded cardboard or a thin plastic spacer under the mounting bracket to eliminate play.
Test Stability: Grip the handlebars and gently shake side to side. No movement should occur at the base.
Knee Pad Assembly and Mounting

Your knee pad must be securely attached to support your weight safely during use.
Attach Support Bar to Knee Pad
- Flip the knee pad upside down.
- Remove the four screws from the bottom.
- Slide the support bar onto the pad’s underside.
- Reattach and hand-tighten the screws first.
- Finish tightening with the hex wrench. Do not over-torque plastic threads.
Mount Knee Pad to Frame
- Remove the mounting screws from the knee pad tubes on the main frame.
- Insert the support bar ends into the tubes.
- Center the pad and ensure it’s level.
- Reinsert and tighten the screws securely.
Final Test: Press down firmly on the pad. It should not shift, tilt, or creak.
Install Accessories and Final Touches
Complete your setup by adding the shopping bag and protective base liner.
Attach the Shopping Bag
- Locate the two slots on the lower steering column.
- Insert the bag’s metal posts into the slots.
- Push down firmly until fully seated.
- Secure with Velcro straps to prevent swinging.
Weight Limit Warning: Do not exceed 11 lbs in the bag. Overloading risks tipping and frame stress.
Add Base Protection and Store Tools
- Insert the cardboard liner into the base of the frame. This prevents floor scratches and adds stability.
- Store the hex wrench and spare screws in the base compartment if available.
- Snap on the cover if included to keep dirt out and tools secure.
Pro Tip: Keep the QR code from the box. It links to the official BlessReach assembly video for visual reference.
Brake System Check and Safety Test
Before your first ride, verify the brake works correctly. This is essential for safety.
How the Brake Works
To engage the brake, squeeze the brake lever and press the locking button simultaneously. This locks both front and rear wheels instantly. To release, squeeze the lever again. The wheels unlock and roll freely.
Test the Brakes
- Engage the brake on a flat surface.
- Try to push the scooter forward or backward. It should not move.
- Release the brake and confirm wheels spin freely.
- Repeat 2 to 3 times to ensure consistent performance.
Troubleshooting: If the brake fails, check cable tension, ensure the lever isn’t obstructed, and contact BlessReach support if issues persist.
Safety Rules and Maintenance Tips
Using your knee scooter safely extends its life and protects your recovery progress.
Weight Limits You Must Observe
The user maximum weight capacity is 300 lbs. The shopping bag maximum weight is 11 lbs. Exceeding either limit risks structural failure, instability, or tipping.
Critical Safety Guidelines
Several important rules keep you safe during use.
- Never hang items from the handlebars. This shifts the center of gravity and can cause tipping.
- Avoid rain and moisture. Metal parts can rust and brakes may degrade.
- Use mild soap and water for cleaning. No harsh chemicals.
- Keep away from children. It’s not a toy and can tip easily if misused.
- Watch for pinch points. Keep fingers clear of folding joints and spinning hubs.
Routine Inspection Checklist
Perform these checks weekly or before each use to ensure safe operation.
| Checkpoint | What to Look For |
|---|---|
| Screws and Fasteners | Tighten any that feel loose |
| Wheels | Spin freely with no cracks or wobbling |
| Knee Pad | No tears and secure attachment |
| Brake Cable | No fraying and smooth operation |
| Frame | No bending, cracks, or rust |
Stop using immediately if you notice damage, looseness, or unsafe behavior. Contact BlessReach customer support for replacement parts or guidance.
Why This Knee Scooter Works for Recovery
The BlessReach WB-2208 stands out for users who want a reliable, easy-to-assemble alternative to crutches. Its steerable front wheels, shock-absorbing design, and dual-wheel brake system make indoor and outdoor navigation smoother and safer. With a 300-lb capacity and lightweight frame, it balances strength and portability.
While minor adjustments like adding a shim for handlebar stability may be needed, the overall build quality supports effective short-term mobility, perfect for doctor visits, grocery runs, or moving around the house.
Key Takeaways for BlessReach Knee Scooter Assembly
Assembly of your BlessReach knee scooter should take under 20 minutes with no extra tools required. The key to a stable, safe ride lies in proper wheel installation with correct gasket placement, secure handlebar tightening with full hex screw seating, and thorough brake testing before first use. By following these steps carefully, you ensure a comfortable and reliable mobility solution throughout your recovery. Keep the hex wrench stored in the base, refer to the QR code video if needed, and always inspect your scooter before use. Your BlessReach knee scooter is now set for smooth, supported mobility.
Frequently Asked Questions About BlessReach Knee Scooter Assembly
How long does it take to assemble the BlessReach knee scooter?
Most first-time users complete the entire assembly process in under 20 minutes. The design uses pre-drilled holes and labeled parts, making the process intuitive and straightforward.
What tools are required for BlessReach knee scooter assembly?
Only the included hex wrench (Allen wrench) is required. No external tools are needed for standard assembly.
How do I fix handlebar wobble on my BlessReach knee scooter?
First, ensure the hex screw is fully seated in its hole. If wobble persists, add a thin shim such as a piece of folded cardboard or plastic spacer under the mounting bracket to eliminate play.
What is the weight limit for the BlessReach knee scooter?
The user weight limit is 300 lbs, and the shopping bag weight limit is 11 lbs. Exceeding either limit risks structural damage and instability.
Can I use the BlessReach knee scooter in rain?
No. Exposure to rain and moisture causes metal parts to rust and degrades brake performance. Keep the scooter dry and clean with mild soap and water only.