
If your Razor scooter won’t start, the throttle isn’t responding, or the folding mechanism is stuck, you are not alone. Millions of Razor scooters have been sold since 1999, and with heavy use, mechanical and electrical failures are common, especially in older models like the E100, E300, A2, and A5 Lux. Whether it is a dead battery, faulty relay, or unresponsive throttle, most problems can be diagnosed and repaired at home with basic tools and a multimeter.
This guide delivers a step-by-step repair roadmap for both electric and kick scooters. You will learn how to test every component in the power chain, restore dying batteries, replace failed relays, and fix stuck latches, saving time and money over professional service.
Verify Charger Function First
Before tearing into your scooter, confirm the charger is working. A faulty charger is one of the top causes of no power issues.
Test Output Voltage with Multimeter
Set your multimeter to DC Volts. Insert the red probe into the center hole and the black probe into the outer ring of the charger barrel plug. A healthy Razor E100 or E300 charger should read between 26V and 30V when unplugged from the scooter. Under load, it drops to around 24V.
If the reading is below 20V or fluctuates when you wiggle the cord, the internal wiring is damaged. Replace the charger immediately.
Check Indicator Light Behavior
A solid green light usually means the charger is functional, but not always. Some defective units show green even with low output. Always verify with a multimeter.
Never use a non-OEM charger unless it matches 24V output, 1.0 to 1.5A current, and correct barrel plug size. Using an incorrect charger can permanently damage the battery or controller.
Diagnose Battery Health Accurately

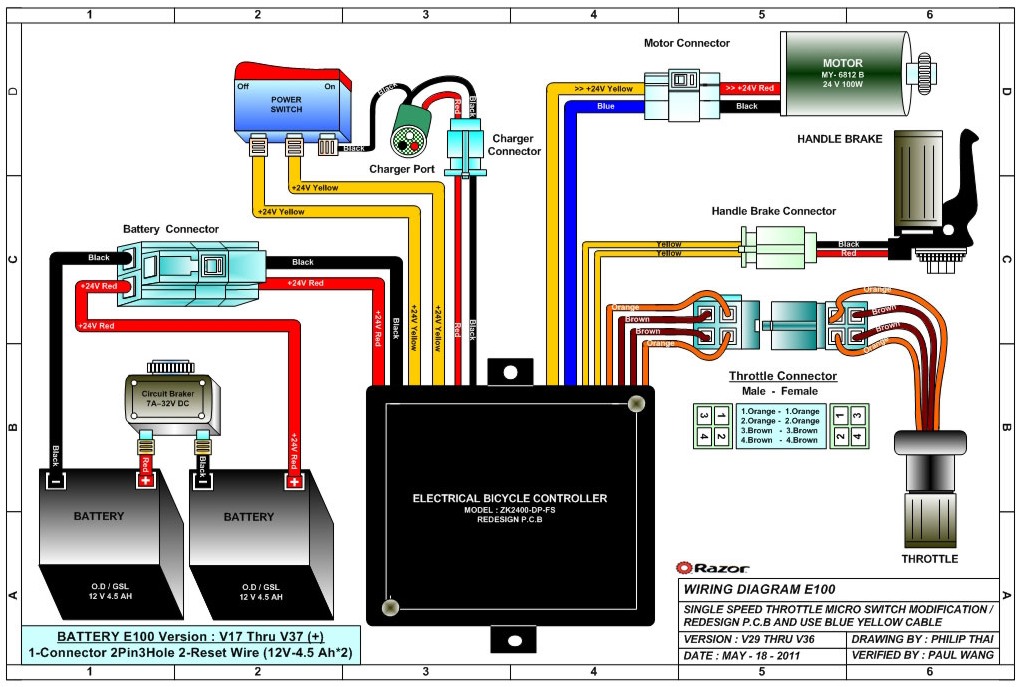
Electric Razor scooters use two 12V lead-acid batteries wired in series to create a 24V system. Weak or mismatched batteries are the second most common cause of failure.
Measure Individual Battery Voltage
Disconnect the battery connector by pressing the release tab. Test each battery separately with the multimeter set to DC Volts.
Healthy readings are approximately 12.6V fully charged. Low readings are below 11V. Dead batteries show below 10V or display 0.9V.
If one battery reads 12.4V and the other only 8.2V, replace both. Mixing good and bad cells shortens lifespan and reduces performance.
Restore Dry Lead-Action Cells
If the rubber caps on top are sunken, the battery is dry. You can often revive it by removing the top casing and lifting off the rubber caps. Use a syringe or straw to add distilled water to each cell, filling to just below the fill ring. Gently tap the side with a stick to release trapped air bubbles. Reconnect and charge continuously for 24 hours.
After recharging, retest voltage. Many restored batteries jump from 1 to 2V to over 12.3V, regaining full function.
Never use tap water. Minerals cause internal corrosion and permanent damage.
Replace Failed Relay Modules
The relay module inside the controller is a frequent failure point. When it fails, the scooter will not respond to the throttle, even with a charged battery.
Listen for Relay Clicks
Turn on the scooter and twist the throttle. Place your ear near the controller box, usually under the deck. You should hear two distinct clicks from the dual relays.
One click means one relay is dead. No clicks means both relays or the control circuit has failed. No clicking means the circuit is not completing, so the motor gets no power.
Test Continuity on Control Wires
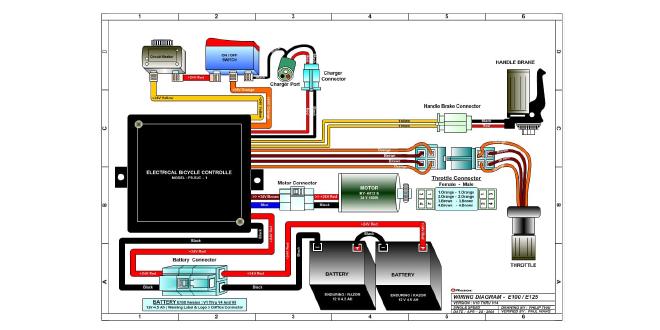
Set multimeter to continuity mode. Probe the orange and brown wires at the controller end while twisting the throttle.
Orange wires should beep when throttle is engaged. Brown wires must also beep, as this side commonly fails.
If either circuit shows no continuity, the relay is faulty.
Install New 24V Relay Module
Relays are not repairable. Replace the entire module by disconnecting the battery, opening the controller housing, unplugging the old relay board, and plugging in a compatible replacement. Search for “Razor E100 24V relay module” to find the correct part.
This fix resolves no-response issues in 80% of cases. Replacement modules cost $15 to $20 on Amazon or eBay.
Test and Replace Throttle Units
Even with good batteries and relays, a failed throttle will prevent movement.
Perform Continuity Test
Remove the handlebar grip by pulling it straight off. Expose the throttle housing and locate the wiring.
Set multimeter to continuity mode. Connect probes to orange wire terminals and twist the throttle. It should beep. Repeat with brown wire terminals. No beep means internal switch failure.
Swap Out Entire Throttle Assembly
Due to tiny sealed switches, repairs are not practical. Replace the full unit by unscrewing the small mounting bolt beneath the housing, sliding out the old throttle, installing the new unit with correct cable alignment, and reattaching the grip.
Use OEM or high-rated aftermarket parts to avoid premature failure.
Inspect Power and Brake Safety Switches
These switches cut power for safety. If faulty, they can block motor activation.
Check Power Switch Continuity
Test with multimeter in continuity mode. In the off position, there should be no beep. In the on position, it should beep. No continuity when on means replace the switch.
Diagnose Brake Cutoff Switch
Located near the brake lever, this switch kills power when brakes are applied.
Test by checking continuity while operating the brake. With brake released, it should beep continuously. With brake pulled, beeping stops. If it does not close when released, the motor will not run.
Some models have a reset button on the switch face. Press it if continuity fails. Still no fix? Replace the brake lever assembly.
Test Motor Resistance
A bad motor is rare but possible. Confirm its condition before replacing other parts.
Measure Ohms at Motor Terminals
Set multimeter to Ohms. Touch probes to the two motor terminals.
A healthy motor reads 5.23Ω to 7Ω, varying by model. A shorted motor reads 0Ω. An open circuit shows OL, meaning infinite resistance.
If reading is far outside the expected range, the motor windings are damaged.
Understand High-Torque Start Behavior
Even with a good motor, some Razor scooters like the E100 will not start from a dead stop. This is normal.
Give the rear wheel a manual push to initiate motion. Once rolling, the motor engages fully. This design prevents stalling at zero RPM, especially on inclines.
Fix Stuck Folding Mechanism
Common on Razor A2 and JD Razor 2000 kick scooters, the handlebars sometimes will not fold due to latch issues.
Identify the Quick-Release Latch
Located on the headtube, this mechanism locks the handlebar stem. Over time, dirt, misalignment, or pin wear prevents release.
Free a Jammed Latch
Fully extend and lock the scooter. Spray lubricant like WD-40 or silicone spray around the latch pin. Gently tap the latch area with a rubber mallet to loosen debris. Pull the latch lever while applying slight upward pressure on the handlebars.
If still stuck, remove screws from the latch housing and inspect for bent locking pin, cracked plastic actuator, or misaligned headtube extension. Replace damaged parts using model-specific guides.
Inspect Wiring and Connectors
Loose or broken wires mimic electrical failures.
Check Controller Prong Continuity
At the controller end, test the three internal prongs with continuity mode. All should beep when connected to their source.
No continuity? Trace the wire back for pinched insulation, frayed strands near bends, or corroded terminals.
Match Connectors by Shape
Razor uses keyed connectors to prevent incorrect hookups. Never force a plug. Battery, motor, and throttle connectors all have unique shapes. If a connector feels loose, check for broken tabs.
Use a small tool to press the release tab before unplugging to prevent housing cracks.
Restore Wheel Alignment and Stability
Wobbly front wheels reduce control and wear out bearings.
Diagnose Handlebar and Headtube Alignment
With the scooter upright, look down the stem. The front wheel should align perfectly with the deck.
If crooked, loosen the stem clamp bolts, re-center the handlebars, and retighten evenly. Avoid over-tightening, which damages the aluminum frame.
Replace Damaged Wheel Bars
The wheel bar, also called the fork assembly, can bend from drops or jumps. If alignment cannot be corrected, replace it by removing the front wheel, sliding out the old fork, inserting the new wheel bar, and reinstalling the wheel.
Use thread-locker on set screws to prevent loosening.
Source Parts and Tools Smartly
Avoid costly mistakes with correct parts and tools.
Essential Repair Tools
You will need a multimeter with auto-ranging and continuity, costing around $50. A Phillips #1 screwdriver is required. A Narwhal 6-in-1 or Manta 112-bit driver kit handles security screws. Have small pliers for connector tabs and a wrench set for mounting hardware.
Where to Buy Replacement Parts
Amazon and eBay offer fast shipping for relays, throttles, and batteries. Specialty shops like scooterhut.com and pro-scooter.com stock specific components. OEM via Razor works for warranty or exact-match parts.
Always check your serial number before ordering. Internal specs vary between model years.
Seek Professional Help When Needed
Not every issue is DIY-friendly.
Use Authorized Service Centers
For complex repairs or warranty claims, visit an official provider. CycleFit Sports in Fenton, MI is one example. Search razorusa.com under Support to find a service center.
Services include full diagnostics, warranty validation, ride-on and Crazy Cart repairs, and pro upgrade advice.
Contact Razor Support
Email support@razor.com and include the product name, serial number, proof of purchase, and detailed symptom description. They can confirm part compatibility and guide troubleshooting.
Frequently Asked Questions About Razor Scooter Repair
Why does my Razor scooter not turn on at all?
The most common causes are a dead battery, faulty charger, or failed power switch. Start by testing the charger output voltage with a multimeter. If the charger works, check individual battery voltages. Both 12V batteries should read above 11V.
How do I know if my Razor scooter relay is bad?
Turn on the scooter and twist the throttle while listening near the controller box. You should hear two distinct clicks. If you hear only one click or no clicks, the relay module has failed and needs replacement.
Can I restore a dead lead-acid battery myself?
Yes, if the cells are dry. Remove the battery caps and add distilled water to each cell using a syringe. Charge continuously for 24 hours. Many batteries restored this way recover to over 12V. Never use tap water.
Why does my Razor E100 motor hum but not move?
This is normal behavior for high-torque motors. Give the rear wheel a manual push to get the scooter rolling. Once moving, the motor engages fully. This prevents stalling at zero RPM on inclines.
How much does Razor scooter repair cost?
Relay modules cost $15 to $20. A quality multimeter costs around $50. Throttle assemblies and batteries vary in price. Professional service adds labor costs but handles complex issues safely.
Key Takeaways for Fixing Your Razor Scooter

Most Razor scooter problems stem from simple electrical faults, particularly in the relay, battery, or throttle. With a $50 multimeter and 30 minutes, you can diagnose and fix the majority of issues. Always test the charger first, then check battery voltage in pairs, and test the relay module if the throttle is unresponsive.
Regular maintenance extends your scooter’s lifespan significantly. Check battery water levels every few months, clean electrical connectors, and lubricate the folding latch mechanism. Address problems early to prevent cascading damage.
For persistent issues or mechanical damage like bent wheel bars or cracked frames, consult an authorized service center. Keep your scooter rolling safely by using proper PPE and following local regulations.



