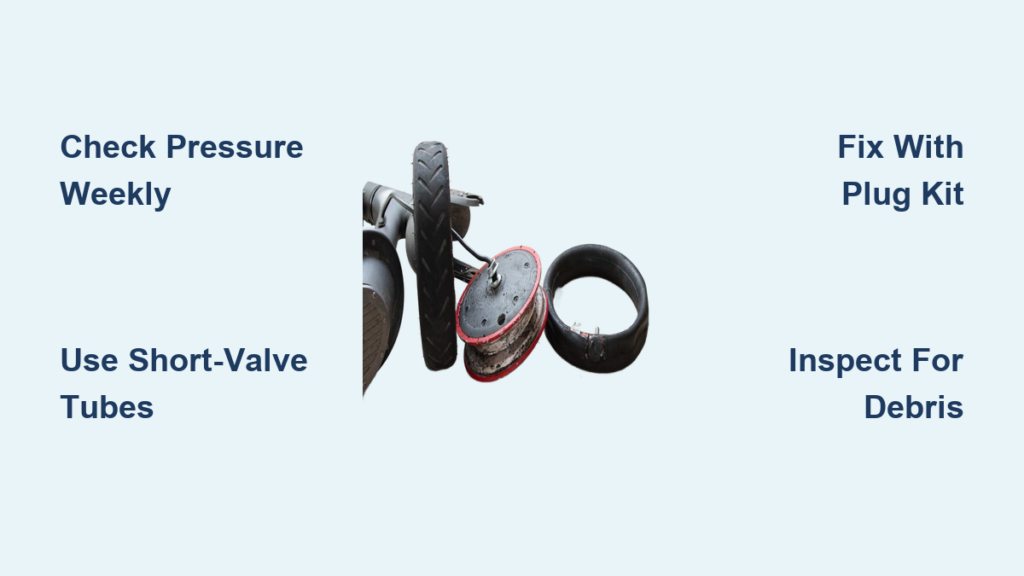
Flat tires are one of the most common electric scooter breakdowns, especially for riders navigating city streets, construction zones, or debris-filled paths. If your scooter suddenly feels sluggish, wobbly, or won’t move at all, a punctured or underinflated tire is likely the culprit. The good news is that most electric scooter tire issues can be repaired at home with the right tools or through professional service. Whether you’re dealing with a slow leak, a full flat, or worn-out tread, understanding electric scooter tire repair saves time, money, and keeps you riding safely.
This guide breaks down everything you need to know, from diagnosing tire problems and choosing the right repair method to step-by-step fixes for both tubed and tubeless systems. You’ll learn how to avoid costly mistakes, use affordable DIY kits, and decide when it’s smarter to call in a pro. With proper care, most scooter tires last between 1,000 and 2,000 miles, but neglecting pressure checks or riding on flats can destroy rims and motors fast. Let’s get your wheels back in shape.
Diagnose the Problem First
Before grabbing tools, confirm what’s wrong. Not every tire issue requires full replacement. Some are quick fixes that save you hours of unnecessary work.
Signs You Need a Repair
Watch for these common indicators that your tire needs attention.
• Frequent air loss: Tire deflates daily or weekly
• Visible damage: Cuts, cracks, bulges, or bald tread
• Poor ride quality: Vibration, thumping, or reduced traction
• Pinch flats: Two small holes close together from underinflation
• Valve leaks: Air hissing from the stem, especially after inflation
Use soapy water to pinpoint leaks. Spray around the valve, rim, and tread. Bubbles reveal the exact escape point so you know where to focus your repair.
Common Causes of Failure
Understanding what damages tires helps you prevent future flats.
• Road debris: Nails, glass, metal shards
• Underinflation: Increases pinch flat risk and accelerates wear
• Overinflation: Raises blowout chances and reduces grip
• Wear and tear: Tread wears down after 1,000 plus miles
• Valve interference: Long bike tubes hit the fork, causing leaks or rotation issues
Never ride on a flat tire. Doing so can warp the rim, shred the tire, or damage the hub motor, turning a 20 dollar fix into a 200 dollar repair.
Choose Your Repair Method

Not all flats are equal. The fix depends on your tire type: tubed or tubeless.
Tubeless Tires: Plug or Sealant
Tubeless tires are ideal for small punctures up to 6mm. This method is fast and often requires no disassembly.
Fix With a Plug Kit
- Remove debris with pliers
- Insert rubber plug using a T-handle tool
- Trim excess and inflate to 50 PSI
- Test with soapy water. No bubbles means success
This method works best for small nail holes in the tread center. Avoid using plugs for sidewall tears, large gashes, or shredded rubber.
Use Liquid Sealant
Liquid sealant offers another option for tubeless tires.
• Inject through the valve stem
• Spin the wheel to coat the interior
• Seals micro-holes and small punctures automatically
Pro tip: Some riders pre-treat tires with sealant to prevent future flats, especially useful in high-debris areas.
Repair Tubed Tires: Patch or Replace

Most scooters like the Xiaomi M365 and Hover-1 use inner tubes. These require more work but are highly repairable.
On-Scooter Patch Method
If the tire bead is loose, you might access the tube without removing the wheel. This is an emergency-only approach.
- Deflate completely by pressing the valve core
- Pry off one side with metal tire levers
- Pull out the tube section near the puncture
- Patch it: Sand the area, apply glue, wait 30 seconds, press patch firmly
- Reinsert, reseat, and inflate
Warning: Pinching the tube during reassembly causes new flats. Only attempt this method if you have experience with tire repairs.
Full Wheel Removal: Step-by-Step
For major damage or tight beads, full disassembly is required. This is standard for hub motor wheels.
Gather Essential Tools
Having the right tools makes every repair easier.
• Allen keys: 2.5 mm, 4 mm, 5 mm
• T20 security bit for Xiaomi motor bolts
• 18 mm fixed spanner for axle nuts
• Metal tire levers. Plastic breaks easily
• Mole grips or pipe wrench for compressing beads
• Zip ties to hold clamps in place
• Bicycle pump with Xiaomi valve extender
Never use screwdrivers as levers. They can puncture the new tube and cause another flat.
Remove Front Wheel Xiaomi Style
Most common procedure applies to scooters with front hub motors.
Take Off Wheel Covers
- Peel back reflective stickers
- Remove six 2.5 mm Allen bolts. Four on right, two on left
- Unscrew two 2.5 mm bolts on each fork leg
Loosen Axle Nuts
- Place 18 mm spanner on drive-side nut
- Loosen both nuts one at a time
- Support the motor. Do not strain the cable
Note: The drive-side nut connects to the motor wire. Pull gently to avoid damaging internal wiring.
Extract the Wheel
Once nuts are off, the wheel drops out. Set it aside safely.
Disassemble the Hub Motor
This critical step gives you access to the inner tube in motorized wheels.
Remove Anti-Spin Washers
Take off washers from both ends. The notch faces outward on both sides.
Unscrew Motor Housing
- Flip the wheel
- Remove six T20 security bolts
- Keep them safe. These are easy to lose
Separate Motor from Rim
- Tap the axle gently with a hammer until you hear a click
- Place scooter on the ground
- Hold motor down with your knees
- Pull tire and rim away. Magnets resist strongly
Do not force it. Let the magnets release naturally to avoid damaging stator wires.
Replace Tire and Tube
Now you can fully access the tire and replace or repair the tube.
Deflate and Compress the Bead
- Fully deflate the tire
- Use mole grips on opposite sides of the tire
- Tighten until slack appears
- Secure with zip ties
This step is crucial. Scooter tire beads are much tighter than bike tires.
Remove Old Tire
- Insert metal tire levers between rim and bead
- Work around the circumference
- Remove one side completely
- Pull out the old tube
Inspect for Hidden Debris
Run fingers inside the tire casing. Look for glass, thorns, or metal fragments. Clean the rim with a cloth.
One missed shard means another flat on your next ride.
Install New Tube and Tire
Prep the New Tube
- Partially inflate to give it shape
- Confirm valve length. It must be short for scooters
- Ensure tire direction arrow points forward
Insert the Tube
- Place valve through rim hole first
- Feed the rest of the tube inside
- Avoid twists or kinks
Reseat the Tire
- Push the bead onto the rim by hand, starting at the valve
- Use tire levers for the final section
- Remove zip ties and clamps
- Replace valve washer if loose
Use pliers to reseat the washer if it’s misaligned.
Reassemble the Motor and Wheel
Reversing disassembly requires precision to avoid brake or motor issues.
Reattach Motor Housing
- Align the valve hole
- Guide the motor back into position
- Let magnets pull it into place
- Reinstall six T20 bolts in a diamond pattern. Opposite bolts first
- Tighten fully
Even pressure prevents misalignment and motor drag.
Reinstall Wheel on Scooter
- Slide axle into fork
- Tighten drive-side nut first
- Then secure the other side with 18 mm spanner
- Ensure wheel spins freely
Reattach Covers
- Replace shorter 2.5 mm screws on fork legs
- Install longer bolts for cover plates
- Reapply reflective stickers
Rear Wheel Specifics
Rear wheel removal differs slightly due to the brake disc and reflector bracket.
Remove Brake Disc First
This prevents hand injuries and tube damage. Loosen caliper bolts if needed.
Handle Reflector Bracket
On Pro 2 models, remove the POSI screw holding the rear reflector. Slide wheel out from the back of the scooter.
Axle Bolts May Differ
Some models use 4 mm Allen keys instead of 5 mm. Always check your model’s manual before disassembly.
Inflate and Test
Final step: get air in and check for leaks.
Inflate to Correct PSI
Standard range is 40 to 60 PSI. Xiaomi M365 and Hover-1 need 50 PSI. Check the tire sidewall or manual for exact specs.
Use a Xiaomi valve extender if your pump doesn’t reach the deep-set valve.
Leak Test With Soapy Water
Spray around valve, rim, and repair site. Bubbles indicate a leak. Recheck seating or patch.
Spin the Wheel
Listen for rubbing or resistance. If brake is dragging, see the next section.
Fix Common Post-Repair Issues
Even perfect assembly can lead to problems. Here’s how to fix them fast.
Brake Rubbing After Reassembly
Symptoms include squeaking, resistance, or slow wheel spin.
Align the Caliper
- Loosen two 5/32 inch Allen bolts on caliper
- Spin the wheel. It should self-center
- Retighten bolts while spinning
- Ensure no oil or grease is on rotor or pads
Done right, the wheel spins freely with no contact.
Avoid Valve Length Mistakes
Standard bike tubes have long valves that hit the fork. The result is wheel won’t rotate, valve leaks, or core breaks.
Use short-valve tubes only. Buy tubes labeled for electric scooters. Never use standard bicycle tubes.
Last resort involves tapping a long valve down with a hammer, but this risks damage.
Prevent Tool Failures
Scooter tires are tougher than bike tires. Common mistakes cause delays and frustration.
Plastic Levers Break Easily
High bead tension snaps plastic levers. Use metal tire levers only. Never use spoons or screwdrivers.
Adjustable Wrench Slips
Rounded axle nuts make adjustable wrenches dangerous. Use a fixed 18 mm spanner. It fits perfectly and won’t slip.
When to Go Pro vs DIY

Know your limits. Some jobs are better left to experts.
DIY Is Best When
• You have the tools needed
• Puncture is small and central
• You’re comfortable with mechanical tasks
• Cost savings matter
DIY saves 75 to 125 dollars per repair.
Seek Professional Help When
• Multiple punctures or sidewall damage
• Tire won’t hold air after repair
• You lack strength to compress beads
• Unsure about motor disassembly
• Need a warranty-backed fix
Professional services start at 50 dollars for a plug to 125 dollars for full change with scooter drop-off.
Compare Tire Types: Pneumatic vs Solid
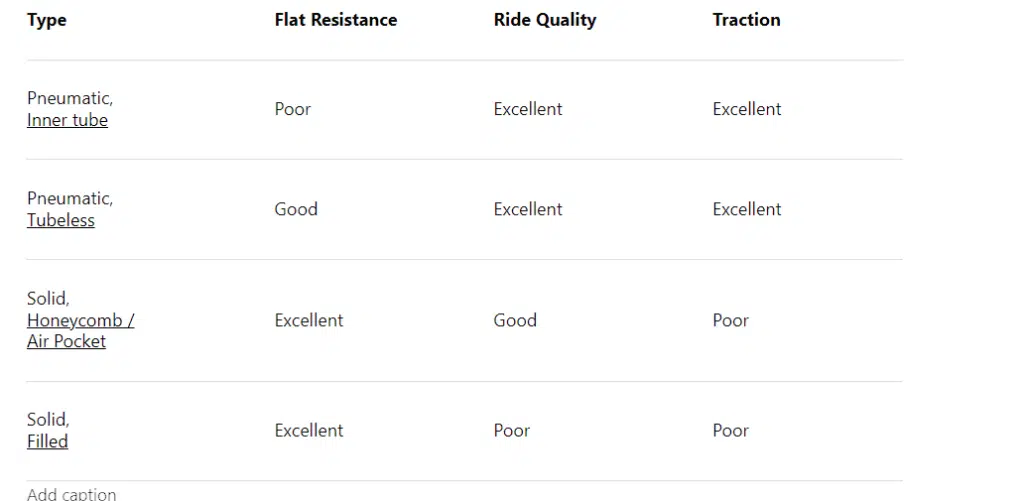
Your tire choice affects repair frequency and ride comfort.
Pneumatic tires offer smooth, shock-absorbing rides but carry high puncture risk and require weekly pressure checks. They work best for smooth roads and daily commuting.
Solid tires eliminate puncture risk entirely and need zero maintenance. However, they deliver harsh rides that transmit vibration. These suit rough terrain and high-debris zones.
Pro tip: Upgrade to heavy-duty thick tubes to reduce future flats.
Maintain Tires to Prevent Flats
Prevention beats repair every time.
Check Pressure Weekly
Use a reliable gauge. Inflate to 50 PSI or your model-specific requirement. Low pressure means more flats and battery drain.
Inspect Tread Monthly
Look for cracks, bald spots, or bulges. Replace every 1,000 to 2,000 miles.
Avoid Debris Zones
Steer clear of construction sites, glass piles, or thorny paths. Ride in cleaner lanes when possible.
Frequently Asked Questions About Electric Scooter Tire Repair
How much does professional electric scooter tire repair cost?
Professional repair ranges from 50 dollars for a simple plug to 125 dollars for full tire replacement including labor. If you remove the wheel yourself, costs drop to around 75 dollars.
Can I repair a flat tire on my electric scooter at home?
Yes, most punctures can be fixed at home using a plug kit for tubeless tires or a patch kit for tubed tires. You’ll need specific tools including an 18 mm spanner, T20 bit, and metal tire levers.
How long do electric scooter tires last?
Most pneumatic tires last between 1,000 and 2,000 miles depending on terrain and maintenance. Solid tires last longer since they cannot puncture but must be replaced entirely when worn.
Why does my scooter tire keep going flat?
Common causes include hidden punctures from debris, worn valve cores, tube pinch flats from underinflation, or using incorrect long-valve bicycle tubes. Check pressure weekly and inspect for visible damage.
Can I use a bicycle tube in my electric scooter?
No. Bicycle tubes have long valves that hit the fork and prevent wheel rotation. Always use short-valve tubes specifically designed for electric scooters.
What pressure should I inflate my scooter tires to?
Most electric scooters require 40 to 60 PSI. Check your manual or tire sidewall. Xiaomi M365 and similar models recommend 50 PSI.
Key Takeaways for Electric Scooter Tire Repair
Electric scooter tire repair doesn’t have to be intimidating. With the right tools and knowledge, most riders can handle punctures and replacements at home, saving significant money over professional service.
The key is preparation. Invest in a T20 bit, 18 mm spanner, metal levers, and a plug kit. For frequent riders, a portable repair kit is essential for on-the-go fixes.
Remember to never ride on a flat tire, always use short-valve tubes, and check pressure weekly. Whether you choose DIY or professional help, staying proactive keeps your scooter safe, efficient, and ready to roll.