
If your Razor scooter isn’t powering up like it used to, the issue might not be the motor or electronics. It could simply be a charging problem. Knowing how to charge a Razor scooter properly is essential for maintaining battery health, maximizing ride time, and avoiding avoidable repairs. Whether you own an E90, E100, E200, or E300 model, following the correct charging procedure ensures long-term performance and safety.
This guide walks you through every step, from plugging in for the first time to troubleshooting when the charger light won’t turn red. We’ll cover best practices, model-specific details, and common pitfalls so you can keep your scooter running at full power.
Initial and Routine Charging Steps
Charging your Razor scooter correctly from day one sets the foundation for long battery life. The initial charge and routine charging habits make the biggest difference in how long your battery lasts.
First-Time Charge Protocol
Before taking your first ride, give the scooter a full 18-hour initial charge, even if the battery shows some power. This ensures the lead-acid battery reaches full capacity and stabilizes its internal chemistry. Skipping this step may result in reduced runtime and premature degradation.
Follow these steps before first use:
- Plug in the scooter before first use, regardless of indicator light color
- Use only the original 24V UL-listed charger
- Charge in a dry, well-ventilated area away from carpets or furniture
- Do not attempt to ride during the initial charge cycle
Standard Recharge Procedure
After regular use, follow a 12-hour overnight charging routine. This prevents over-discharge and maintains optimal battery health.
- Turn the scooter off using the power switch
- Insert the charger into the scooter port first (usually on the left side near the deck or rear wheel)
- Plug the other end into a working wall outlet
- Confirm the charger light turns red, which means charging has started
- Let it charge for 12 hours, even if the light turns green earlier
- Unplug from the wall first, then disconnect from the scooter
Avoid frequent deep discharges. Instead, charge after every ride, even short ones. Partial charging is better than draining to zero.
Safety and Setup Before Charging
Charging safely is just as important as charging correctly. A few overlooked steps can lead to fire hazards or battery damage. Taking these precautions protects your scooter and your home.
Essential Safety Steps
Always charge indoors in a dry, open space. Never leave the scooter charging unattended for long periods, especially overnight without supervision.
- Never charge a wet scooter. Wipe it down and let it dry completely after rain or damp rides
- Allow cooldown after riding. Wait 15 to 30 minutes before plugging in to prevent overheating
- Keep away from flammables. Place the scooter on a hard floor, not on beds, sofas, or near curtains
- Supervise children while charging. Teach them not to touch the charger or plug
Check Charging Environment
Your charging location matters more than most people realize. An improper environment can reduce charging efficiency and create safety risks.
Ensure your charging setup meets these requirements:
- Outlet must be functional. Test with another device before plugging in the scooter
- Room temperature should be between 60°F and 80°F (15°C to 27°C)
- Avoid garages or sheds where temperatures fluctuate drastically
- Keep the area free of clutter and soft materials
Proper Charging Port and Plug Use
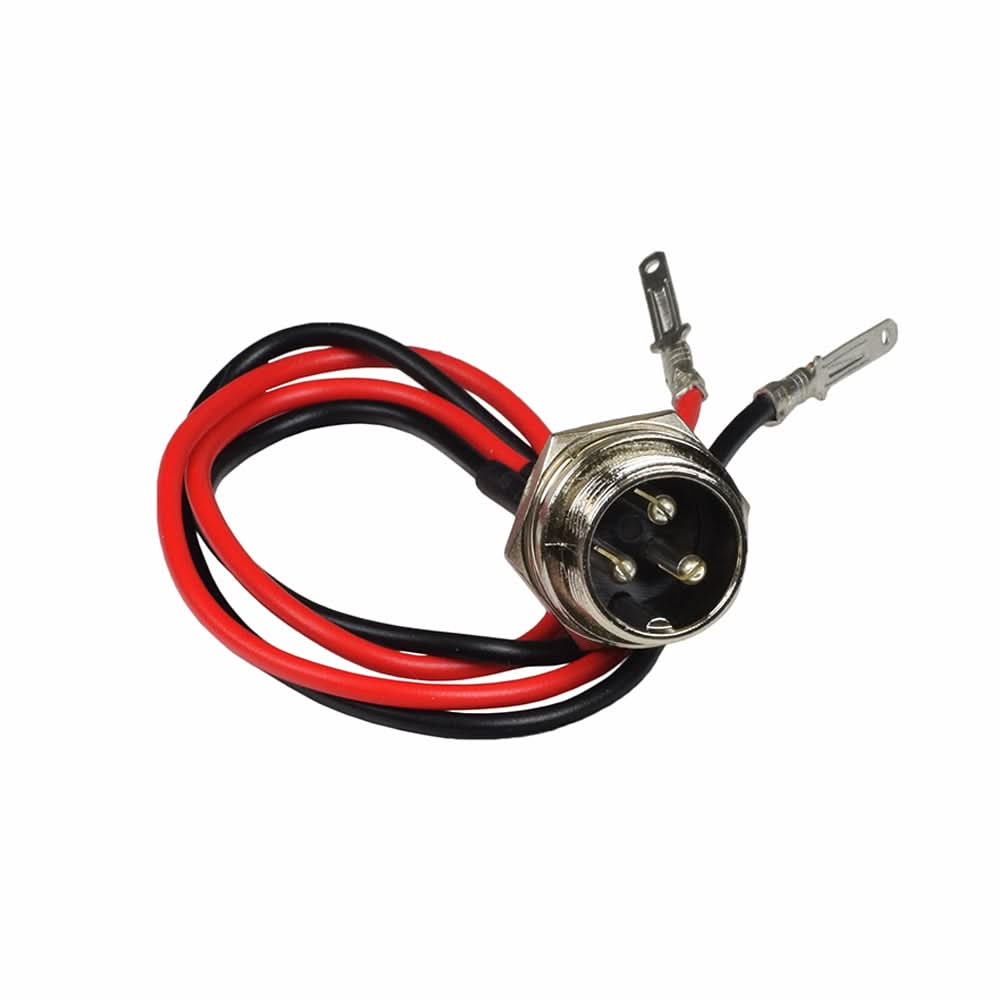
A poor connection is one of the most common reasons charging fails. This issue is often mistaken for a dead battery, leading to unnecessary replacements. Understanding how to properly connect and disconnect your charger saves time and money.
Locate and Inspect the Charging Port
The port is typically on the left side of the frame, near the rear wheel or power button. It has a rubber cover to protect against dust and moisture. Taking a moment to inspect it before each charge prevents many common problems.
Before each charge, do the following:
- Remove debris with a dry cloth or soft brush
- Look for bent pins or corrosion inside the port
- Ensure the rubber seal is intact to prevent water ingress
Connect Charger Correctly
Using the correct connection sequence avoids sparks and protects internal components. Many people connect the charger backward, which can cause damage over time.
- Scooter first. Firmly insert the charger plug into the scooter. It should fit snugly without forcing
- Then outlet. Plug into the wall socket
- Verify red light. If it turns red, charging has begun properly
If the light is green immediately, the connection may be faulty or the battery is not accepting charge.
Disconnect in Reverse Order
When finished charging, disconnect in the correct sequence to prevent arcing and protect internal components.
- Unplug from the wall first
- Then remove from the scooter
- Replace the port cover to keep dust out
Charger Compatibility and Specifications
Using the wrong charger can permanently damage your scooter’s battery. Understanding the specifications ensures you use the right equipment every time you charge.
Use the Correct 24V Charger
Most Razor models (E90, E100, E200, E300) use a 24V DC, 0.6A (600mA) charger with a 3-prong inline female connector. These specifications are critical for safe charging.
Key specs to remember:
- Input: 100 to 120V AC
- Output: 24V DC, 0.6A
- Cord length: Approximately 6 feet
- Safety: UL listed with over-voltage and short-circuit protection
Never use a 12V or 36V charger. This can destroy the battery instantly.
Identify Compatible Models
The standard 24V charger works with multiple Razor models. Knowing if your model is compatible prevents charging mistakes.
Compatible models include:
- E90, E100, E125, E150, E200, E300
- MX350, MX400, PR200
- Pocket Mod Rocket, Dirt Quad, Mini Chopper, Sunl City Express
Check your model number under the deck or in the manual if you’re unsure.
Alternative Charging Options
If you’ve lost your original charger, a 24V DC power adapter can work temporarily. However, this should only be a backup solution, not a permanent replacement.
Requirements for alternative chargers:
- Exactly 24V output
- At least 48mA, but 0.6A to 2A is ideal
- Correct polarity: Red wire equals positive (right pin), Black equals ground (left pin)
Warning: Third-party fast chargers (like 28V 2A) may overheat lead-acid batteries. Only use them if explicitly rated for your model.
Troubleshoot Common Charging Issues
Even with proper care, problems can occur. Knowing how to diagnose and fix charging issues fast keeps your scooter running and saves money on unnecessary repairs.
Charger Light Stays Green Immediately
This usually means no power is reaching the battery. The charger thinks the battery is full or isn’t detecting it at all.
Fix it with these steps:
- Test the wall outlet with a lamp or phone charger
- Unplug and firmly reconnect both ends
- Clean the charging port with compressed air
- Confirm the charger matches your model (24V)
If the scooter runs but won’t charge, the battery may be fully charged, or the circuit breaker has tripped.
No Light or Red Light That Won’t Change
If the light stays red for more than 15 hours or stays off completely, something is wrong with the charging circuit.
Try these solutions:
- Wait several hours. Deeply discharged batteries take time to register
- Ensure the scooter is turned off during charging
- Check for overheating. If the charger feels hot, stop and inspect for frayed wires
Test Charger Output
Use a multimeter to verify the charger works properly:
- Set to DC voltage
- Touch probes to charger tip. Should read approximately 25.5V
- If below 20V or zero, the charger is faulty
Check Battery Voltage
Remove the battery (if accessible) and test each 12V cell:
- Healthy: 12 to 13V per cell
- Weak: Below 11V
- Dead: Below 10V and not rising
Low voltage may indicate sulfation or permanent damage.
Scooter Charges But Loses Power Fast
Short runtime doesn’t always mean a bad battery. Many other factors can cause this problem.
Rule out these common causes:
- Tire pressure too low. Inflate to 45 to 55 PSI
- Cold weather. Batteries lose up to 30% capacity in cold temps. Store and charge indoors
- Heavy rider or hills. These increase power draw significantly
- Frequent stop-and-go riding. Drains battery faster than steady cruising
For E300 models, rotate the wheel to align the valve stem with the access gap before inflating.
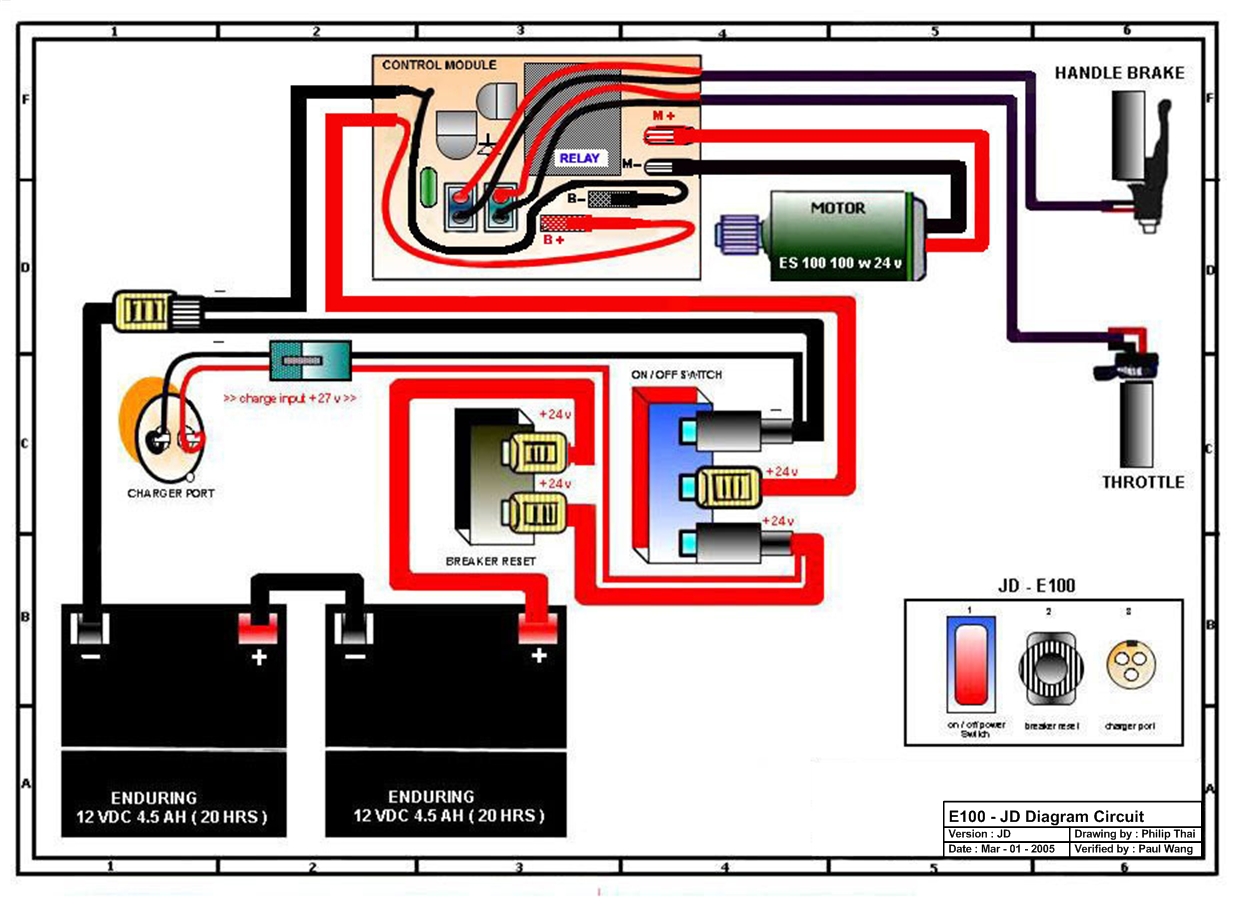
Circuit Breaker Tripped
If the scooter cuts out suddenly, especially going uphill, and won’t restart or charge, the resettable circuit breaker may have tripped. This is common on E100 models after extended use.
Symptoms to watch for:
- Power switch lights up but motor doesn’t engage
- Charger shows green immediately
- No response from throttle
Solution:
- Locate the reset button on the frame near the battery
- Press it firmly
- Try charging again
If it doesn’t hold, the breaker (Part # RAZ-RESET2) may need replacement.
Model-Specific Charging Expectations

Different models have different performance and charging behaviors. Understanding your specific model helps set realistic expectations and identify problems early.
E90: Kick-Start, Long Ride Time
- Top speed: 10 mph
- Ride time: Up to 60 to 65 minutes
- Start method: Must kick to 3 mph before throttle engages
- Battery care: Charge after every use. Ideal for light riders on smooth surfaces
E100: Pneumatic Front Tire, Kick-Start
- Top speed: 11 mph
- Ride time: Up to 60 minutes
- Start method: Must kick to 3 mph
- Common issue: Circuit breaker failure after 2+ years
- Tip: Check breaker if scooter dies mid-ride
E200: Instant Start, Higher Speed
- Top speed: Faster than E100
- Start method: Throttle engages from standstill
- Tires: Pneumatic. Inflate to 45 to 55 PSI
- Battery: Requires regular charging to maintain performance
E300: Teen/Adult Scooter, 15 mph
- Top speed: 15 mph
- Ride time: Up to 40 minutes
- Start method: Instant throttle
- Tire inflation: Rotate wheel to access valve stem
- Battery drain: Higher speed and weight mean shorter runtime
All models benefit from monthly charging during storage to prevent deep discharge.
Extend Battery Life and Prevent Damage
A well-maintained battery can last for years. Following these habits avoids early replacement and keeps your scooter performing at its best.
Avoid Deep Discharge Cycles
Don’t run the scooter until it shuts off completely. Instead, adopt these habits:
- Charge after every ride
- Recharge when performance drops noticeably
- Never leave it stored with a dead battery
Lead-acid batteries degrade faster when cycled to 0% regularly.
Store Properly During Off-Season
If not using the scooter for weeks or months, proper storage prevents permanent damage:
- Charge fully before storage
- Recharge at least once per month (some sources suggest every two months)
- Store in a cool, dry place at room temperature
- Cold or damp storage accelerates battery decay significantly
Keep Tires Properly Inflated
Under-inflated tires increase drag, making the motor work harder and draining the battery faster. This simple maintenance task makes a huge difference.
Maintenance schedule:
- Check pressure monthly
- Use a pump with a gauge
- Inflate to 45 to 55 PSI
- Replace valve caps to keep dirt out
Replace Chargers and Batteries When Needed
Eventually, parts wear out. Knowing when to replace them prevents being stranded with a non-functional scooter.
When to Buy a New Charger
Replace the charger if you notice these problems:
- Light doesn’t turn red when connected
- Output voltage is below 20V
- Cord is frayed or damaged
- It gets excessively hot during use
OEM charger cost ranges from $12.59 to $18.95. Look for UL listing, 24V output, and 0.6A minimum when purchasing a replacement.
Battery Replacement Signs
Replace the battery if you experience these issues:
- Runtime drops below 20 minutes despite proper charging
- Scooter struggles on flat ground
- Charger light turns green within minutes
- Voltage tests show cells below 10V
Use only compatible 12V AGM/SLA batteries in series. Lithium-ion models require different charging equipment, so verify your battery type before purchasing replacements.
Frequently Asked Questions About Charging a Razor Scooter
How long does it take to charge a Razor scooter for the first time?
The initial charge requires 18 hours before first use. This long charge cycle ensures the lead-acid battery reaches full capacity and stabilizes its internal chemistry for optimal performance and longevity.
Why does my Razor charger stay green when I plug it in?
A green light immediately usually means the charger isn’t detecting the battery. Check that the connections are firm, test the wall outlet with another device, and verify you’re using the correct 24V charger. If the scooter runs normally, the battery may already be charged.
Can I overcharge my Razor scooter?
Modern chargers have automatic shutoff, but leaving the scooter plugged in for extended periods (24+ hours) isn’t recommended. The standard practice is to charge for 12 hours after use and unplug once the light turns green.
What charger do I need for a Razor E300?
The Razor E300 uses a 24V DC, 0.6A (600mA) charger with a 3-prong inline female connector. This is the same charger used by E90, E100, E200, and most other Razor lead-acid models.
Why does my scooter lose power so quickly after charging?
Several factors can cause short runtime. Check tire pressure (should be 45 to 55 PSI), avoid cold weather exposure, reduce rider weight or hills, and consider that the battery may be aging. If the battery is more than 2 to 3 years old, replacement may be necessary.
Can I use a fast charger for my Razor scooter?
Third-party fast chargers exist, but they may overheat lead-acid batteries. If using an alternative charger, ensure it matches the 24V specification and has proper safety certifications. Slower charging is safer and extends battery life.
Key Takeaways for Charging Your Razor Scooter

Charging your Razor scooter properly is simple, but skipping steps can lead to big problems. The most important habits are using the right 24V charger, charging after every ride (not just when empty), and storing the scooter correctly during off-seasons. Always inspect the charging port and connections before plugging in, and never charge a wet or hot scooter.
If charging issues persist, check the circuit breaker, tire pressure, and battery voltage before assuming the worst. The circuit breaker on E100 models commonly fails after heavy use and is easily reset or replaced. Most charging problems have simple solutions that don’t require buying a new battery.
Stay safe, charge smart, and keep riding your Razor scooter for years of reliable fun.



