
Charging your scooter properly is essential for performance, safety, and battery longevity. Whether you own a compact electric kick scooter or a heavy-duty mobility scooter, knowing how to charge it correctly can prevent damage, extend battery life, and avoid fire risks. The process may seem simple—plug it in and wait—but doing it wrong can lead to reduced range, premature battery failure, or even dangerous malfunctions. This guide breaks down the exact steps, safety protocols, model-specific tips, and best practices for charging any scooter safely and effectively.
From understanding battery types like Lithium-Ion and Sealed Lead Acid (SLA), to following the correct plug-in sequence and recognizing when your battery needs replacement, this comprehensive walkthrough ensures you get the most out of every charge. You will also learn how to troubleshoot common charging issues, store your scooter properly, and avoid the most frequent mistakes users make.
Understanding Your Scooter’s Battery Type

Understanding your scooter’s battery chemistry is the first step to safe and effective charging. Two main battery types dominate the market, and each requires different charging approaches.
Lithium-Ion Batteries
Most modern e-scooters use Lithium-Ion batteries due to their high energy density, lightweight design, and long lifespan. These batteries are common in models like Xiaomi, Jetson, and many premium brands.
• Operate at voltages like 36V or 48V, with capacities ranging from 7.5Ah to 12.8Ah
• Require a Battery Management System (BMS) to regulate charging and prevent overloads
• Sensitive to heat and overcharging, so always allow cooling before plugging in
• Perform best when kept between 20% and 80% charge for daily use
Sealed Lead Acid Batteries
Found in older models, children’s scooters, and most mobility scooters, SLA batteries are heavier and less efficient but more affordable.
• Typically configured as 12V 35Ah deep cycle units or multiple smaller batteries in series
• Tolerate deeper discharges than Li-ion but degrade faster over time
• Use smart chargers that automatically stop when full, making them safe for overnight charging
• Have different charge cut-off voltages compared to Li-ion batteries
Never mix chargers between battery types. Using a Li-ion charger on an SLA battery or vice versa can cause permanent damage or fire.
Finding and Preparing the Charging Port
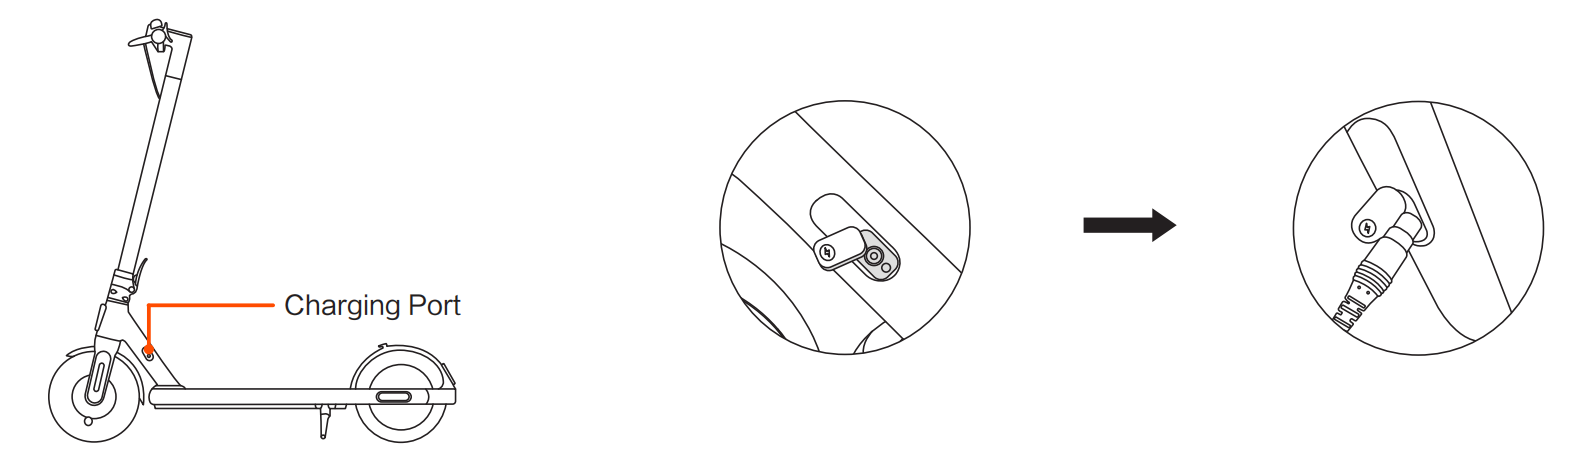
Port placement varies by brand and model, so knowing where to look prevents forced connections that can damage your scooter.
Common Port Locations
• Xiaomi scooters: Side of the stem, under a red protective flap
• Jetson models: On the deck (Beam), handlebar (Omega), or stem (Element Pro)
• Mobility scooters: Near the rear, often under a cover or behind the seat
Pre-Charging Port Inspection
Before connecting your charger, perform a quick inspection.
- Look for dirt, moisture, or corrosion around the port
- Gently wipe with a dry cloth or use compressed air to remove debris
- Ensure the red flap on Xiaomi models closes securely after charging to block debris
- Make sure the port is completely dry before plugging in
Selecting the Correct Charger
Using the wrong charger is one of the top causes of battery failure. Always verify compatibility before plugging in.
Match Voltage and Amperage Exactly
Your charger must match the voltage (V) and amperage (A) of your scooter’s battery.
• Example: A Xiaomi Pro 2 requires a 48V/5A charger. A 36V unit will not work, and a higher-voltage charger could destroy the battery
• Check labels on both the battery and charger for exact specifications
• Never use laptop chargers, generic power supplies, or USB cables
Use Only OEM or Certified Replacements
• Stick to original manufacturer chargers or certified replacements
• Third-party chargers may lack safety cutoffs, risking overcharge and thermal runaway
• Using an incompatible charger voids warranties and creates serious fire hazards
The Safe Charging Sequence
The order you connect and disconnect your charger matters. Doing it wrong can cause sparks that damage sensitive electronics.
Connection Steps: Wall First, Scooter Second
- Turn off the scooter completely before charging
- Plug the charger into the wall outlet first and watch for the indicator light (usually turns green)
- Then plug into the scooter securely until it clicks into place
- Watch the light change from green to red, indicating charging has begun
Why this order? It prevents electrical arcing at the scooter’s port, protecting sensitive circuitry from damage.
Disconnection Steps: Scooter First, Wall Second
- Unplug from the scooter first while the charger is still powered
- Then unplug from the wall outlet
- Store the charger in a dry, safe place
This reverse sequence mirrors the connection logic and keeps voltage stable during disconnection.
Monitoring the Charging Process

Once connected, track progress and environmental conditions to ensure safe, efficient charging.
Understanding Indicator Lights
• Red light means charging is in progress
• Green light means the battery is fully charged
• Some models have LCD screens showing percentage or bar levels
Estimated Charge Times by Battery Size
• Small batteries (36V 7.5Ah to 8Ah): 5 to 6 hours
• Standard batteries (36V 10Ah): 6 to 7 hours
• Large batteries (48V 12.8Ah): 7 to 8 hours
• Mobility scooter deep cycle batteries: 8 or more hours
Times vary based on battery health, ambient temperature, and charger output.
Maximizing Battery Life with the 20-80% Rule
For Lithium-Ion batteries, smart charging habits significantly extend overall lifespan.
Optimal Charging Practices
• Keep your battery between 20% and 80% charge for daily use
• Recharge when the battery hits 20%, not 0%
• Only charge to 100% before long trips requiring maximum range
• Avoid letting the battery sit at 0% for extended periods
Why? Deep cycling and constant full charges stress Li-ion cells, reducing overall cycle life and causing premature capacity loss.
New Battery Calibration
• Charge to 100% before your first ride on a new scooter
• This helps the BMS calibrate voltage thresholds and estimate range accurately
• Follow this initial calibration for any replacement battery
Storing Your Scooter for Extended Periods
Improper storage kills batteries faster than regular use. Follow these guidelines when putting your scooter away.
Long-Term Storage Charge Level
• Charge to 50% to 70% before storing
• Storing at 0% risks deep discharge sleep mode where the battery may not wake up
• Storing at 100% causes voltage stress and permanent capacity loss
Storage Maintenance Schedule
• Recharge e-scooters every 4 to 6 weeks during storage
• Charge mobility scooters weekly even when not in use
• Store in a cool, dry place away from freezing temperatures and direct sunlight
Temperature Considerations
• Cold weather: Batteries lose efficiency in cold temps, with range dropping 20% to 30%. Never charge a frozen battery. Bring it indoors and let it warm to room temperature first
• Hot weather: High heat accelerates degradation. Avoid charging in direct sun or hot vehicles
Troubleshooting Common Charging Problems
When charging does not work as expected, diagnose systematically to identify the issue.
Charger Light Stays Green
Possible causes include the battery already being full, a loose connection, a blown fuse, or a faulty charger.
• Fix: Check all connections first. Try a different outlet. Test with a known-good charger if available
No Light on Charger
• Check the wall outlet with another device to confirm power is working
• Inspect the charging cable for fraying or damage
• Try a different power source
Battery Won’t Hold a Charge
Signs of aging or failure include reduced range despite a full charge, longer charge times than normal, and swollen or bulging casing.
• Immediate action: If the casing is swollen or bulging, stop using the battery immediately as it pose a fire risk
• Replace the battery if performance drops below 60% of original range
Error Codes on Display
If the LCD screen displays an error code during charging attempts, contact the manufacturer’s support team immediately.
Essential Safety Precautions

Safety should never be compromised when charging your scooter.
Fire Prevention Tips
• Never charge unattended overnight, even with smart chargers
• Unplug once the green light appears
• Do not charge on beds, sofas, or flammable surfaces
• Use a surge protector to guard against power spikes
• Charge in a dry, well-ventilated area
Critical Prohibitions
• Never use improvised charging setups with laptop chargers or DIY wire setups
• Never charge in rain or damp environments
• Never use chargers with mismatched voltage or amperage
Battery Damage Warning Signs
A bloated or swollen battery is unstable and can ignite.
• Do not puncture, heat, or continue using a swollen battery
• Dispose of damaged batteries at a certified e-waste facility
• Stop use immediately if you notice physical deformation or leakage
Model-Specific Charging Tips
Different brands have unique features and requirements that affect how you should charge.
Xiaomi Scooters
• Port location is under the red flap on the stem
• Use the original 48V/5A charger for Pro models
• Red light means charging, green means full
• Never charge immediately after a long ride; allow 30 minutes for cooling
Jetson Scooters
• LCD display shows battery bars (5 bars = 100%, 1 bar = recharge)
• Port locations vary by model: deck, handlebar, or stem
• Some models like Knight have removable batteries for off-scooter charging
• Always unplug when fully charged, even though smart chargers automatically stop
Mobility Scooters
• Typically use deep cycle SLA or Li-ion batteries
• Charge every night after use, even for short trips
• Smart chargers automatically stop when full, making overnight charging safe
• For storage, charge fully once per week if not in use
Frequently Asked Questions About Charging a Scooter
How long does it take to charge an electric scooter fully?
Most e-scooters take 5 to 8 hours to fully charge. Smaller batteries (36V 7.5Ah to 8Ah) typically need 5 to 6 hours, while larger batteries (48V 12.8Ah) may take 7 to 8 hours. Mobility scooters with deep cycle batteries can take 8 hours or longer depending on capacity and charger output.
Can I leave my scooter charging overnight?
While modern smart chargers automatically stop when the battery is full, it is best practice to unplug once the green light appears. Leaving a scooter plugged in overnight on flammable surfaces poses unnecessary fire risks. If you must charge overnight, use a surge protector and charge on a hard, non-flammable surface.
What happens if I use the wrong charger?
Using a charger with incorrect voltage or amperage can cause permanent battery damage, reduced lifespan, or fire hazards. Always use the original manufacturer charger or an exact replacement that matches your scooter’s specifications. Never use laptop chargers or generic power supplies.
Should I let my scooter battery drain completely before charging?
No, you should avoid letting Lithium-Ion batteries drain to 0%. For optimal battery health, recharge when the battery reaches 20% capacity. Deep discharges stress the cells and reduce overall cycle life. Only charge to 100% when you need maximum range for a long trip.
Why is my scooter battery draining faster than usual?
Rapid battery drain is often caused by factors other than charging issues. Aggressive acceleration, riding uphill, headwinds, underinflated tires, dragging brakes, heavy loads, and using accessories like bright headlights all consume more power. Check these factors before assuming a battery problem.
How do I know when my scooter battery needs replacement?
Signs that your battery needs replacement include significantly reduced range on a full charge, unusually long charge times, failure to charge at all, or physical swelling of the battery casing. If your scooter travels less than 60% of its original range, it is time to replace the battery.
Key Takeaways for Charging Your Scooter
Proper charging is about more than just powering your scooter. It protects your investment, ensures safety, and saves money by extending battery life.
The most important steps are using the correct charger that matches your battery’s voltage and amperage, following the wall-first, scooter-second connection sequence to prevent electrical damage, and allowing the battery to cool for 30 minutes after riding before charging. Monitor your charging process and unplug once the green light appears rather than leaving it connected indefinitely.
For Lithium-Ion batteries, practice the 20-80% rule by keeping charge levels between 20% and 80% during regular use. Store your scooter at 50% to 70% charge if you will not use it for weeks, and recharge every 4 to 6 weeks to prevent deep discharge. Whether you ride daily or occasionally, treating every charge as an opportunity to extend your battery’s life will keep your scooter running at peak efficiency for years to come.



