
If your mobility scooter isn’t traveling as far as it used to or won’t power on at all, it’s likely time to replace the battery. A failing battery is one of the most common issues for electric scooters, but the good news is that replacing it is often a simple DIY task. Knowing how to replace battery in mobility scooter properly ensures your device stays reliable, safe, and efficient. Whether you own a lightweight Go-Go model or a heavy-duty Pride Wrangler, this guide walks you through every step.
You don’t need advanced technical skills, just basic tools and attention to detail. Replacing both batteries in a pair takes about 30 to 60 minutes and can extend your scooter’s life by years. We’ll cover safety protocols, model-specific tips, and how to dispose of old batteries responsibly.
Choose the Right Replacement Battery
Match Voltage and Amp-Hours Exactly
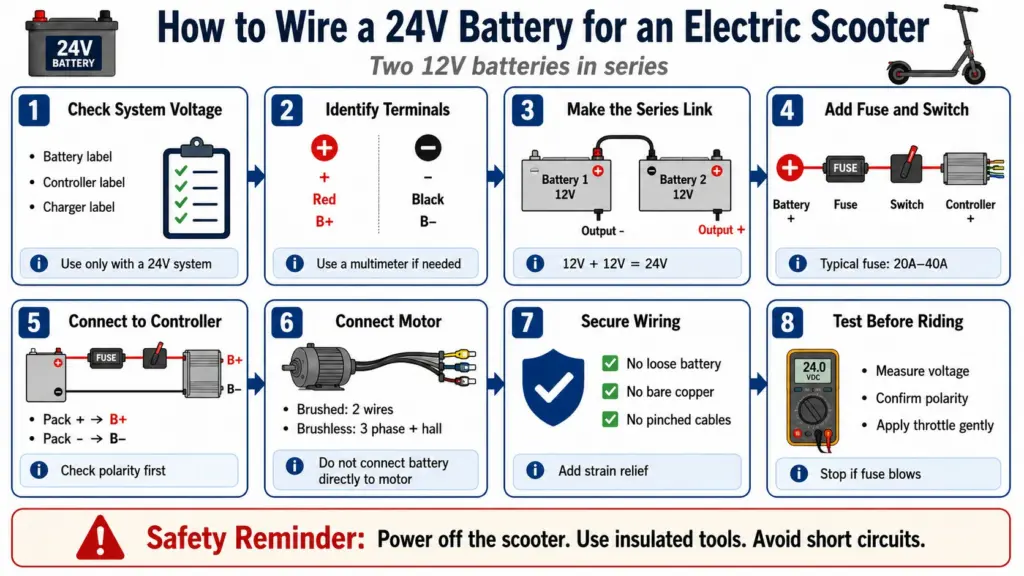
The most critical step before buying new batteries is matching the voltage and amp-hours to your scooter’s original specs. Most mobility scooters run on a 24-volt system, powered by two 12-volt batteries connected in series. Installing a single 24V battery instead of two 12V units will damage your scooter’s electronics.
Check the label on your old battery for these specifications. Voltage must be 12V each for a 24V system. Amp-hours typically range from 35Ah to 75Ah, with higher ratings providing longer range but increasing size and weight. Never mix old and new batteries. Always replace both at once to prevent imbalance and premature failure.
Select the Correct Battery Chemistry
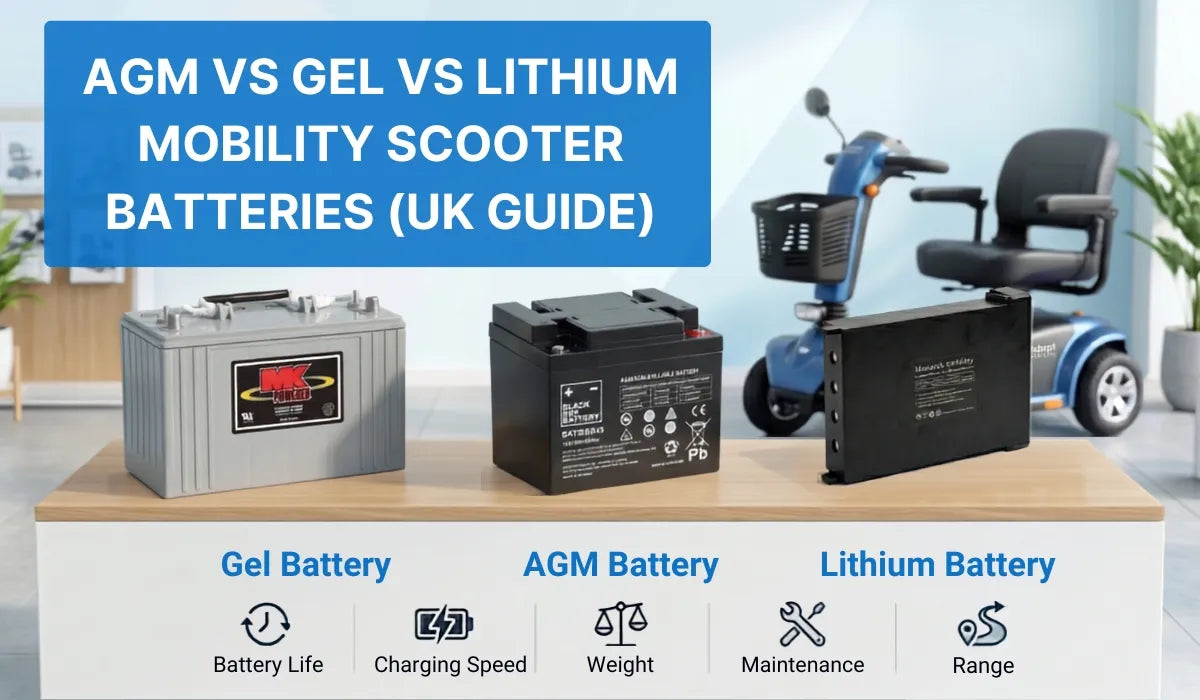
Mobility scooters use several sealed battery types, each with pros and cons.
• AGM (Absorbent Glass Mat): Most common, spill-proof, maintenance-free, good for daily use
• Gel: Handles deep discharges better, ideal for long-distance riders
• Lithium Iron Phosphate (LiFePO4): Lighter, longer-lasting (up to 5x more cycles), but more expensive and may require a compatible charger
Warning: Upgrading to lithium requires checking scooter compatibility. Some models need a new charger or wiring modifications.
Confirm Physical Fit and Terminal Type
Even if electrical specs match, the battery must fit inside the compartment. Measure length, width, height, and weight before purchasing. SLA batteries weigh 15 to 40 lbs each. Check terminal position: internal or external posts must align with existing cables. U-1 size batteries (12V 35Ah) are standard in mid-size scooters like Victory or Revo. Heavy-duty models like Pride Wrangler use larger 50Ah to 75Ah units.
Prepare for Safe Battery Replacement
Gather Essential Tools and Gear
You’ll need just a few basic tools for this job. A 5/16 inch or 10 mm socket set handles terminal nuts. A Phillips head screwdriver with a long shaft helps reach hidden screws. Pliers assist with adjusting tight connectors. Work gloves protect hands from weight and accidental sparks. Keep metal jewelry off. Rings or watches can short terminals and cause burns.
Power Down and Disconnect Safely
Before touching any wires, turn off the scooter and remove the key. Store the key away to prevent accidental startup. Work on a flat, dry surface. Disconnect in this order: negative (black cable) first, then positive (red cable). This prevents accidental short circuits. When reconnecting later, reverse the order: positive first, then negative.
Remove Old Batteries Step by Step
Access the Battery Compartment
Location varies by model, but access usually starts with the seat. For most mid-size and heavy-duty scooters, lift the seat straight up or pull forward to release from the post. Remove rear shroud or cowling, which often snaps off or has hidden clips. Some models require removing a support column with a pin or bolt.
For portable scooters like Go-Go or Buzzaround, fold or lift the seat. Grab the handle on the battery pack and lift it out. Flip the pack over and remove eight screws to open the casing.
Disconnect and Extract Batteries
Once exposed, locate the two 12V batteries connected in series. Release Velcro straps, belts, or buckles securing the batteries. Use a wrench to loosen terminal nuts. Disconnect negative first, then positive. Move cables aside so they don’t touch terminals. Carefully lift batteries out. They are heavy. Place them on a table to avoid back strain. Note wire routing and connector types before removal.
Install New Batteries Correctly
Position and Connect with Proper Polarity
Place new batteries into the tray, ensuring correct orientation. Match cables: red to red (positive), black to black (negative). Connect positive first, then negative. Tighten terminal bolts securely. Loose connections cause power loss or arcing. Replace terminal covers or insulating sleeves.
Pro Tip: If using external post batteries, feed wires through the handle slot before tightening. Use lock washers to prevent loosening from vibration.
Secure and Reconnect Wiring
Reattach Velcro straps or battery belt firmly. Align any foam spacers or styrofoam inserts for a snug fit. Plug in harness connectors, matching colors and shapes. Do not force connections. Route wires neatly to avoid pinching when reassembling. On models like the Pride Victory LX, route the belt through the side slot by pulling one battery slightly out, then reinsert and tighten.
Reassemble and Test Your Scooter
Reattach Covers and Seat
Replace shroud or cowling by aligning tabs and pressing until it clicks. Reinstall support column if removed by reinserting pin or tightening bolt. Slide seat back onto post and wiggle gently until locked. Ensure all parts are secure and no wires are trapped.
Perform Power-On Function Test
Insert key and turn on. Check dashboard display for power indicator lights and error codes. Test throttle by moving slowly forward and reverse. Listen for unusual sounds or hesitation.
If the scooter doesn’t power on, double-check terminal connections. Verify polarity (red to red, black to black). Ensure both batteries are seated and secured. Let the scooter charge fully before first use, even if batteries are pre-charged.
Model-Specific Replacement Tips
Replace Battery in Go-Go or Buzzaround Scooter
These portable models use a removable battery pack. Lift seat and remove battery pack via handle. Flip pack and unscrew eight Phillips screws on back. Open cover and disconnect old batteries with 5/16 inch wrench. Install new batteries, matching polarity. Reconnect, close cover, screw in place. Slide pack back in until it clicks. Reattach seat. Time: approximately 20 minutes. Difficulty: Easy.
Replace Battery in Pride Victory or Revo Scooter

These use U-1 12V 35Ah batteries under the seat. Remove seat and rear shroud. Undo Velcro strap. Disconnect harness. Replace batteries, checking terminal type (internal vs. external). Use 10 mm socket to secure terminals. Reconnect black and white harnesses. Route belt and tighten. Replace shroud and seat. Tip: Adjust foam inserts so batteries don’t rattle.
Replace Battery in Pride Wrangler or Afikim S4
Heavy-duty models with 50Ah to 75Ah batteries. Remove seat and cowling. Lift out old batteries. Get help if needed. Connect new batteries: positive first, then negative. Tighten bolts firmly. Re-secure with straps. Reassemble in reverse order. Caution: These batteries are large and heavy. Lift with legs, not back.
Extend Battery Life with Proper Care
Charge Smart to Maximize Lifespan
Charge after every use, even short trips. Plug in immediately after returning. Avoid deep discharges. Don’t run until completely dead. Unplug once fully charged. Overcharging reduces lifespan. Most scooters have auto-shutoff, but don’t leave on charger for days.
Store Batteries the Right Way
If storing scooter for weeks, charge to 100%. Store in cool, dry place. Recharge every four to six weeks. Never store a fully drained battery.
Clean Terminals and Prevent Corrosion
Every three months, power down and disconnect. Wipe terminals with dry cloth. Check for white or green corrosion. Clean with baking soda and water if needed. Dry thoroughly before reconnecting. Always keep protective covers in place.
Dispose of Old Batteries Responsibly
Recycle at Authorized Centers
Lead-acid and lithium batteries contain hazardous materials. Never throw them in household trash. Return to retailer. Many offer free recycling. Take to auto parts store like AutoZone or Advance Auto. Visit local hazardous waste or recycling center. Some suppliers give discounts when you recycle old batteries with a new purchase.
Avoid Common Replacement Mistakes

Wrong Battery Type or Size
Using a non-OEM or incompatible battery can void warranty, damage motor or controller, or cause overheating or fire. Always verify voltage, amp-hours, and physical fit before buying.
Skipping Safety Steps
Not disconnecting negative first, wearing metal jewelry near terminals, or forcing mismatched connectors can lead to sparks, shocks, or shorts. Follow proper sequence every time.
Replacing Only One Battery
Old and new batteries wear unevenly. The new one works harder and fails quickly. Always replace in pairs.
Loose Terminal Bolts
Poor contact leads to intermittent power, voltage drops, and arcing. Tighten securely with correct wrench size.
When to Call a Professional
DIY replacement works for most users, but seek help if you’re unsure about battery specs, the scooter needs deep disassembly, wiring is damaged or corroded, the scooter still won’t charge after replacement, or you want to upgrade to lithium batteries. Many mobility retailers offer installation services or phone support with model-specific guidance.
Frequently Asked Questions About Replacing Mobility Scooter Batteries
How do I know when my mobility scooter battery needs replacing?
Signs include noticeably shorter range than usual, battery failing to hold charge, inconsistent power output, or battery age exceeding 18 months to 3 years. If your scooter can’t complete previously manageable trips, the battery likely needs replacement.
Can I replace just one battery in my mobility scooter?
No. Always replace both batteries at the same time. Mixing old and new batteries causes imbalance. The new battery works harder to compensate for the aging one, leading to premature failure of both units.
What voltage battery does a mobility scooter use?
Most mobility scooters use a 24-volt system. This is created by connecting two 12-volt batteries in series. Check your owner’s manual or the existing battery labels to confirm the correct voltage for your specific model.
How long does it take to replace mobility scooter batteries?
For most models, plan for 30 to 60 minutes if replacing both batteries. Portable models like Go-Go take approximately 20 minutes. Heavy-duty models with larger batteries may take longer due to size and weight considerations.
Can I upgrade from lead-acid to lithium batteries in my mobility scooter?
You can, but it requires verification. Not all scooters support lithium batteries without modification. Upgrading may require a new charger or wiring changes. Check with your scooter manufacturer or a professional before making the switch.
Key Takeaways for Replacing Your Mobility Scooter Battery
Replacing the battery in your mobility scooter is a straightforward task that restores independence and performance. Choose the correct replacement by matching voltage (typically 24V system), amp-hours, and physical fit. Always replace batteries in pairs and follow proper safety protocols: disconnect negative first, reconnect positive first.
Secure all terminal connections tightly to prevent power loss or arcing. Test the scooter before regular use and charge new batteries fully. Extend battery life by charging after every use, storing properly, and keeping terminals clean. Recycle old batteries at authorized centers rather than throwing them in household trash.
With this guide, you now know exactly how to replace battery in mobility scooter safely, correctly, and confidently.



